Java学习笔记
— 第一阶段 —
第一章 内容介绍
略
第二章 Java概述
2.1 Java历史
- 1995年,sun公司正式发布Java第一个版本
- 2009年,甲骨文公司收购sun
2.2 Java 技术体系平台
| 版本 | 说明 |
|---|---|
| Java SE(Standard Edition)标准版 | 支持面向桌面级应用(如Windows下的应用程序)的Java平台,提供了完整的Java核心API,此版本以前称为J2SE |
| Java EE(Enterprise Edition)企业版 | 是为开发企业环境下的应用程序提供的一套解决方案。该技术体系中包含的技术如:Servlet、Jsp等,主要针对于Web应用程序开发。版本以前称为J2EE |
| Java ME(Micro Edition)小型版 | 支持Java程序运行在移动终端(手机、PDA)上的平台,对Java API有所精简,并加入了钛对移动终端的支持,此版本以前称为J2ME |
2.3 Java语言特点
- Java 语言是面向对象的(oop)
- Java 语言是健壮的。Java 的强类型机制、异常处理、垃圾的自动收集等是 Java 程序健壮性的重要保障
- Java 语言是跨平台性的。[即: 一个编译好的.class 文件可以在多个系统下运行,这种特性称为跨平台]
- Java 语言是解释型的
2.4 Java虚拟机及运行过程
- JVM 是一个虚拟的计算机,具有指令集并使用不同的存储区域。负责执行指令,管理数据、内存、寄存器,包含在JDK 中.
- 程序运行过程
1 | graph LR |
2.5 JDK JRE
- JDK 的全称(Java Development Kit Java 开发工具包)
JDK = JRE + 开发工具集(例如 Javac,java 编译工具等)
- JRE(Java Runtime Environment Java 运行环境)
JRE = JVM + Java SE 标准类库(java 核心类库)
2.6 Java注释
单行注释 //
多行注释 /* */
文档注释 /** */
文档注释内容可以白JDK提供的工具javadoc所解析,生成一套以网页文件形式体现的该程序的说明文档。一般写在类和方法前。
javadoc -d d:\temp -author -version Test.java
javadoc标签
1
2
3
4/**
* @author Durango
* @version 1.0
*/
2.7 Java代码规范
- 类、方法的注释,要以javadoc的方式来写。
- 非Java Doc的注释,往往是给代码的维护者看的,着重告述读者为什么这样写,如何修改,注意什么问题等
- 使用tab操作,实现缩进,默认整体向右边移动,时候用shift+tab整体向左移4、运算符和=两边习惯性各加一个空格。比如:2 + 4 * 5 + 345 - 89
- 源文件使用utf-8编码
- 行宽度不要超过80字符
- 代码编写次行风格(推荐)和行尾风格
第三章 基本数据类型
3.1 数据类型(必背)
1 | graph LR |
3.2 整数类型
- 表示范围
| 类型 | 占用空间 | 范围 |
|---|---|---|
| byte | 1字节 | -128 ~ 127 |
| short | 2字节 | -2^15 ~ 2^15-1 |
| int | 4字节 | -2^31 ~ 2^31-1 |
| long | 8字节 | -2^63 ~ 2^63-1 |
- 注意细节
java的整数常量默认为int,声明long型常量时,须后加’L’或‘l’
1 | long a = 12L |
3.3 浮点类型
- 表示范围
| 类型 | 占用空间 | 范围 |
|---|---|---|
| float(单精度) | 4 | -3.403E38 ~ 3.403E38 |
| double(双精度) | 8 | -1.798E308 ~ 1.798E308 |
- 说明:浮点数=符号位+指数位+尾数位
- 注意细节:
- java的浮点型常量默认为double型,声明float型常量时,须后加‘F’或‘f’
- 通常情况下使用double,它比float更加精确
- 两种表示形式
- 十进制:5.12 0.512f .512(0可以省略)
- 科学计数法:5.12e2 (5.12*10的2次方) 5.12E-2 (5.12/10的2次方)
- 浮点数使用陷阱
1 | // 一个重要的使用点: 当我们对运算结果是小数, 进行相等判断时要小心,应该是以两个数的差值的绝对值,在某个精度范围类判断 |
3.4 字符类型
使用细节
- java中,char的本质是一个整数,在输出时,是Unicode码对应的字符
- char类型时可以进行运算法
Java API
字符型的本质
- 存储:‘a’ ==> 码值97 ==> 二进制(110 0001)==> 存储
- 读取:二进制(110 0001)==> 码值97 ==> ‘a’
常见编码
ASCII (ASCII编码表,一个字节表示,一共128个字符, 实际上一个字节可以表示256个字符,只用128个)
Unicode (Unicode编码表固定大小的编码使用两个字节来表示字符,字母和汉字统一都是占用两个字节,这样浪费空间)
utf-8(编码表,大小可变的编码字母使用1个字节,汉字使用3个字节)gbk(可以表示汉字,而且范围广,字母使用1个字节,汉字2个字节)gb2312(可以表示汉字,gb2312 <gbk)
big5码(繁体中文,台湾,香港)
3.5 布尔类型
- 占1个字节
- true or false
- java中不可以用0或非0的整数替代false或true。(C语言中可以)
3.6 数据类型转换
3.6.1. 自动类型转换(必背)
1 | graph LR |
- 注意和细节
(1)有多种类型的数据混合运算时,系统首先自动将所有数据转换成容量最大的那种数据类型,然后再进行计算。
(2)当我们把精度(容量)大的数据类型赋值给精度(容量)小的数据类型时,就会报错,反之就会进行自动类型转换。
(3)(byte,short)和char之间不会相互自动转换。
(4)byte, short,char 他们三者可以参与计算,在计算时首先转换为int类型。
(5)boolean不参与转换
(6)自动提升原则:表达式结果的类型自动提升为操作数中最大的类型
1 | //自动类型转换细节 |
3.6.2 强制类型转换
- 当进行数据从高精度到低精度转换时,需要使用强制转换
- 强制转换符 如(int) (byte)等
- char类型可以用int常量值赋值,但是不能用int变量值赋值
- byte, short, char类型在参与运算时,当做int类型处理
3.6.3 与字符串转换
基本数据类型 -> 字符串
1
2int n1 = 100;
String s1 = n1 + "";字符串 -> 基本数据类型
1
2
3
4
5
6
7
8String s5 = "123";
int num1 = Integer.parseInt(s5);
double num2 = Double.parseDouble(s5);
float num3 = Float.parseFloat(s5);
long num4 = Long.parseLong(s5);
byte num5 = Byte.parseByte(s5);
boolean b = Boolean.parseBoolean("true");
short num6 = Short.parseShort(s5)
第四章 运算符
4.1 算数运算符
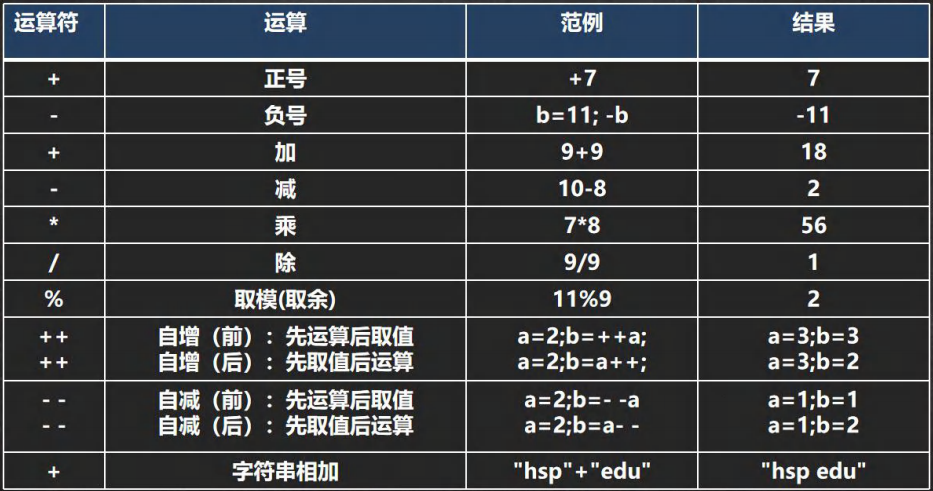
- 注意事项
- 对于除号”/“,它的整数除和小数除是有区别的: **整数之间做除法时,只保留整数部分而舍弃小数部分**。例如: int x= 10/3,结果是3
- 当对一个数取模时,可以等价a%b = a-a/b*b,这样我们可以看到取模的一个本质运算。
- 当自增当做一个独立语言使用时,不管是 ++i 还是 i++ 都是一样的
- 当自增当做一个表达式使用时 j=++i 等价于 i=i+1; j=i
当自增当做一个表达式使用时 j=i++ 等价 j=i; i=i+1
1 | // % 取模 ,取余 |
4.2 关系运算符
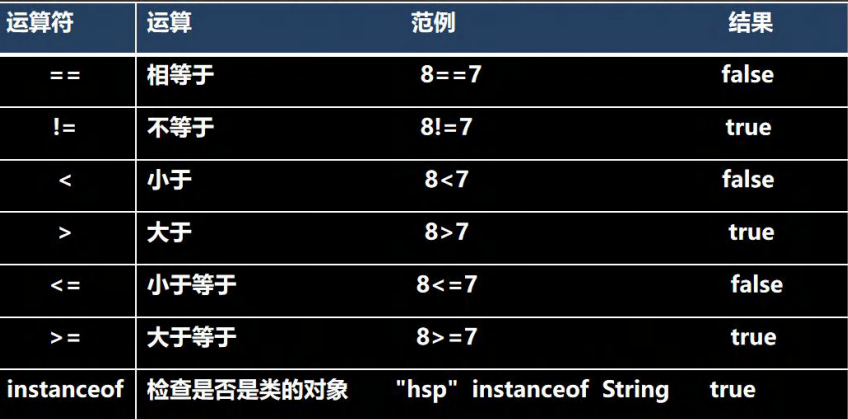
4.3 逻辑运算符
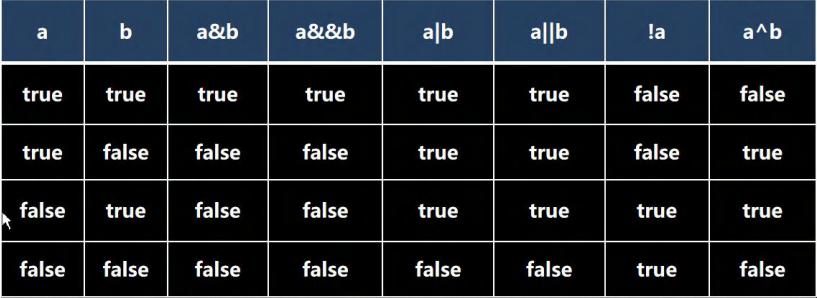
&& 和 & 的区别
&&短路与:如果第**一个条件为 false,则第二个条件不会判断**,最终结果为 false,效率高
& 逻辑与:不管第一个条件是否为 false,第二个条件都要判断,效率低
1
2
3
4
5
6
7
8
9
10
11
12
13//对于&&短路与而言,如果第一个条件为 false ,后面的条件不再判断
//对于&逻辑与而言,如果第一个条件为 false ,后面的条件仍然会判断
int a = 4;
int b = 9;
if(a < 1 && ++b < 50) {
System.out.println("ok300");
}
System.out.println("a=" + a + " b=" + b);// 4 9
if(a < 1 & ++b < 50) {
System.out.println("ok300");
}
System.out.println("a=" + a + " b=" + b);// 4 10
|| 和 | 的区别
- ||短路或:如果**第一个条件为 true,则第二个条件不会判断**,最终结果为 true,效率高
- | 逻辑或:不管第一个条件是否为 true,第二个条件都要判断,效率低
1
2
3
4
5
6
7
8
9
10
11
12
13
14//(1)||短路或:如果第一个条件为 true,
//则第二个条件不会判断,最终结果为 true,效率高
//(2)| 逻辑或:不管第一个条件是否为 true,第二个条件都要判断,效率低
int a = 4;
int b = 9;
if( a > 1 || ++b > 4) { // 可以换成 | 测试
System.out.println("ok300");
}
System.out.println("a=" + a + " b=" + b); //4 9
if( a > 1 | ++b > 4) {
System.out.println("ok300");
}
System.out.println("a=" + a + " b=" + b); //4 10
4.4 赋值运算符
- 复合赋值运算符会进行类型转换
1 | byte b = 3; |
4.5 三元运算符
条件表达式 ? 表达式 1: 表达式 2;
运算规则:
如果条件表达式为 true,运算后的结果是表达式 1;
如果条件表达式为 false,运算后的结果是表达式 2;
1 | int a = 10; |
1 | //案例:实现三个数的最大值 |
4.6 标识符
- 标识符命名规则
由26个英文字母大小写, 0-9,或 $ 组成
数字不可以开头。int 3ab = 1;//错误
不可以使用关键字和保留字,但能包含关键字和保留字。
Java中严格区分大小写,长度无限制。int totalNum = 10; int n = 90;
标识符不能包含空格。int a b = 90;
- 标识符命名规范
包名:多单词组成时所有字母都小写:aaa.bbb.ccc //比如 com.hsp.crm
类名、接口名:多单词组成时,所有单词的首字母大写:XxxYyyZzz [大驼峰]
变量名、方法名:多单词组成时,第一个单词首字母小写,第二个单词开始每个单词首字母大写:xxxYyyZz[小驼峰, 简称 驼峰法]
常量名:所有字母都大写。多单词时每个单词用下划线连接:XXX_YYY_ZZZ
4.7 键盘输入
next():接收用户输入字符串
next().charAt(0):接收用户输入的一个字符
nextInt():接收用户输入的int
nextDouble():接收用户输入的Double
1 | import java.util.Scanner;//表示把 java.util 下的 Scanner 类导入 |
4.8 进制(基本功)
4.8.1 进制介绍
- 对于整数,有四种表示方式:
- 二进制:0,1 ,满 2 进 1. 以 0b 或 0B 开头。
- 十进制:0-9 ,满 10 进 1。
- 八进制:0-7 ,满 8 进 1. 以数字 以数字 0 开头表示 开头表示。
- 十六进制:0-9 及 A(10)-F(15),满 16 进 1. 以 0x 或 0X 开头表示。此处的 A-F 不区分大小写。
4.8.2 进制转化
- k进制转十进制
从最低位(右边)开始,将每个位上的数提取出来,乘以 k的(位数-1)次方 后再求和
十进制转k进制
除k取余法
二进制转八进制(十六进制)
从低位开始, 将二进制数(十六进制数)每三位(四位)一组,转成对应的八进制数(十六进制数)即可。
- 八进制(十六进制)转二进制
将八进制数(十六进制)每 1 位,转成对应的一个 3 位(4位)的二进制数即可。
4.8.3 源码、反码、补码(必背)
- 二进制的最高位是符号位: 0表示正数,1表示负数
- 正数的原码,反码,补码都一样(三码合一)
- 负数的反码=它的原码符号位不变, 其它位取反(0->1,1->0)
- 负数的补码=它的反码+1,负数的反码=负数的补码-1,0的反码,补码都是0
- java没有无符号数,换言之,java中的数都是有符号的
- 在计算机运算的时候,都是以补码的方式来运算的.
- 当我们看运算结果的时候,要看他的原码(重点)
4.9 位运算
- 按位与&:两位全为1,结果为1,否则为0
- 按位或:两位有一个为1,结果为1,否则为0
- 按位异或^:两位一个为0,一个为1,结果为1,否则为0
- 按位取反~:0->1,1->0
- 算术右移 >>:低位溢出,符号位不变,并用符号位补溢出的高位
- 算术左移 <<:符号位不变,低位补 0
- 无符号右移>>>:运算规则是: 低位溢出,高位补 0
- 没有无符号左移
- 操作过程:先得到原码,再得到补码,在补码上进行操作,最后还原为原码
1 | // 1. 先得到-2的原码(4字节) 10000000 00000000 00000000 00000010 |
1 | // 00000000 00000000 00000000 00000001 |
第五章 程序控制结构
5.1 顺序结构
5.2 分支控制
单分支
1
2
3if(条件表达式) {
执行代码块;
}双分支
1
2
3
4
5
6if(条件表达式) {
执行代码块1;
}
else {
执行代码块2;
}多分支
1
2
3
4
5
6
7
8
9
10
11
12
13if(条件表达式) {
执行代码块1;
}
if else(条件表达式2) {
执行代码块2;
}
...
if else(条件表达式n) {
执行代码块n;
}
else { //可以没有else
执行代码块n+1;
}
switch分支
1
2
3
4
5
6
7
8
9
10
11
12
13
14
15switch(表达式) {
case 常量1:
语句块1;
break;
case 常量2:
语句块2;
break;
...
case 常量n:
语句块n;
break;
defalut:
default语句块;
break;
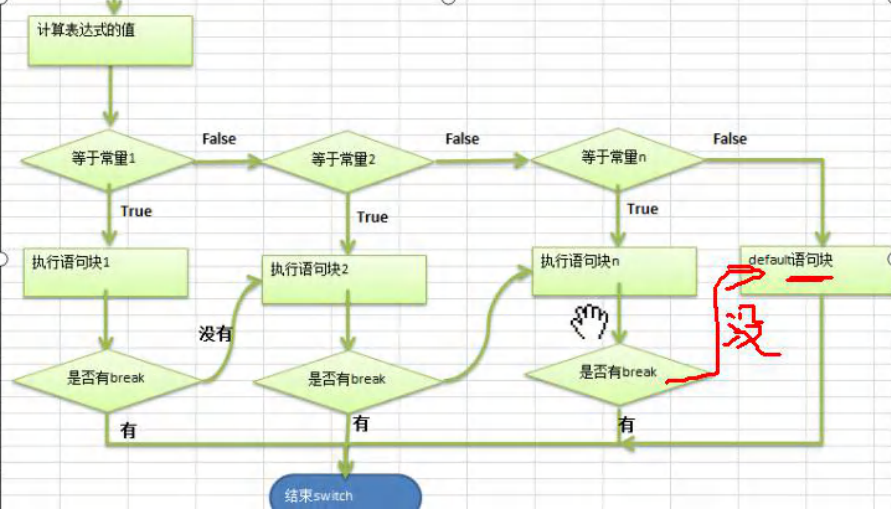
}- 特别注意:当前一个case没有break时,会直接进入下一个case的语句块,而不需要判断
- 使用细节
- 表达式数据类型,应和case后的常量类型一致,或者是可以自动转换成可以相互比较的类型,比如输入的是字符,而常量是int
- switch(表达式)中表达式的返回值必须是: byte, short, int, char, enum[枚举], String
double c = 1.1; switch(c)//错误 - case子句中的值必须是常量,而不能是变量
- default子句是可选的,当没有匹配的case时,执行default
- break语句用来在执行完一个case分支后使程序跳出switch语句块; 如果没有写break,程序会顺序执行到switch结尾,除非遇到break; (穿透现象)
- switch和if的比较
- 如果判断的具体数值不多,而且符合 byte、 short 、int、 char, enum[枚举], String 这 6 种类型。虽然两个语句都可以使用,建议使用 swtich 语句。
- 其他情况:对区间判断,对结果为 boolean 类型判断,使用 if,if 的使用范围更广
5.3 循环控制
5.3.1 for循环
1 | for (循环变量初始化; 循环条件; 循环变量迭代) { |
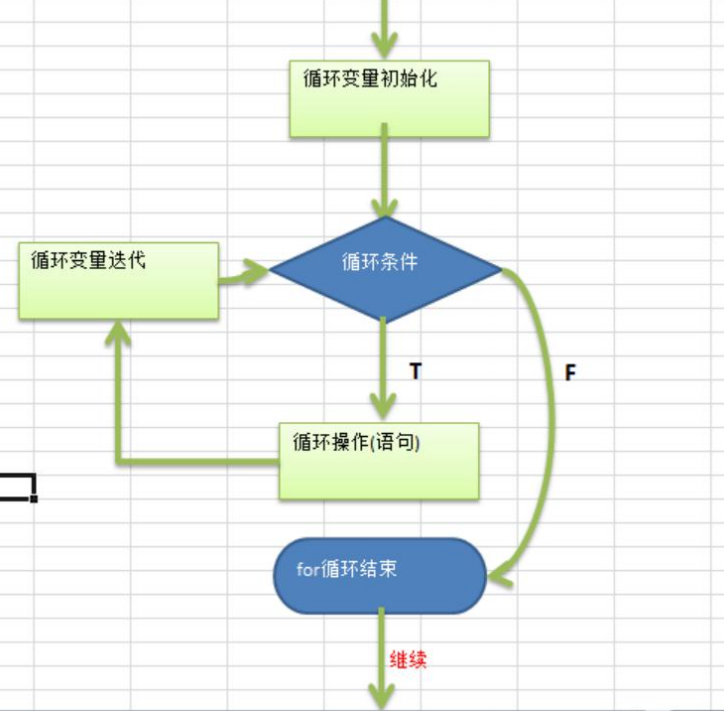
for 有四要素: (1)循环变量初始化 (2)循环条件 (3)循环操作 (4)循环变量迭代
for(; ;)表示无限循环
for(; 循环判断条件; ) 中的初始化和变量迭代可以写到其它地方,但是两边的分号不能省略。
1
2
3
4
5int i = 1;
for( ; i <= 10; ) {
System.out.println(i);
i++
}循环初始值可以有多条初始化语句,但要求类型一样,并且中间用逗号隔开,循环变量迭代也可以有多条变量迭代语句,中间用逗号隔开.
1
2
3for (int i = 0, j = 0; i < 100; i++, j += 2) {
System.out.println("i=" + i + "j=" + j)
}
5.3.2 while循环
1 | 循环变量初始化; |
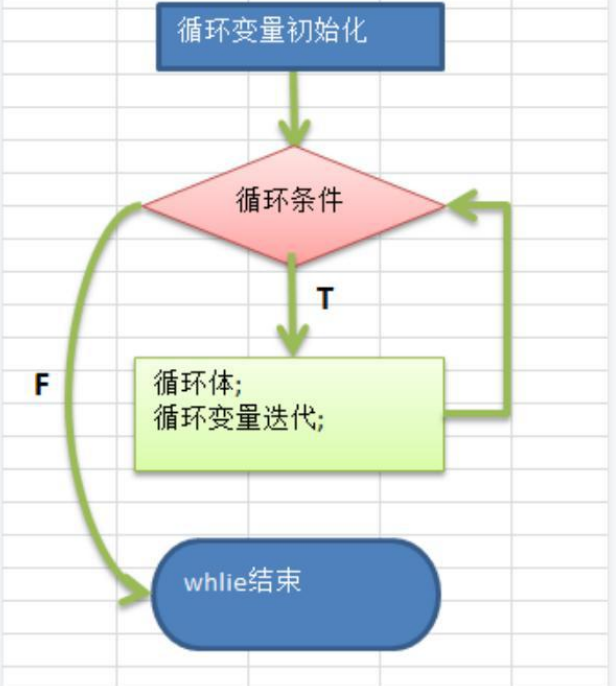
5.3.3 do while循环
1 | 循环变量初始化; |
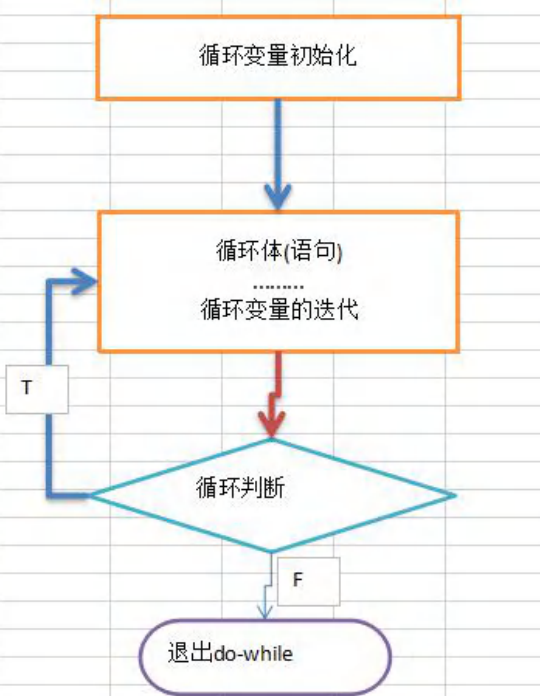
5.3.4 嵌套循环
编程思想:化繁为简,先死后活
化繁为简:将复杂的程序简化为多个简单的步骤
先死后活:先考虑常量的情况,再考虑变量的情况
打印九九乘法表
1
2
3
4
5
6
7for(int i = 1; i <= 9; i++) {
for (int j = 1; j <= i; j++) {
System.out.print(j + "*" + i +"=" + j * i);
System.out.print("\t");
}
System.out.println();
}
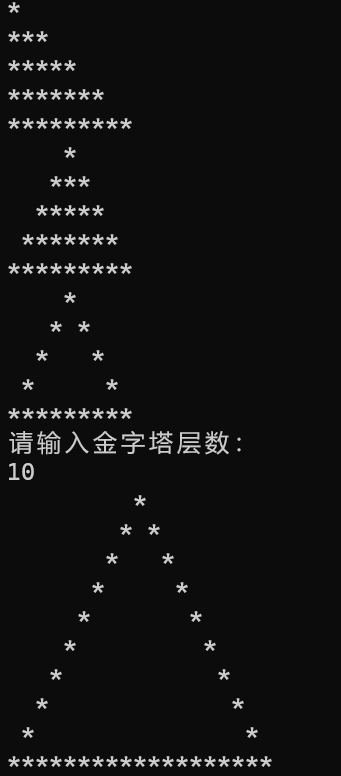
打印空心金字塔
- 化繁为简
1
2
3
4
5
6
7
8
9
10
11
12
13
14
15
16
17
18
19
20
21
22
23
24
25
26
27
28
29
30
31
32
33
34
35
36
37
38// 第一版
for(int i = 1; i <= 5; i++) {
for(int j = 1; j <= 2 * i - 1; j++) {
System.out.print("*");
}
System.out.println();
}
// 第二版
for(int i = 1; i <= 5; i++) {
// 空格数 = 层数 - 当前层数
for (int k = 1; k <= 5 - i; k++) {
System.out.print(" ");
}
for(int j = 1; j <= 2 * i - 1; j++) {
System.out.print("*");
}
System.out.println();
}
// 第三版
for(int i = 1; i <= 5; i++) {
for (int k = 1; k <= 5 - i; k++) {
System.out.print(" ");
}
for(int j = 1; j <= 2 * i - 1; j++) {
// 每行只有第一个位置和最后一个位置打印*
// 最后一行全部输出
if(j == 1 || j == 2 * i - 1 || i == 5) {
System.out.print("*");
} else { //其他位置打印空格
System.out.print(" ");
}
}
System.out.println();
}- 先死后活
1
2
3
4
5
6
7
8
9
10
11
12
13
14
15
16
17
18
19// 终版
Scanner myScanner = new Scanner(System.in);
System.out.println("请输入金字塔层数:");
int level = myScanner.nextInt();
// 第三版
for(int i = 1; i <= level; i++) {
for (int k = 1; k <= level - i; k++) {
System.out.print(" ");
}
for(int j = 1; j <= 2 * i - 1; j++) {
// 每行只有第一个位置和最后一个位置打印*
// 最后一行全部输出
if(j == 1 || j == 2 * i - 1 || i == level) {
System.out.print("*");
} else { //其他位置打印空格
System.out.print(" ");
}
}
5.3.5 break跳转
跳出最近的循环体
break语句出现在多层嵌套的语句块中时,可以通过**标签**指明要终止的是哪一层语句块。
label1: { …{break label1}… }
label1是标签,名字由程序员指定,可以是任意如abc1,ABC2
在实际开发中尽量不要使用标签
如果break没有指定标签,默认退出最近的循环体
5.3.6 continue跳转
- 结束本次循环,继续执行下一次循环
- continue 语句出现在多层嵌套的循环语句体中时,可以通过**标签**指明要跳过的是哪一层循环 , 这个和前面的标签的使用的规则一样.
第六章 数组
6.1 数组初始化
6.1.1 静态初始化
语法:数据类型[] 数组名 = {元素值1,元素值2,….} 或 数据类型 数组名[] = {元素值1,元素值2,….} 或 数据类型 数组名[] = new 数据类型[ ]{元素值1,元素值2,….} .
```java
int a[] = {1, 2, 3, 4};
int[] b = {5, 6, 7, 8};1
2
3
4
5
- ```java
int a[] = {1, 2, 3, 4};
double b[] = {1.1, 2.2, 3.4};
char c[] = {'a', 'b', 'c'};```java
int a[] = new int[]{1, 2, 3, 4};
double b[] = new double[]{1.1, 2.2, 3.4};
char c[] = new char[]{‘a’, ‘b’, ‘c’};1
2
3
4
5
6
7
8
9
10
11
12
### 6.1.2 动态初始化
- 语法:<font color='red'>数据类型[] 数组名 = new 数据类型[大小]</font> 或 <font color='red'>数据类型 数组名[] = new 数据类型[大小]</font>
- ```java
int a[] = new int[4];
int[] b = new int[4];
int c[]; // int[] c;
c = new int[4];```java
char[] table = new char[26];
for(int i = 0; i < table.length; i++) {// 'a' + i是int类型,需要强制转换为char table[i] = (char)('a' + i);}
System.out.println(“==table数组===”);
for(int i = 0; i < table.length; i++) {System.out.print(table[i] + " ");}
1
2
3
4
5
6
7
8
9
10
11
12
13
14
15
16
17
18
19
20
21
22
23
24
25
26
## 6.2 使用细节
- 数组是多个**相同类型数据**的组合,实现对这些数据的统一管理
- 数组中的**元素可以是任何数据类型**,包括基本类型和引用类型,但是不能混用。
- 数组创建后,如果没有赋值,有<a id="myid"> **默认值** </a>**int 0,short 0, byte 0, long 0, float 0.0,double 0.0,char \u0000,boolean false,String null**
- 数组的**下标是从** **0** **开始的**。
- 获取数组长度:<font color='red'>数组名.length</font>
- 数组下标必须在指定范围内使用,否则报:下标越界异常
- 数组属**引用类型**,数组型数据是对象(object)代码
## 6.3 数组赋值机制
- 基本数据类型是<font color='red'>值传递</font>,赋值类型是<font color='red'>值拷贝</font>
```java
// b的变化不会影响到a
int n1 = 10;
int n2 = a;
n2 = 80;
System.out.println(n1); // 10
System.out.println(n2); // 80数组在默认情况下是**引用传递,赋的值是地址**,赋值方式为地址拷贝。
1
2
3
4
5
6
7// b的变化会影响到a
int[] arr1 = {1, 2, 3};
int[] arr2 = arr1; //把数组a赋值给b,赋的是地址
arr2[0] = 10;
for(int i = 0; i < arr1.length; i++) {
System.out.println(arr1[i]);
} // 10, 2, 3值传递和引用传递区别
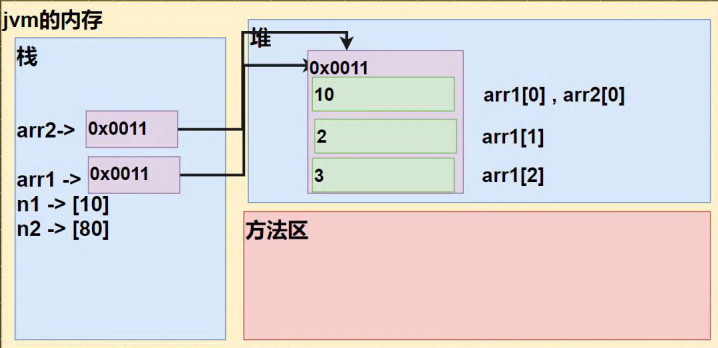
6.4 数组拷贝
1 | int[] arr1 = {1, 2, 3, 4}; |
6.5 数组反转
1 | int[] arr = {11, 22, 33, 44, 55, 66, 77}; |
6.6 数组扩容
要求:实现动态的给数组添加元素效果,实现对数组扩容。
```Java
// 1. 定义初始数组 int[] arr = {1,2,3}//下标 0-2
// 2. 定义一个新的数组 int[] arrNew = new int[arr.length+1];
// 3. 遍历 arr 数组,依次将 arr 的元素拷贝到 arrNew 数组
// 4. 将 4 赋给 arrNew[arrNew.length - 1] = 4;把 4 赋给 arrNew 最后一个元素
// 5. 让 arr 指向 arrNew ; arr = arrNew; 那么 原来 arr 数组就被销毁
int[] arr = {1, 2, 3};
int[] arrNew = new int[arr.length + 1];
for(int i = 0; i < arr.length; i++) {arrNew[i] = arr[i];}
arrNew[arrNew.length - 1] = 4;
arr = arrNew;1
2
3
4
5
6
7
8
9
10
11
12
13
14
15
16
17
18
19
20
21
22
23
24
25
26
27
28
29
30
31
32
33
34
35
36
37
38
39
40
41
42
43
44
45
46
47
48
49
50
51
52
53
54
55
56
57
58
59
60
## 6.7 冒泡排序
- 基本思想:每一轮,依次比较相邻元素的值,若发现逆序则交换,使得较大的元素逐渐从前向后移动,就像水底的气泡一样逐渐向上冒。
- 例子
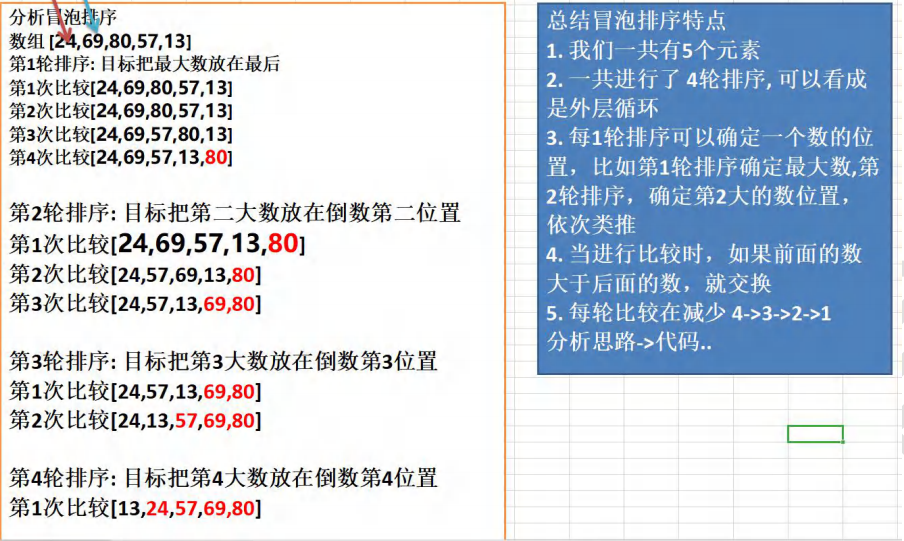
- 化繁为简,先死后活
```java
int[] arr = [24, 69, 80, 57, 13]
int temp;
// 第一轮,4次比较
for(int j = 0; j < 4; j++) {
if(arr[j] > arr[j + 1]) {
temp = arr[j];
arr[j] = arr[j + 1];
arr[j + 1] = temp;
}
}
// 第二轮,3次比较
for(int j = 0; j < 3; j++) {
if(arr[j] > arr[j + 1]) {
temp = arr[j];
arr[j] = arr[j + 1];
arr[j + 1] = temp;
}
}
// 第三轮,2次比较
for(int j = 0; j < 2; j++) {
if(arr[j] > arr[j + 1]) {
temp = arr[j];
arr[j] = arr[j + 1];
arr[j + 1] = temp;
}
}
// 第四轮,1次比较
for(int j = 0; j < 1; j++) {
if(arr[j] > arr[j + 1]) {
temp = arr[j];
arr[j] = arr[j + 1];
arr[j + 1] = temp;
}
}
// 一共有四轮比较,可用i代表(轮数-1),每轮比较4-i次
for(int i = 0; i < 4; i++) {
for(int j = 0; j < 4 - i; j++) {
if(arr[j] > arr[j + 1]) {
temp = arr[j];
arr[j] = arr[j + 1];
arr[j + 1] = temp;
}
}
}1
2
3
4
5
6
7
8
9
10// 数组长度length,一共需要比较length-1轮(冒泡length-1次),第i轮需要比较length-1-i次
for(int i = 0; i < arr.length - 1; i++) {
for(int j = 0; j < arr.length - 1 - i; j++) {
if(arr[j] > arr[j + 1]) {
temp = arr[j];
arr[j] = arr[j + 1];
arr[j + 1] = temp;
}
}
}
6.8 二维数组
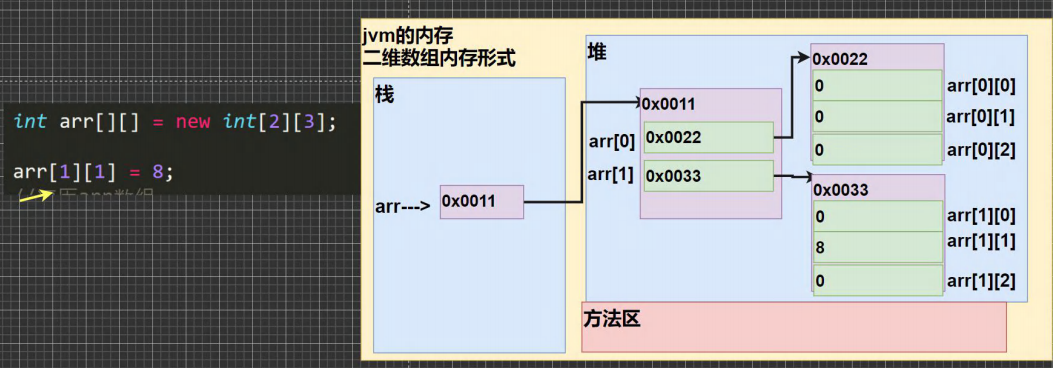
6.8.1 初始化
静态初始化:
- 数据类型[][] 数组名 = <!–swig360–>
- 数据类型 数组名[][] = <!–swig361–>
- 数据类型[] 数组名[] = <!–swig362–>
动态初始化1:
- 数据类型[][] 数组名 = new 数据类型[大小][大小]
- 数据类型 数组名[][] = new 数据类型[大小][大小]
- 数据类型[] 数组名[] = new 数据类型[大小][大小]
动态初始化2(列数不确定):
- 数据类型[][] 数组名 = new 数据类型[大小][]
- 数据类型 数组名[][] = new 数据类型[大小][]
1 | int[][] arr = new int[3][3]; |
1 | // 声明时列数不确定 |
6.8.2 应用-杨辉三角
1 | /* |
第七章 面向对象编程(基础)
7.1 类与对象
案例
1
2
3
4
5
6class Cat {
String name;
int age;
String color;
double weight;
}
7.1.1 类与对象的区别和联系
- 类是抽象的,概念的,代表一类事物,比如人类,猫类.., 即它是数据类型.
- 对象是具体的,实际的,代表一个具体事物, 即 是实例.
- 类是对象的模板,对象是类的一个个体,对应一个实例
7.1.2 对象在内存中存在形式(重要!)
栈中存放的是对象的引用(对象名),真正的对象在堆中。
年龄12是一个基本数据类型(整型),直接存放在堆中;名字和颜色是一个引用类型(字符串),在堆中存放的是地址,真正的数据存放在方法区的常量池中。
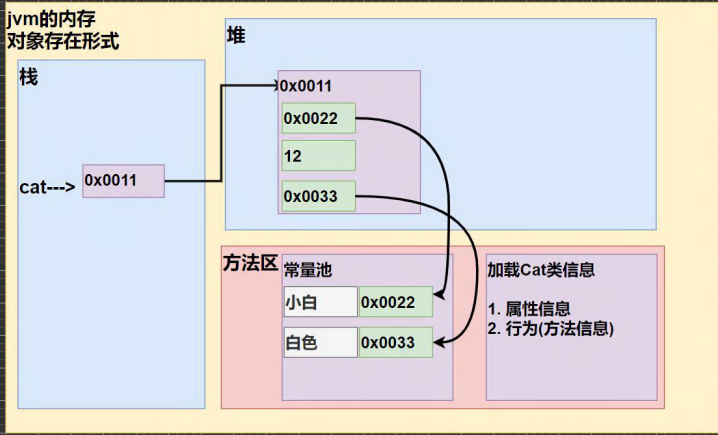
7.1.3 成员变量|属性|字段
定义:访问修饰符 属性类型 属性名
赋值:属性如果不赋值,有默认值,规则和数组一致。具体说: int 0,short 0, byte 0, long 0, float 0.0,double 0.0,
char \u0000,boolean false,String null
访问属性:对象名.属性名
7.1.4 创建对象
先声明在创建
1
2
3// 声明时会在栈中创建一个值为空的变量,创建时会在堆中创建一个对象并把它的地址赋给这个变量
Cat cat;
cat = new Cat();直接创建
1
Cat cat = new Cat();
7.1.5 类和对象的内存分配机制(重要!)
1 | Person p1 = new Person(); |
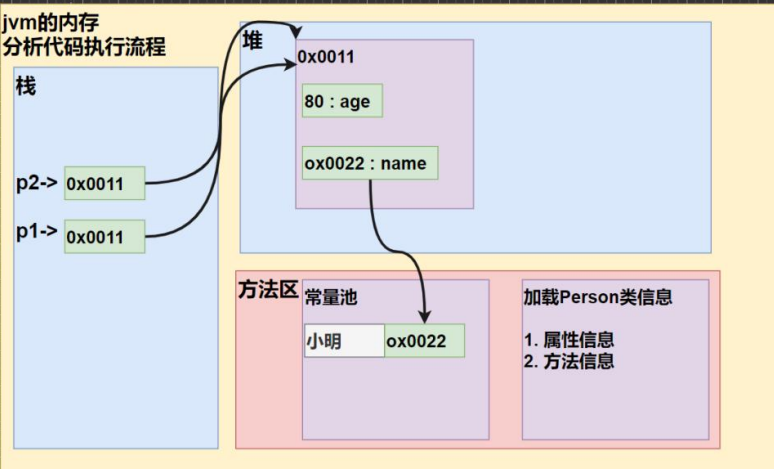
- java的内存结构
- 栈: 一般存放基本数据类型(局部变量)
- 堆: 存放对象(Cat cat , 数组等)
- 方法区:常量池(常量,比如字符串), 类加载信息
- java创建对象的流程
- 先加载 Person 类信息到方法区中(属性和方法信息, 只会加载一次)
- 在堆中分配空间, 进行默认初始化(看规则)
- 把地址赋给栈中的变量p , p 就指向对象
- 进行指定初始化, 比如 p.name =”jack” p.age = 10
7.2 成员方法
7.2.1 方法的调用机制(重要!)
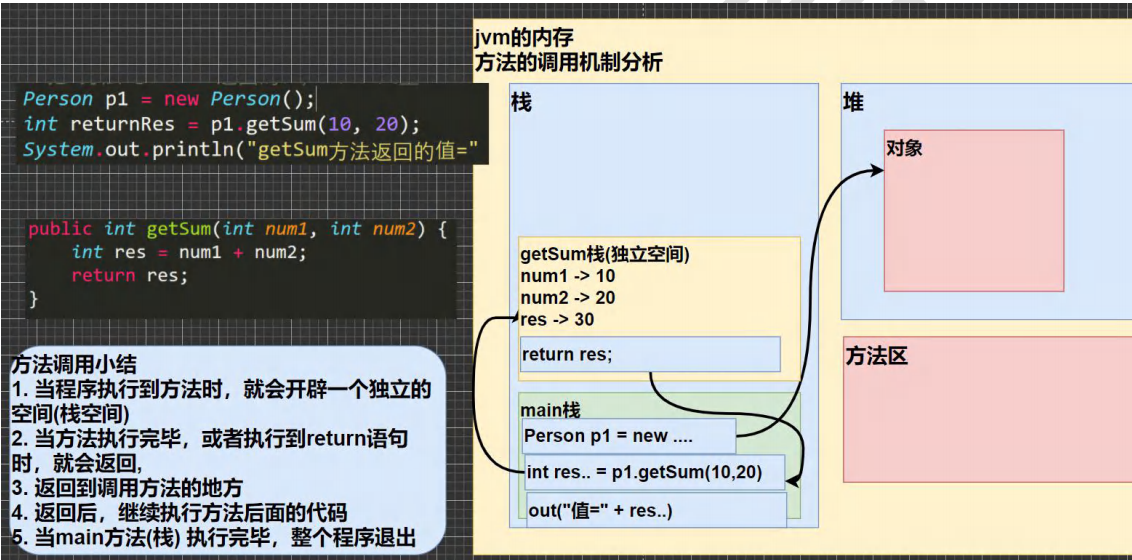
7.2.2 方法的作用
- 提高代码的复用性
- 将实现的细节进行封装,然后供其他用户直接调用而不需要了解其内部细节
7.2.3 方法的定义
1 | public 返回数据类型 方法名(形参列表...) { |
7.2.4 方法的使用细节
- 访问修饰符:控制方法的使用范围,有 public,protected,默认,private
- 放回数据类型:
- 一个方法最多有一个返回值 [思考,如何返回多个结果 返回数组 ]
- 返回类型可以为任意类型,包含基本类型或引用类型(数组,对象)
- 如果方法要求有返回数据类型,则方法体中最后的执行语句必须为 return 值; 而且要求返回数据类型必须和 return 的值类型一致或兼容(可以自动转换)
- 如果方法是 void,则方法体中可以没有 return 语句,或者 只写 return ;
- 方法名
- 遵循小驼峰命名法
- 最好见名知义,如求和getSum
- 形参列表
- 调用带参数的列表时,传入的参数必须和参数列表是相同类型或兼容类型
- 方法定义时的参数成为形参,方法调用时传入的参数成为实参,实参和新参的类型必须一致或兼容,个数、顺序必须一致
- 方法体:方法体里面不能再定义方法,即方法不能嵌套定义。
7.2.5 方法的调用
- 同一个类中调用:直接调用即可
- 跨类中的方法调用:需要创建对象,对象名.方法名( ),能否调用与方法的访问修饰符有关
7.3 成员方法的传参机制(重要!)
7.3.1 值传递
- 案例
1 | public class MethodParameter01 { |
- 基本数据类型的传参机制是值传递(值拷贝),形参的任何改变不会影响实参。
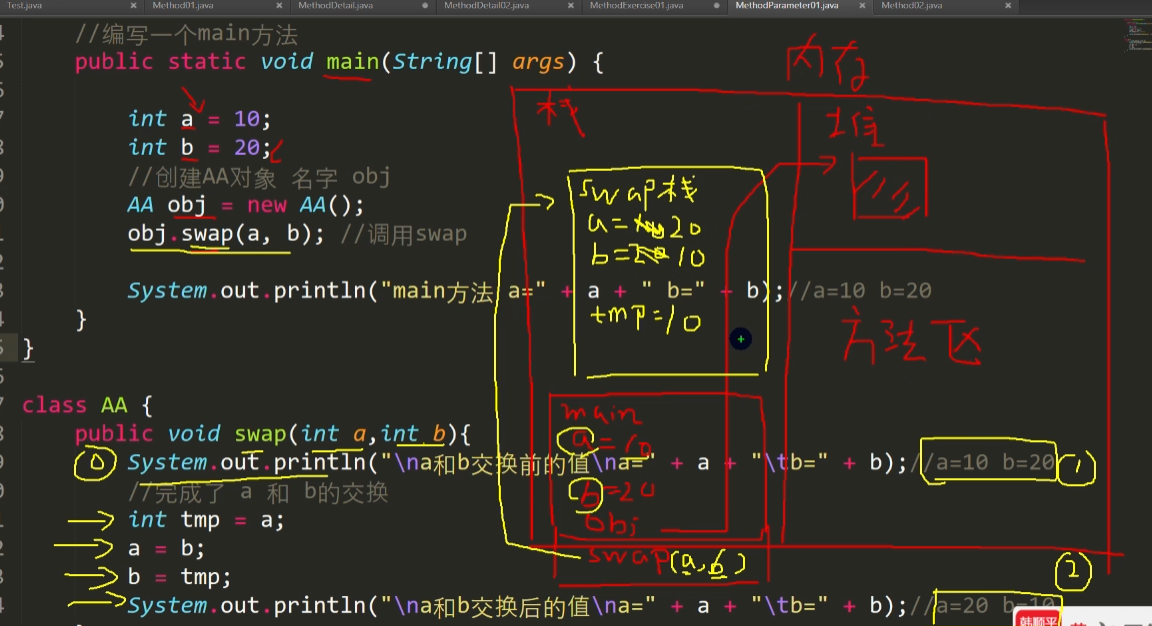
7.3.2 地址传递
案例
1
2
3
4
5
6
7
8
9
10
11
12
13
14
15
16
17
18
19
20
21
22
23
24
25
26
27
28
29
30
31
32
33
34
35
36
37
38
39
40
41
42
43
44
45
46public class MethodParameter02 {
//编写一个 main 方法
public static void main(String[] args) {
//测试
B b = new B();
int[] arr = {1, 2, 3};
b.test100(arr);//调用方法
System.out.println(" main 的 arr 数组 ");
// 遍历数组
for(int i = 0; i < arr.length; i++) {
System.out.print(arr[i] + "\t"); // {200, 2, 3}
}
System.out.println();
//测试
Person p = new Person();
p.name = "jack";
p.age = 10;
b.test200(p);
//测试题, 如果 test200 执行的是 p = null ,下面的结果是 10
//测试题, 如果 test200 执行的是 p = new Person();..., 下面输出的是 10
System.out.println("main 的 p.age=" + p.age);//10000
}
}
class Person {
String name;
int age;
}
class B {
//可以接收一个数组,在方法中修改该数组,看看原来的数组是否变化
public void test100(int[] arr) {
arr[0] = 200;//修改元素
}
public void test200(Person p) {
p.age = 10000; //修改对象属性
// 思考
// p = new Person();
// p.name = "tom";
// p.age = 99;
// 思考
// p = null;
}
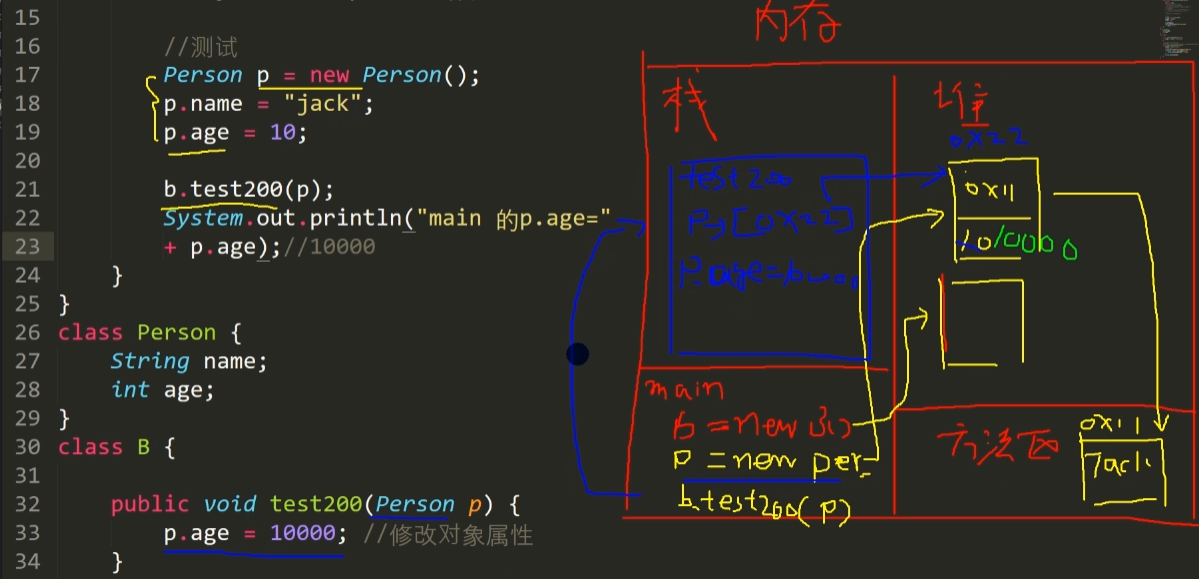
- 引用数据类型的传参机制是地址传递(地址拷贝),形参的改变会影响实参。除非形参指向新的地址
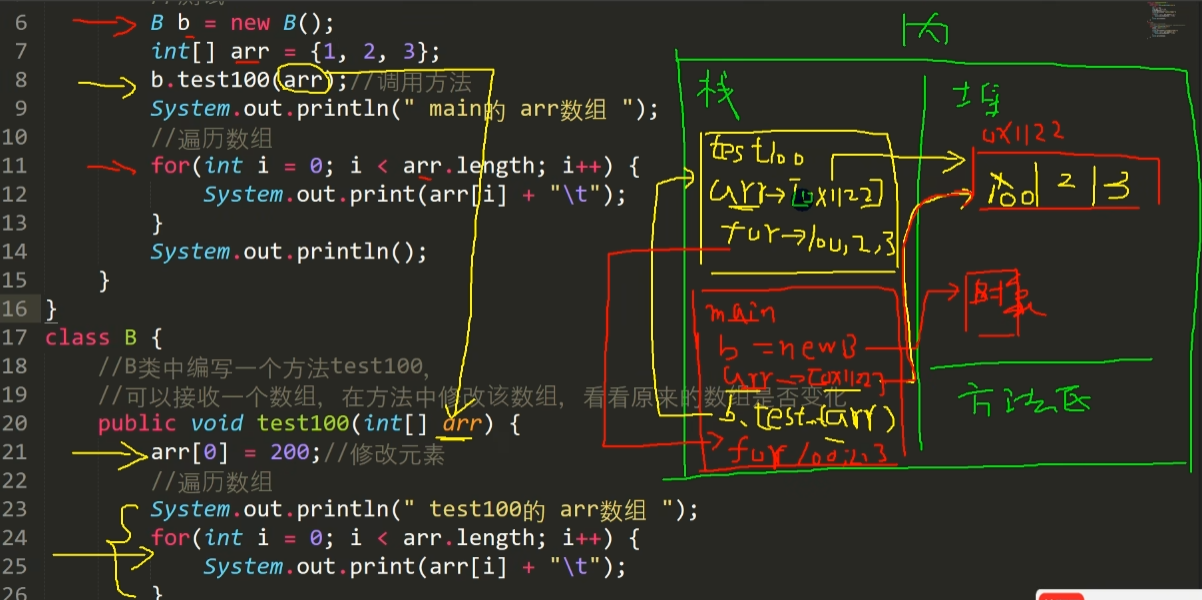
7.4 递归调用
7.4.1 注意事项
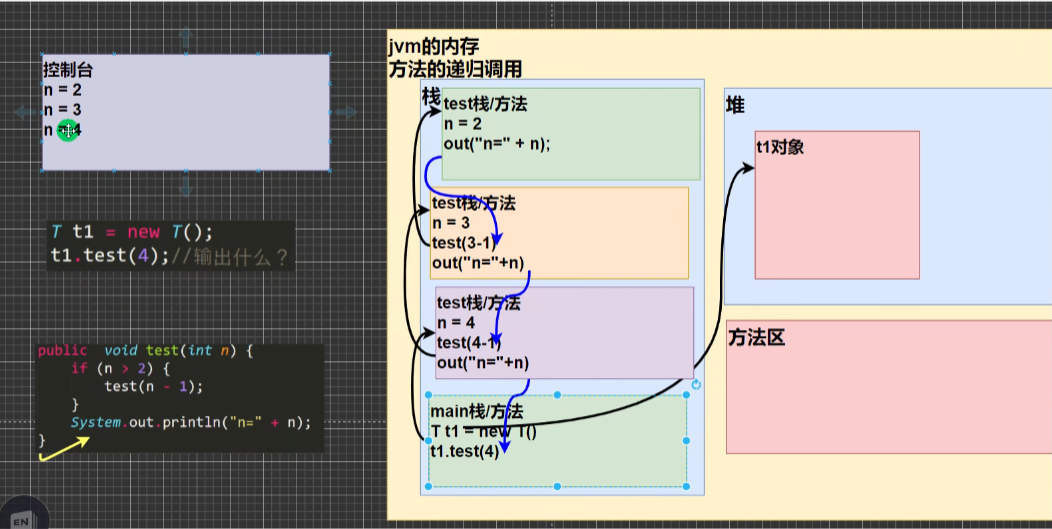
- 执行一个方法时,就创建一个新的受保护的独立空间(栈空间)
- 方法的局部变量是独立的,不会相互影响, 比如n变量
- 如果方法中使用的是引用类型变量(比如数组,对象),就会共享该引用类型的数据
- 递归必须向退出递归的条件逼近, 否则就是无限递归,出现StackOverflowError,栈溢出错误)
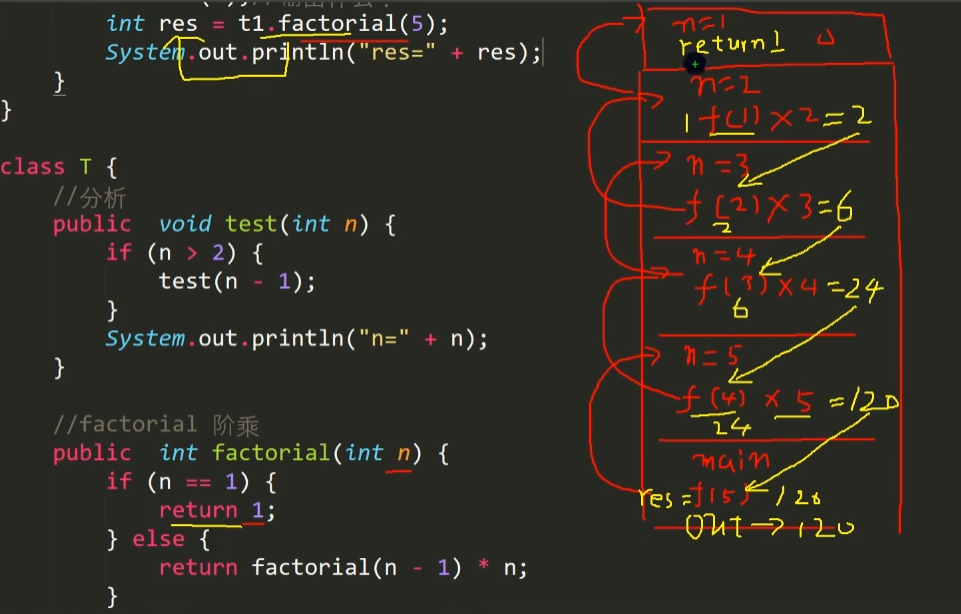
- 当一个方法执行完毕,或者遇到return时,就会返回,遵守谁调用,就将结果返回给谁
7.4.2 执行机制
案例:阶乘
1
2
3
4
5
6
7public int factorial(int n) {
if(n == 1) {
return 1
} else {
return factorial(n - 2) * n;
}
}
案例:迷宫
1
2
3
4
5
6
7
8
9
10
11
12
13
14
15
16
17
18
19
20
21
22
23
24
25
26
27
28
29
30
31
32
33
34
35
36
37
38
39
40
41
42
43
44
45
46
47
48
49
50
51
52
53
54
55
56
57
58
59
60
61
62
63
64
65
66
67
68
69
70
71
72
73
74
75
76public class MiGong{
public static void main(String[] args) {
// 先创建迷宫,二维数组表示。规定0表示可以走,1表示障碍物
int[][] map = new int[8][7];
for(int i = 0; i < 7; i++) {
map[0][i] = 1;
map[7][i] = 1;
}
for(int i = 0; i < 8; i++) {
map[i][0] = 1;
map[i][6] = 1;
}
map[3][1]= 1;
map[3][2] = 1;
map[2][2] = 1;
System.out.println("========当前地图情况========");
for(int i = 0; i < map.length; i++) {
for(int j = 0; j < map[i].length; j++) {
System.out.print(map[i][j] + " ");
}
System.out.println();
}
// 定义findWay给老鼠找路
T t = new T();
t.findWay(map, 1, 1);
System.out.println("========找路的情况========");
for(int i = 0; i < map.length; i++) {
for(int j = 0; j < map[i].length; j++) {
System.out.print(map[i][j] + " ");
}
System.out.println();
}
}
}
class T {
//1. findWay 方法就是专门来找出迷宫的路径
//2. 如果找到,就返回 true ,否则返回 false
//3. map 就是二维数组,即表示迷宫
//4. i,j 就是老鼠的位置,初始化的位置为(1,1)
//5. 因为我们是递归的找路,所以我先规定 map 数组的各个值的含义
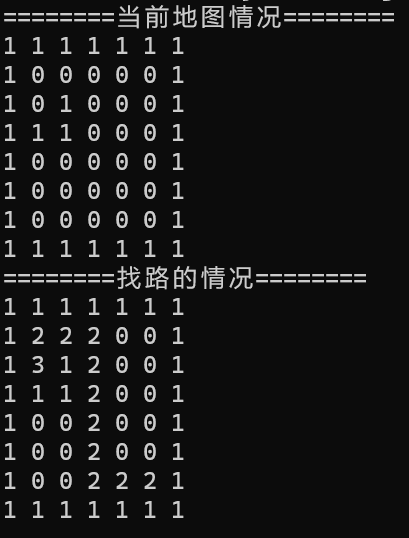
// 0 表示没有走过可以走(无障碍) 1 表示障碍物 2 表示走过且可以走通 3 表示走过,但是走不通是死路
//6. 当 map[6][5] =2 就说明找到通路,就可以结束,否则就继续找.
//7. 先确定老鼠找路策略 下->右->上->左
public boolean findWay(int[][] map, int i, int j) {
if(map[6][5] == 2) { //找到出口
return true;
} else {
if(map[i][j] == 0) { //当前位置没有障碍物可以走
// 先假设这个位置可以走通
map[i][j] = 2;
// 判断下一个位置(4个方向是否走得通)
if(findWay(map, i + 1, j)) { //下
return true;
} else if(findWay(map, i, j + 1)){ //右
return true;
} else if(findWay(map, i - 1, j)){ //上
return true;
} else if(findWay(map, i, j - 1)){ //左
return true;
} else { //当前位置四个方向都试过了,走不通
map[i][j] = 3;
return false;
}
} else { //map[i][j]=1,2,3 当前位置是障碍物走不通,或者已经走过(2,3)
return false;
}
}
}
}
7.5 方法重载 Overload
java 中允许同一个类中,多个同名方法的存在,但要求**形参列表不一致**!
减轻了起名和记名的麻烦
注意事项
- 方法名必须相同
- 形参列表必须不同(形参类型、个数、顺序至少有一样不同,形参名无要求)
- 返回类型无要求
案例
1
2
3
4
5
6
7
8
9
10
11
12
13
14
15
16
17
18
19
20
21
22
23
24
25
26
27
28
29public class OverLoad{
public static void main(String[] args) {
Methods md = new Methods();
System.out.println(md.max(10, 20));
System.out.println(md.max(10.2, 20.5));
System.out.println(md.max(33.0, 20.1, 44.0));
System.out.println(md.max(33.0, 20.1, 44));
}
}
class Methods{
int max(int a, int b) {
return a > b ? a : b;
}
double max(double a, double b) {
return a > b ? a : b;
}
double max(double a, double b, double c) {
return (a > b ? a : b) > c ? (a > b ? a : b) : c;
}
double max(double a, double b, int c) {
return (a > b ? a : b) > c ? (a > b ? a : b) : c;
}
}
7.6 可变参数
java 允许将同一个类中多个同名同功能但参数个数不同的方法,封装成一个方法。就可以通过可变参数实现
访问修饰符 返回类型 方法名(数据类型… 形参名) { }
注意事项
- 可变参数的实参个数可以为0或者任意多个
- 可变参数的实参可以为数组
- 可变参数的本质就是数组
- 可变参数可以和普通类型的参数一起放在形参列表,单必须保证可变参数在最后
- 一个新参列表只能出现一个可变参数
案例
1
2
3
4
5
6
7
8
9
10
11
12
13
14
15
16
17
18
19
20
21
22
23
24
25public class VarParameterExercise {
public static void main(String[] args) {
HspMethod hm = new HspMethod();
System.out.println(hm.showScore("milan" , 90.1, 80.0 ));
System.out.println(hm.showScore("terry" , 90.1, 80.0,10,30.5,70 ));
}
}
class HspMethod {
/*
有三个方法,分别实现返回姓名和两门课成绩(总分),
返回姓名和三门课成绩(总分),返回姓名和五门课成绩(总分)。
封装成一个可变参数的方法
*/
//分析 1. 方法名 showScore 2. 形参(String ,double... ) 3. 返回 String
public String showScore(String name ,double... scores ) {
double totalScore = 0;
for(int i = 0; i < scores.length; i++) {
totalScore += scores[i];
}
return name + " 有 " +scores.length + "门课的成绩总分为=" + totalScore;
}
}
7.7 作用域
基本作用
全局变量:也就是属性(成员变量),作用域在整个类体中
局部变量:一般指在成员方法中定义的变量
全局变量可以不赋值直接使用,因为有默认值。局部变量必须先赋值再使用,因为没有默认值。
注意事项
属性和局部变量可以重名,访问时遵循就近原则。
在同一个作用域中,比如在同一个成员方法中, 两个局部变量,不能重名。
属性生命周期较长,伴随着对象的创建而创建,伴随着对象的销毁而销毁。局部变量,生命周期较短,伴随着它的代码块的执行而创建,伴随着代码块的结束而销毁。即在一次方法调用过程中。
作用域范围不同:全局变量/属性可以被本类使用,或其他类使用(通过对象调用)。局部变量只能在本类中对应的方法中使用
修饰符不同:全局变量/属性可以加修饰符局部变量不可以加修饰符
7.8 构造方法
7.8.1 基本介绍
- 构造方法又叫构造器(constructor),是类的一种特殊的方法,它的主要作用是完成对新对象的初始化(调用时对象已经创建)。
7.8.2 注意事项
- 构造器名与类名相同
- 构造器没有返回值,也不能加void
- 一个类中可以定义多个构造器,即构造器重载
- 构造器是完成对对象的初始化,并不是创建对象
- 在new创建对象时,系统自动调用该类的构造方法。
- 如果程序员没有定义构造器,系统会自动生成一个默认无参的构造器(默认构造器),如Dog(){},使用javap指令反编译看看。javap dog.class
- **一旦定义了自己的构造器,默认的构造器就被覆盖了,就不能再使用默认的无参构造器,除非显示的定义一下,即Dog(){}**(重要!)
案例
1
2
3
4
5
6
7
8
9
10
11
12
13
14class Person {
String name;
int age;
//构造器
public Person() {
age = 18;
}
public Person(String pName, int pAge) {
name = pName;
age = pAge;
}
}
7.9 对象创建的流程分析(重要!)
案例
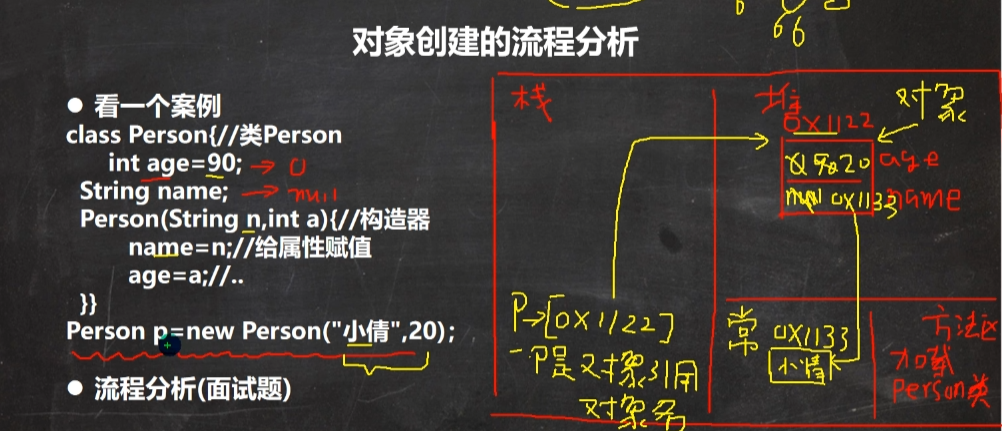
流程
- 先加载Person类信息到方法区
- 在堆中开辟空间,进行默认初始化
- 然后运行构造方法,给属性赋值(基本数据类型保存在堆中,引用类型保存在常量词)
7.10 this关键字
java虚拟机会给每个对象分配一个this,表示当前对象的引用。
1
2
3
4
5
6
7
8
9
10
11
12
13
14
15class Person {
String name;
int age;
//问题:构造器中的name和age是局部变量
public Person(String name, int age) {
name = Name;
age = Age;
}
//解决:用this关键字指明当前对象的属性
public Person(String Name, int Age) {
this.name = Name;
this.age = Age;
}
}7.10.1 内存示意图
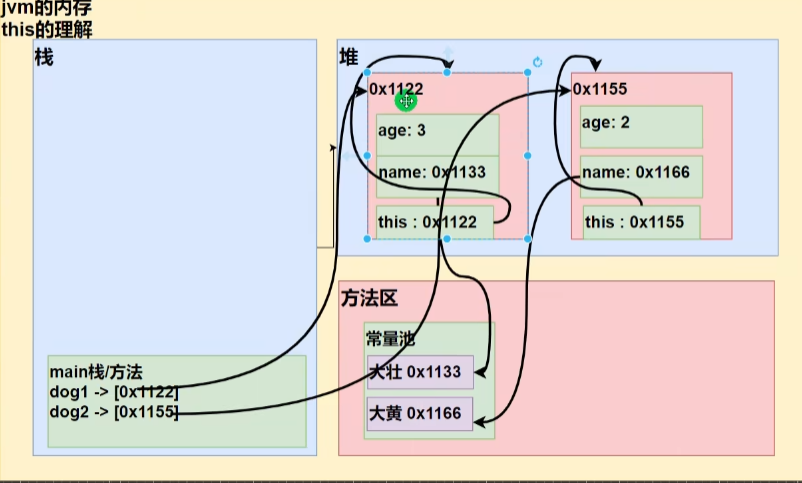
- 使用**this.hashcode()**可以输出对象的唯一标识
7.10.2 this注意事项
- this 关键字可以用来访问本类的属性、方法、构造器
- this 用于区分当前类的属性和局部变量
- 访问成员方法的语法:this.方法名(参数列表);
- 访问构造器语法:this(参数列表); 注意只能在构造器中使用(即只能在构造器中访问另外一个构造器, 必须放在第一条语句)
- this 不能在类定义的外部使用,只能在类定义的方法中使用。
第八章 面向对象编程(中级)
8.1 开发工具IDEA
8.1.1 目录结构
- src:存放java源码文件
- out:存放编译后的class文件
8.1.2 常用快捷键(重要!)
- 删除当前行, 默认是 ctrl + Y 自己配置 ctrl + d
- 复制当前行, 自己配置 ctrl + alt + 向下光标
- 补全代码 alt + /
- 添加注释和取消注释 ctrl + /
- 导入该行需要的类 先配置 auto import , 然后使用 alt+enter 即可
- 快速格式化代码 ctrl + alt + L
- 快速运行程序,默认是shift + F10,自己定义 alt + R
- 生成构造器等 alt + insert [提高开发效率]
- 查看一个类的层级关系 ctrl + H [学习继承后,非常有用]
- 将光标放在一个方法上,输入 ctrl + B , 可以定位到方法 [学继承后,非常有用]
- 自动的分配变量名 , 通过在后面加.var [老师最喜欢的]
- 另起一行编写代码,**shift + enter**
- 将当前行代码向上/下移动,ctrl + shift + ↑ / ↓
8.1.3 自定义模板(提高开发速度)
- 设置:file -> settings -> editor-> Live templates ->
- 如fori , sout等,多用多查孰能生巧
8.2 包
8.4.1 作用
- 区分相同名字的类
- 当类很多时,便于管理类
- 控制访问范围
8.4.2 基本语法
package com.durango.xxx
package + 包名
8.4.3 包的本质
包的本质实际上就是创建不同的文件夹/目录来保存类文件
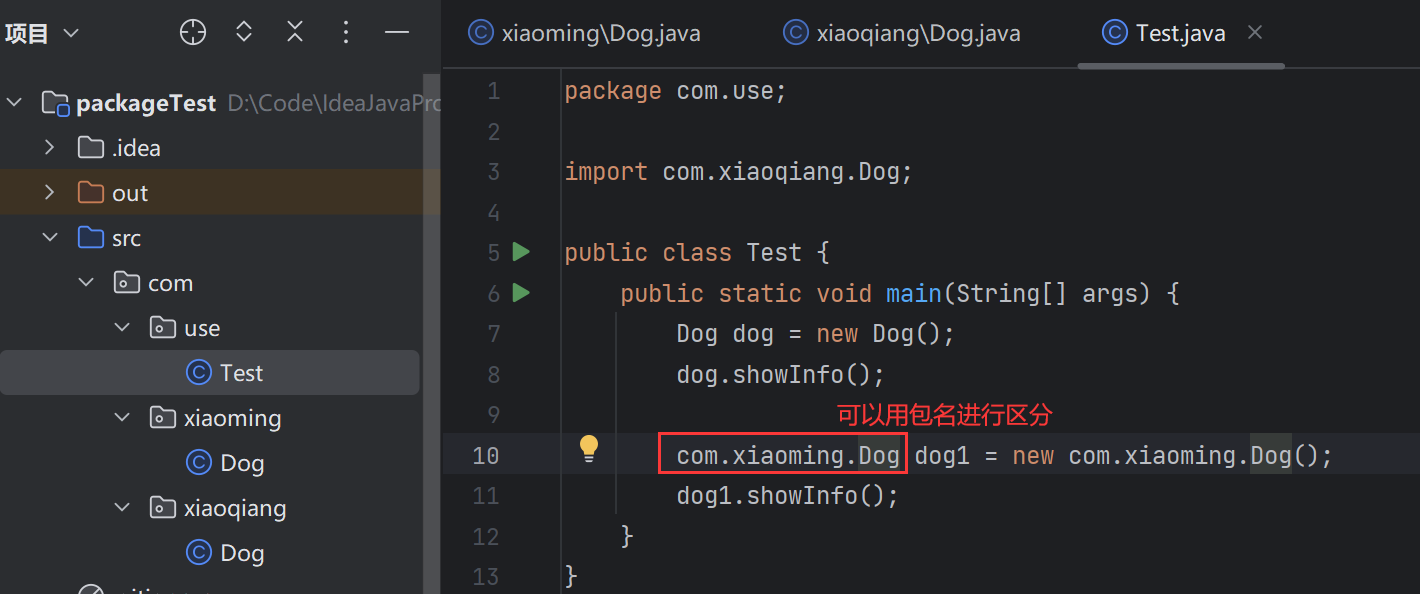
8.4.4 包的命名
- 命名规则
- 只能包含数字、字母、下划线、小圆点
- 不能用数字开头 ,如demo.12a
- 不能是关键字或保留字,如demo.class.exec
- 命名规范
- 一般是 小写字母+小圆点
- 包名一般是 com.公司名.项目名.业务模块名
- 如,com.sina.crm.user com.sina.crm.order com.sina.vrm.utils
8.4.5 常用的包
- java.lang.* :lang 包是基本包,默认引入,不需要再引入.
- java.util.* :util 包,系统提供的工具包, 工具类,使用 Scanner
- java.net.* :网络包,网络开发
- java.awt.* :是做 java 界面的开发,GUI
8.4.6 包的导入
两种方式
1
2
3import java.util.Scanner; //推荐,用到哪个导入哪个
import java.util.*使用系统提供Arrays完成数组排序
1
2
3
4
5
6
7
8
9
10
11
12
13
14
15import java.util.Arrays;
public class Import01 {
public static void main(String[] args) {
//使用系统提供 Arrays 完成 数组排序
int[] arr = {-1, 20, 2, 13, 3};
Arrays.sort(arr);
//输出排序结果
for (int i = 0; i < arr.length ; i++) {
System.out.print(arr[i] + "\t");
}
}
8.4.9 注意事项
package的作用是声明当前类所在的包,需要放在类的最上面,一个类中最多只有一句package
import指令位置放在package的下面,在类定义前面,可以有多句且没有顺序要求
8.5 访问修饰符 Modifier
8.5.1 基本介绍(必背)
公开级别:用 public 修饰,对外公开
受保护级别:用 protected 修饰,对子类和同一个包中的类公开
默认级别:没有修饰符号,向同一个包的类公开.
私有级别:用 private 修饰,只有类本身可以访问,不对外公开.
| 访问级别 | 访问修饰符 | 同类 | 同包 | 子类 | 不同包 |
|---|---|---|---|---|---|
| 公开 | public | √ | √ | √ | √ |
| 受保护 | protected | √ | √ | √ | × |
| 默认 | 无修饰符 | √ | √ | × | × |
| 私有 | private | √ | × | × | × |
| 访问权限 | 可见性 | 访问性 |
|---|---|---|
| public | 所有类、接口、方法、变量都可见 | 所有类、接口、方法、变量都可访问 |
| protected | 当前包中的所有类、接口、方法、变量都可见,其他包中的子类也可见 | 当前包中的所有类、接口、方法、变量都可访问,其他包中的子类也可访问 |
| default | 当前包中的所有类、接口、方法、变量都可见 | 当前包中的所有类、接口、方法、变量都可访问 |
| private | 当前类中的所有方法和变量都可见 | 当前类中的所有方法和变量都可访问 |
8.5.2 注意事项
- 修饰符可以用来修饰类中的属性、成员方法以及类
- 只有默认的和public才能修饰类!,并且遵循上述访问权限的特点。
8.6 封装 Encapsulation
8.6.1 封装介绍
封装(encapsulation)就是把抽象出的数据[属性]和对数据的操作[方法]封装在一起,数据被保护在内部,程序的其它部分(比如不同类,不同包)只有通过被授权的操作[方法],才能对数据进行操作。
8.6.2 作用
- 隐藏实现细节
- 可以对数据进行验证,保证安全合理
8.6.3 封装实现步骤
将属性进行私有化private
提供一个公共的public set方法 ,用于对属性判断和赋值
1
2
3
4public void setXxx(类型 参数名) {
// 加入数据验证的逻辑
属性 = 参数名;
}提供一个公共的public get方法 ,用于获取属性的值
1
2
3puclic 类型 getXxx() {
return 属性;
}
8.6.4 快速入门案例
需求:新建一个Person类,不能随便查看人的年龄、工资等隐私,并对设置的年龄、姓名进行合理验证。年龄合理则设置,否则给默认值。年龄必须在1-120。name长度在2-6个字符之间
alt + insert:编写set和get方法的快捷键。
1 | class Person { |
8.7 继承 Extends
8.7.1 继承介绍
继承可以解决代码复用, 让我们的编程更加靠近人类思维. 当多个类存在相同的属性(变量)和方法时,可以从这些类中抽象出父类, 在父类中定义这些相同的属性和方法,所有的子类不需要重新定义这些属性和方法,只需要通过 extends 来声明继承父类即可。画出继承的示意图。
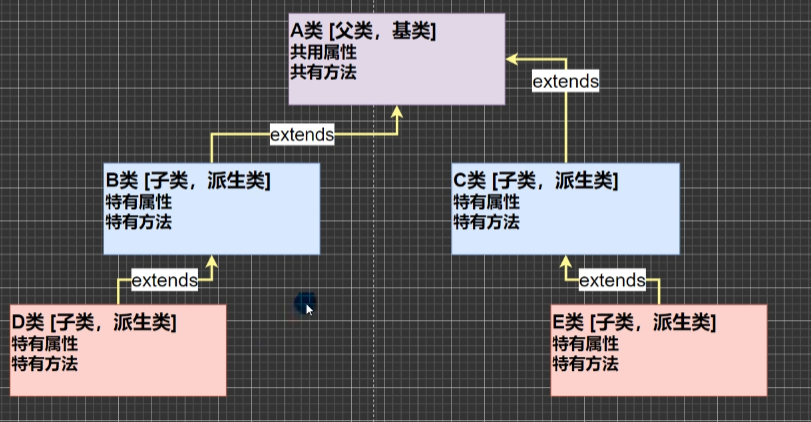
基本语法
class 子类 extends 父类 { }
- 子类会自动拥有父类定义的属性和方法
- 父类又叫超类、基类,子类又叫派生类
**ctrl + H**:可以看到类的继承关系
8.7.2 继承细节
- 子类继承了所有的属性和方法,非私有的属性和方法可以在子类直接访问, 但是私有属性和方法不能在子类直接访问,要通过父类提供公共的方法去访问
子类必须调用父类的构造器, 完成父类的初始化
当创建子类对象时,不管使用子类的哪个构造器,默认情况下总会去调用父类的无参构造器,如果父类没有提供无参构造器(无参构造器被覆盖),则必须在子类的构造器中用 super 去指定使用父类的哪个构造器完成对父类的初始化工作,否则,编译不会通过(怎么理解。) [举例说明]。若父类提供了无参构造器,super写不写都行。
如果希望指定去调用父类的某个构造器,则显式的调用一下 : super(参数列表)
super 在使用时,必须放在构造器第一行(super 只能在构造器中使用)
super() 和 this() 都只能放在构造器第一行,因此这两个方法不能共存在一个构造器。如果写了this(),隐式的super()将不会被该构造器调用,而是会在this()中调用super()
java 所有类都是 Object 类的子类, Object 是所有类的基类. ctrl + H可以看到类的继承关系
父类构造器的调用不限于直接父类!将一直往上追溯直到 Object 类(顶级父类)
子类最多只能继承一个父类(指直接继承),即 java 中是单继承机制。思考:如何让 A 类继承 B 类和 C 类? 【A 继承 B, B 继承 C】
不能滥用继承,子类和父类之间必须满足 is-a 的逻辑关系
8.7.3 继承本质分析(重要!)
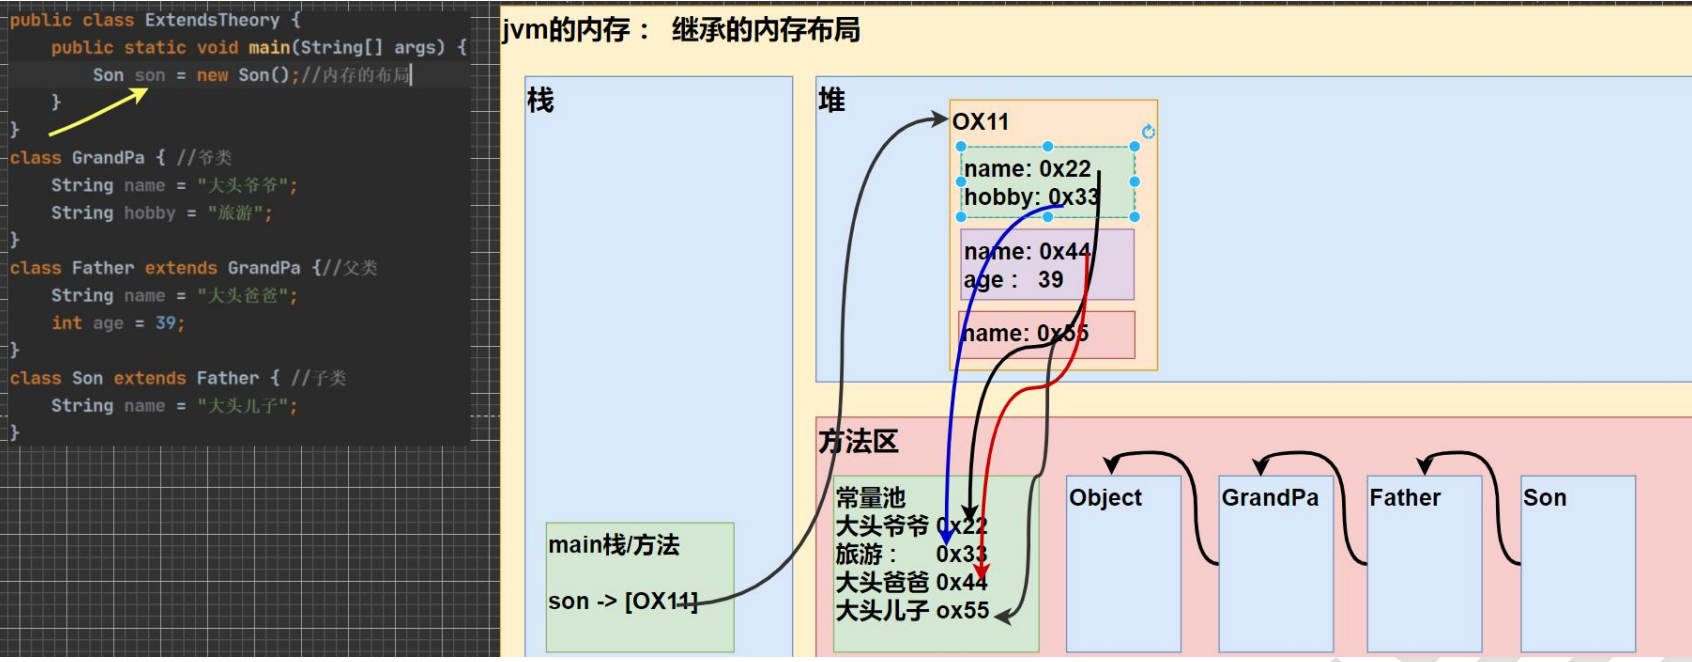
- 创建Son对象
- 在方法区中加载Son类及其父类信息
- 在堆中给GranPa开辟空间,并初始化其属性,引用数据类型时存放在方法区的常量池中
- 在堆中给Father开辟空间,并初始化其属性,基本数据类型直接存放在堆中
- 最后给Son开辟空间,并初始化其属性
- 这时请大家注意,要按照查找关系来返回信息
- 首先看子类是否有该属性,如果子类有这个属性,并且可以访问,则返回信息
- 如果子类没有这个属性,就看父类有没有这个属性(如果父类有该属性,并且可以访问,就返回信息..)
- 如果父类没有就按照2的规则,继续找上级父类,直到 Object…
8.7.4 本质分析案例
Exercise01
1
2
3
4
5
6
7
8
9
10
11
12
13
14
15
16
17
18
19
20
21
22
23
24
25
26
27
28
29
30
31
32package com.extend;
public class ExtendsExercise01 {
public static void main(String[] args) {
B b = new B();
}
}
class A {
public A() {
System.out.println("a");
}
public A(String name) {
System.out.println("a name");
}
}
class B extends A {
public B() {
this("abc"); // 不会调用super()
System.out.println("b");
}
public B(String name) { //会调用super()
System.out.println("b name");
}
}
// 结果
// a
// b name
//Exercise02
1
2
3
4
5
6
7
8
9
10
11
12
13
14
15
16
17
18
19
20
21
22
23
24
25
26
27
28
29
30
31
32
33
34
35package com.extend;
public class ExtendsExercise02 {
public static void main(String[] args) {
C2 c = new C2();
}
}
class A2 {//A2 类
public A2() {
System.out.println("我是 A2 类");
}
}
class B2 extends A2 { //B2 类,继承 A2 类 //main 方法中: C2 c =new C2(); 输出么内容? 3min
public B2() {
System.out.println("我是 B2 类的无参构造");
}
public B2(String name) {
System.out.println(name + "我是 B2 类的有参构造");
}
}
class C2 extends B2 { //C2 类,继承 B2 类
public C2() {
this("hello");
System.out.println("我是 c 类的无参构造");
}
public C2(String name) {
super("hahah");
System.out.println("我是 c 类的有参构造");
}
}
// 我是 A2 类
// hahah我是 B2 类的有参构造
// 我是 c 类的有参构造
// 我是 c 类的无参构造
8.8 super关键字
8.8.1 基本介绍
- super 代表父类的引用,用于访问父类的属性、方法、构造器
- 不能访问父类私有的private属性、方法
- 访问父类属性:super.属性名
- 访问父类方法:super.方法名(参数列表)
- 访问父类构造器:super(参数列表) 只能放在构造器第一句,只能出现一句
- 如果父类中属性设置为private,则不能通过super访问。可以在父类中设置公共的get方法,然后在子类中调用get方法获取父类私有属性。
8.8.2 作用和细节
- 调用父类的构造器的好处(分工明确, 父类属性由父类初始化,子类的属性由子类初始)
- 当子类中有和父类中的成员**(属性和方法)重名时**,为了访问父类的成员,必须通过super。如果没有重名,使用super、this、直接访问是一样的效果!
- super的访问不限于直接父类,如果爷爷类和本类中有同名的成员,也可以使用super去访问爷爷类的成员; 如果多个基类(上级类)中都有同名的成员,使用super访问遵循就近原则。A->B->C,当然也需要遵守访问权限的相关规则
8.8.3 super和this的比较
| 区别点 | this | super |
|---|---|---|
| 访问属性 | 访问本类中的属性,如果本类中没有此属性,则从父类中继续查找 | 从父类开始查找属性 |
| 调用方法 | 访问本类中的方法,如果本类中没有此方法,则从父类中继续查找 | 从父类开始查找方法 |
| 调用构造器 | 调用本类构造器,必须放在构造器的首行 | 调用父类的构造器,必须放在子类构造器的首行 |
| 特殊 | 对当前对象的引用 | 对父类对象的引用 |
8.9 方法重写/重构/覆盖 Override
8.9.1 基本介绍
方法覆盖(重写)就是子类有一个方法和父类的某个方法的名称、返回类型、参数一样,那么我们就说子类的这个方法覆盖了父类的方法
8.9.2 注意事项
- 子类的方法的方法名称,形参列表要和父类方法的形参列表,方法名称完全一样。
- 子类方法的返回类型和父类方法返回类型一样,或者是父类返回类型的子类。比如父类返回类型是Object,子类方法返回类型是String
- 子类方法不能缩小父类方法的访问权限。public > protected > 默认 > privat
8.9.3 重写与重载的比较
| 名称 | 发生范围 | 方法名 | 形参列表 | 返回类型 | 修饰符 |
|---|---|---|---|---|---|
| 重载overload | 本类 | 必须一样 | 类型、个数、顺序至少一个不同 | 无要求 | 无要求 |
| 重写override | 父子类 | 必须一样 | 必须一样 | 子类重写的方法的返回类型和父类放回类型一致,或者是其子类 | 子类方法不能缩小父类方法的访问权限 |
8.9.4 案例
编写一个 Person 类,包括属性/private(name、age),构造器、方法 say(返回自我介绍的字符串)。
编写一个 Student 类,继承 Person 类,增加 id属性/private,、score 属性/private,以及构造器,定义 say 方法(返回自我介绍的信息)。
在 main 中,分别创建 Person 和
1 | package com.override_; |
1 | package com.override_; |
8.10 多态 Polymorphic
8.10.1 一个场景
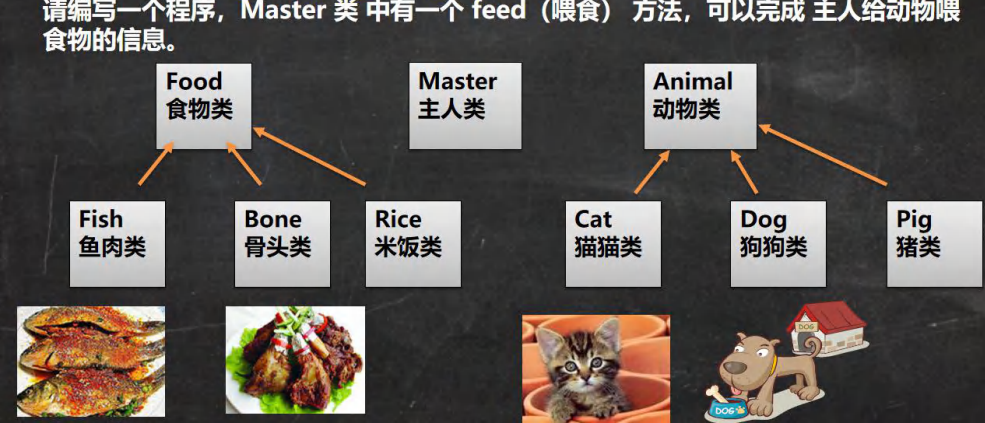
需要在Master类中重载3*3=9个feed方法,才能完成“主人给什么动物喂什么食物”的信息
1 | // 完成主人给小狗 喂 骨头 |
8.10.2 基本介绍
多态:方法或对象具有多种形态,建立在封装和继承基础上。
(1)方法的多态:重写和重载就体现多态
(2)对象的多态(核心)
- 一个对象的编译类型和运行类型可以不一致
- 编译类型在定义对象时,就确定了,不能改变
- 运行类型是可以变化的.
- 编译类型看定义时=号的左边;运行类型看=号的右边

1 | // animal 编译类型时Animal,运行类型是Dog |
8.10.3 注意事项
多态的前提:两个类存在继承关系
多态的向上转型
本质:父类的引用指向了子类的对象
语法:**父类类型 引用名 = new 子类类型( );**
特点:
编译类型看左边,运行类型看右边
可以调用父类中的所有成员(需要遵循访问权限)
不能调用子类中的特有成员
方法的调用看运行类型,属性的调用看编译类型。
最终运行效果看子类的具体实现,即调用方法时,按照从子类开始查找方法,子类没有则查看父类。
Animal类有【public】cry,eat,run,sleep方法和【private】name属性,Cat类继承了Animal,重写了run方法,增加了一个catchMouse方法
1
2
3
4
5
6
7
8
9
10
11
12
13
14
15
16
17
18
19
20
21
22
23
24package com.poly_.detail;
public class PolyDetail {
public static void main(String[] args) {
// 向上转型
Cat animal = new Cat("小花");
// Object obj = new Cat("小花");
// 可以调用父类中所有成员(遵守访问权限)
animal.cry();
// animal.name 不能访问父类private的成员
// annimal.catchMouse(); 不能访问子类特有的方法
animal.eat();
animal.run();
animal.sleep();
// 结果
// 小猫叫
// 动物吃
// 动物跑
// 动物睡
}
}
多态的向下转型
- 本质:子类的引用指向父类的引用
- 语法:**子类类型 引用名 = (子类类型)父类引用;**
- 特点:
- 要求父类的引用必须指向的是当前目标类型的对象;
- 当向下转型后,可以调用子类类型中的所有成员(包括特有的)
1
2
3
4
5
6
7
8
9
10
11
12
13
14
15
16
17
18
19package com.poly_.detail;
public class PolyDetail {
public static void main(String[] args) {
// 向上转型
Cat animal = new Cat("小花");
// annimal.catchMouse(); 不能访问子类特有的方法
// 向下转型
// 需要animal原本就指向Cat对象
// 向下转型后可以访问子类特有对象
Cat cat = (Cat)animal;
cat.catchMouse();
}
}属性没有重写之说!属性的值看编译类型
1
2
3
4
5
6
7
8
9
10
11
12
13
14
15public class PolyDetail02 {
public static void main(String[] args) {
//属性没有重写之说!属性的值看编译类型
Base base = new Sub();//向上转型
System.out.println(base.count);// ? 看编译类型 10
Sub sub = new Sub();
System.out.println(sub.count);//? 20
}
}
class Base { //父类
int count = 10;//属性
}
class Sub extends Base {//子类
int count = 20;//属性
}
instanceOf 比较操作符,用于判断对象的**运行类型**是否为 XX 类型或 XX 类型的子类型
1
2
3
4
5
6
7
8
9
10
11
12
13public class PolyDetail03 {
public static void main(String[] args) {
BB bb = new BB();
System.out.println(bb instanceof BB);// true
System.out.println(bb instanceof AA);// true
//aa 编译类型 AA, 运行类型是 BB
//BB 是 AA 子类
AA aa = new BB();
System.out.println(aa instanceof AA); // true
System.out.println(aa instanceof BB); // true, 判断的是aa的运行类型
}
}一个题目
1 | class Base { |
8.10.4 java的动态绑定机制(非常重要!)
当调用对象方法的时候,该方法会和对象的内存地址/运行类型绑定(动态绑定)
当调用对象属性的时候,没有动态绑定机制,哪里声明,哪里使用
第一个案例
1
2
3
4
5
6
7
8
9
10
11
12
13
14
15
16
17
18
19
20
21
22
23
24
25
26
27
28
29
30
31
32
33
34
35
36
37
38
39
40
41
42
43
44
45
46
47package com.poly_;
public class DynamicBanding {
public static void main(String[] args) {
A a = new B(); // 向上转型
// 分析
/* 调用方法时看运行类型
a.sum()调用的是B类中的sum(),返回getI+i=20+20
a.sum1()同理 i+20=20+20=40
*/
System.out.println(a.sum()); // 40
System.out.println(a.sum1()); // 40
}
}
class A { //父类
public int i = 10;
public int sum() {
return getI() + 10;
}
public int sum1() {
return i + 10;
}
public int getI() {
return i;
}
}
class B extends A{ //子类
public int i = 20;
public int sum() {
return getI() + 20;
}
public int sum1() {
return i + 20;
}
public int getI() {
return i;
}
}第二个案例
1
2
3
4
5
6
7
8
9
10
11
12
13
14
15
16
17
18
19
20
21
22
23
24
25
26
27
28
29
30
31
32
33
34
35
36
37
38
39
40
41
42
43package com.poly_;
public class DynamicBanding {
public static void main(String[] args) {
A a = new B(); // 向上转型
// 分析
/* 调用方法时看运行类型(动态绑定),子类中没有该方法则向上找父类
a的运行类型是B,B中没有sum()方法,则调用父类A中的sum()方法。在A中的sum()方法中会调用
getI(),这个getI()也会动态绑定运行类型,即调用B中的getI()。
最终返回(B)getI+10=20+10=30
a的运行类型是B,B中没有sum1()方法,则调用父类A中的sum1()方法。属性i不会动态绑定
返回(A)i+10=20
*/
System.out.println(a.sum()); // 30
System.out.println(a.sum1()); // 20
}
}
class A { //父类
public int i = 10;
public int sum() {
return getI() + 10; //运行类型是B时,会调用B类的getI()
}
public int sum1() {
return i + 10;
}
public int getI() {
return i;
}
}
class B extends A{ //子类
public int i = 20;
public int getI() {
return i;
}
}第三个案例
1
2
3
4
5
6
7
8
9
10
11
12
13
14
15
16
17
18
19
20
21
22
23
24
25
26
27
28
29
30
31
32
33
34
35
36
37
38
39
40
41
42
43
44
45package com.poly_;
public class DynamicBanding {
public static void main(String[] args) {
A a = new B(); // 向上转型
// 分析
/* 调用方法时看运行类型
a.sum()调用的是B类中的sum(),sum()会调用getI(),此时B类中没有getI(),
会向上查找调用父类A的getI()。属性没有动态绑定机制,A的getI()中返回的是A的i
最终结果 (A)getI+20 = (A)i+20 = 10+20 = 30
a.sum1()返回(B)i+20 = 40
*/
System.out.println(a.sum()); // 30
System.out.println(a.sum1()); // 40
}
}
class A { //父类
public int i = 10;
public int sum() {
return getI() + 10;
}
public int sum1() {
return i + 10;
}
public int getI() {
return i;
}
}
class B extends A{ //子类
public int i = 20;
public int sum() {
return getI() + 20;
}
public int sum1() {
return i + 20;
}
}
8.11 多态的应用
8.11.1 多态数组
数组的定义类型为父类类型,里面保存的实际元素类型为子类类型
案例:
- Person类:name, age, say();
- Student类:继承Person:score, 重写say(),特有study();
- Teacher类:继承Person,salary,重写say(),特有teach()
1 | package com.poly_.polyarr; |
8.11.2 多态参数
- 方法定义的形参类型为父类类型,实参类型为子类类型。
- 案例
- Employee类:name, salary, getAnnual( )
- Worker类:特有work()
- Manager类:bonus, 重写getAnnual( ), 特有manage( )
1 | package com.poly_.polyparameter; |
8.12 Object类详解
8.12.1 equals方法
- == 比较运算符
- 如果判断基本数据类型,判断的是值是否相等
- 如果判断引用数据类型,判断的是地址是否相等
equals方法
equals: 是Object类中的方法,只能判断引用类型,默认判断的是地址是否相等,子类中往往重写该方法,用于判断内容(值)是否相等。比如Integer,String【看看String 和 Integer的equals 源代码】
Object类中的equals
1
2
3public boolean equals(Object obj) {
return (this == ojb); /默认比较两个引用地址是否相同(指向同一个对象)
}String中重写的equals
1
2
3
4
5
6
7
8
9
10
11
12
13
14
15
16
17
18
19
20
21public boolean equals(Object anObject) {
if (this == anObject) { // 同一个对象
return true;
}
if (anObject instanceof String) { // 判断类型
String anotherString = (String)anObject; // 向下转型
int n = value.length;
if (n == anotherString.value.length) { // 判断长度
char v1[] = value;
char v2[] = anotherString.value;
int i = 0;
while (n-- != 0) { // 比较每一个字符
if (v1[i] != v2[i])
return false;
i++;
}
return true;
}
}
return false;
}Integer中重写的equals
1
2
3
4
5
6public boolean equals(Object obj) {
if (obj instanceof Integer) {
return value == ((Integer)obj).intValue();
}
return false;
}
重写equals方法
- 重写Person类中的equals方法,当两个Person类的name, age, gender相同时,就返回true
1
2
3
4
5
6
7
8
9
10
11
12
13
14
15
16
17
18
19
20
21
22
23
24
25
26
27
28
29
30
31
32
33
34
35
36package com.object_;
public class Equals02 {
public static void main(String[] args) {
Person person = new Person("jack", 10, '男');
Person person1 = new Person("jack", 10, '男');
System.out.println(person.equals(person1));
}
}
class Person {
private String name;
private int age;
private char gender;
public Person(String name, int age, char gender) {
this.name = name;
this.age = age;
this.gender = gender;
}
//重写equals(参考String中的equals)
public boolean equals(Object obj) {
if (this == obj){ //如果是同一个对象直接返回true
return true;
}
if (obj instanceof Person) { //判断(运行)类型,是Person类才(能)比较
// 进行向下转型 (为什么?obj的运行类型虽然判断为Person类,但是
// 编译类型是Object,不能访问子类Person中特有的属性方法,需要向下转型)
Person p = (Person)obj;
return this.name.equals(p.name) && this.age == p.age && this.gender == p.gender;
}
return false;
}
}
8.12.2 hashcode方法
- 6个结论
- 提高具有哈希结构的容器的效率!如java.util.Hashtable中提供的哈希表
- 两个引用,如果指向的是同一个对象,则哈希值肯定是一样的!
- 两个引用,如果指向的是不同对象,则哈希值是不一样的
- 哈希值一般是通过该对象的内部地址转换成一个整数来实现的,不能完全将哈希值等价于地址。
案例
1
2
3
4
5
6
7
8
9
10
11
12
13
14
15
16
17
18
19
20package com.object_;
public class HashCode_ {
public static void main(String[] args) {
AA aa = new AA();
AA aa1 = new AA();
AA aa2 = aa;
System.out.println(aa.hashCode());
System.out.println(aa1.hashCode());
System.out.println(aa2.hashCode());
}
}
class AA {
}
// 1163157884
// 1956725890
// 1163157884
8.12.2 toString方法
默认返回:**全类名+@+哈希值的十六进制**,子类往往重写 toString 方法,用于返回对象的属性信息
查看 Object 的 toString 方法
1
2
3
4
5// (1)getClass().getName() 类的全类名(包名+类名 )
// (2)Integer.toHexString(hashCode()) 将对象的 hashCode 值转成 16 进制字符串
public String toString() {
return getClass().getName() + "@" + Integer.toHexString(hashCode());
}重写toString方法
1
2
3
4
5
6
7
8
9
10
11
12
13
14
15
16
17
18
19
20
21class Monster{
private String name;
private String job;
private double sal;
public Monster(String name, String job, double sal) {
this.name = name;
this.job = job;
this.sal = sal;
}
// 重写toString,快捷键alt+insert
public String toString() {
return "Monster{" +
"name='" + name + '\'' +
", job='" + job + '\'' +
", sal=" + sal +
'}';
}
}
当直接输出一个对象时,toString 方法会被默认的调用, 比如 System.out.println(monster); 就会默认调用
monster.toString()
8.12.3 finalize 方法
- 当对象被回收时,系统会自动调用该对象的finalize方法。子类可以重写该方法,做一些释放资源的操作。
- 什么时候回收:当某个对象没有任何引用时,则jvm就认为这个对象是一个垃圾对象,就会用垃圾回收机制来摧毁该对象,在摧毁该对象之前,会调用finalize方法。
- 垃圾回收机制的调用,是由系统来决定的(即有自己的GC算法),也可以通过System.gc()主动触发垃圾回收机制。
1 | package com.object_; |
8.13 断点调试 debug
8.13.1 介绍
- —步一步的看源码执行的过程,从而发现错误所在。
- 重要提示: 在断点调试过程中,是运行状态,是以对象的运行类型来执行的
- 断点调试是指在程序的某一行设置一个断点,调试时,程序运行到这一行时就会停住,然后你可以一步一步往下调试,调试过程中可以看各个变量当前的值,出错的话,调试到出错的代码行即显示错误,停下。进行分析从而找到这个Bug
- 断点调试时程序员必须掌握的技能
- 断点调试也能帮助我们查看java底层源代码的执行过程,提高程序员java水平
8.13.2 快捷键
- F7跳入:跳入方法内
- F8跳过:逐行执行代码
- shift + F8:跳出方法
- F9:resume执行到下一个断电
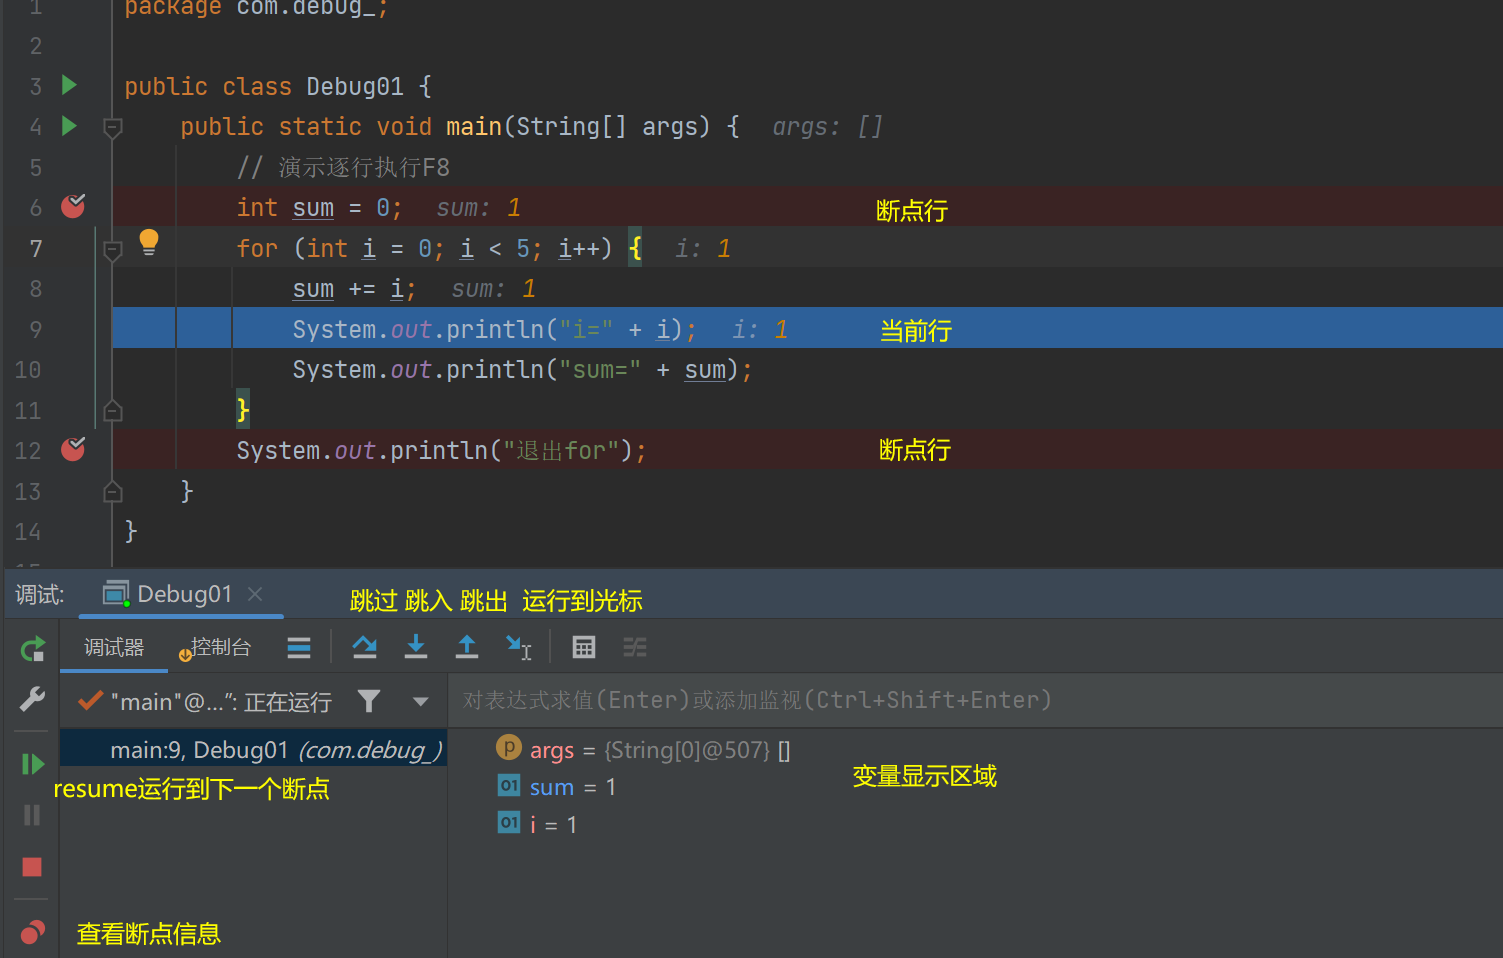
8.13.3 案例
- 使用断点调试,追踪对象创建的过程
- 使用断点调试,查看动态绑定机制如何工作
8.14 案例:零钱通
使用 Java 开发 零钱通项目 , 可以完成收益入账,消费,查看明细,退出系统等功能.
1 | 1) 先完成显示菜单,并可以选择 |
第九章 项目:房屋出租系统
9.1 项目需求
- 实现基于文本界面的《房屋出租软件》
- 能够实现对房屋信息的添加、修改和删除(用数组实现),并能够打印房屋明细表
9.2 界面设计
主菜单
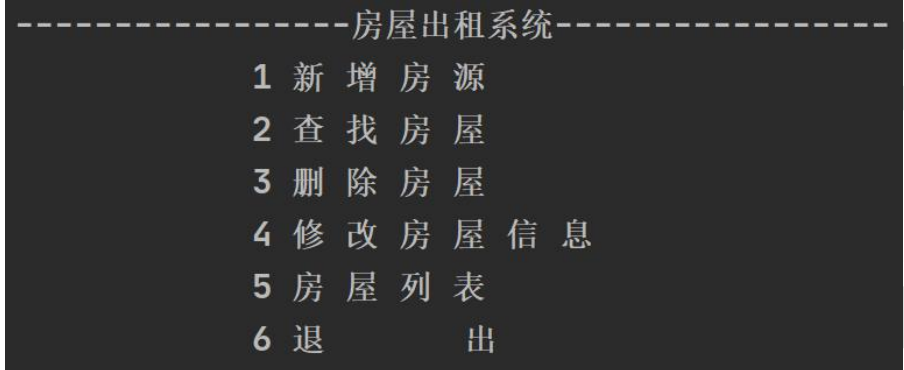
新增房屋
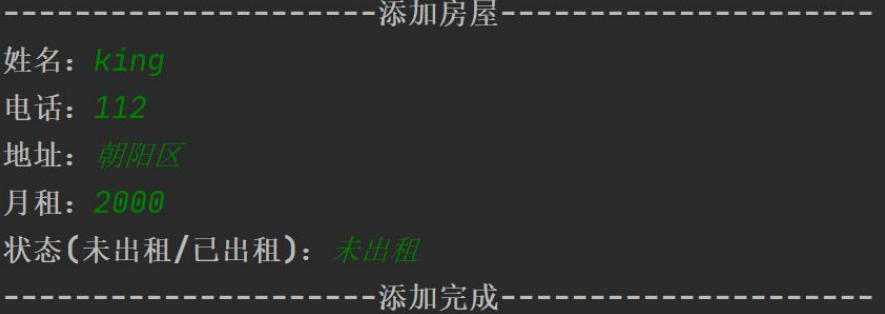
查找房屋

删除房屋

修改房屋
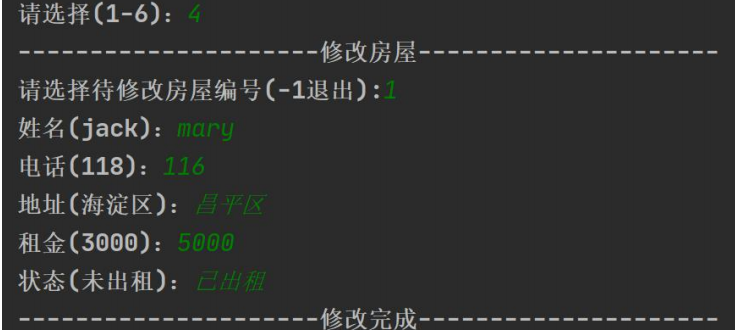
房屋列表

退出系统

9.3 系统设计
项目设计-程序框架图 (分层模式=>当软件比较复杂,需要模式管理)
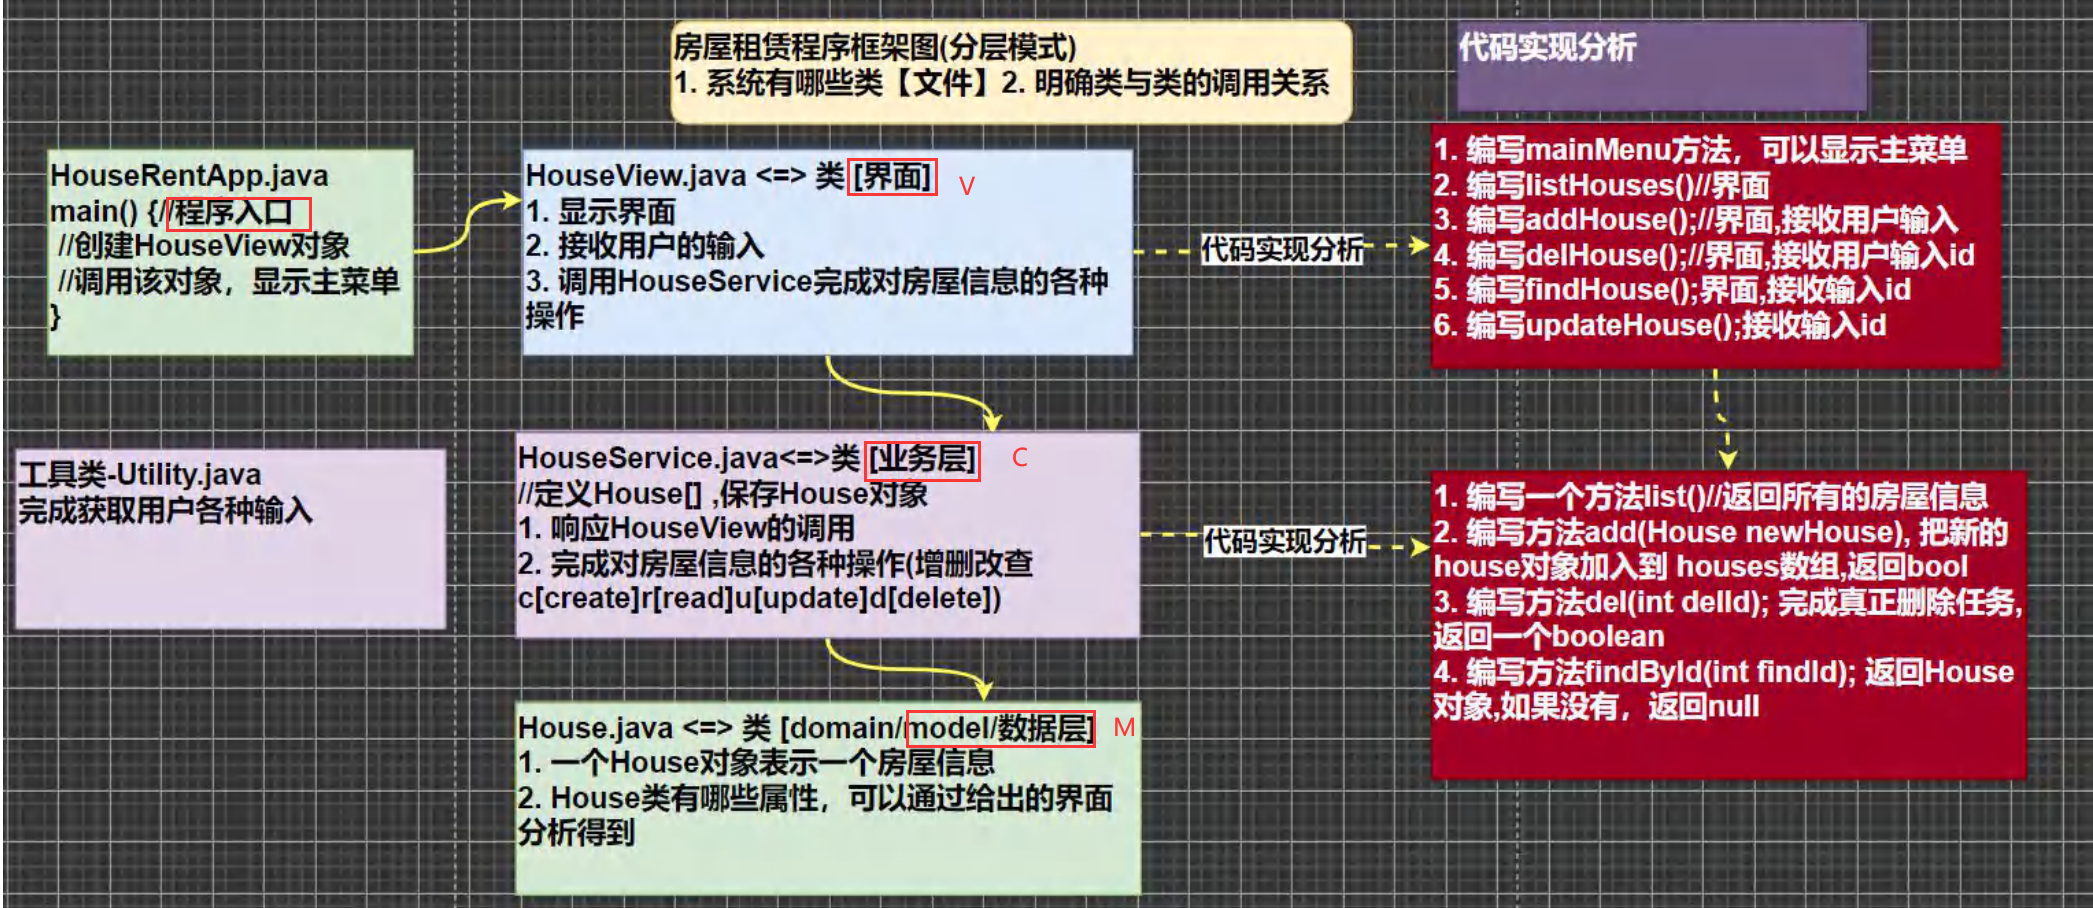
9.4 系统实现
9.4.1 了解和使用工具库
在实际开发中,公司都会提供相应的工具类和开发库,可以提高开发效率,程序员也需要能够看懂别人写的代码,并能够正确的调用。(造轮子的事情别人已经做好了)
了解 Utility 类的使用
测试 Utility 类
当作API使用,会用就行,有余力的可以读懂源码
9.4.2 完成House类
编号 房主 电话 地址 月租 状态(未出租/已出租)
9.4.3 显示主菜单和完成退出软件功能
实现功能的三部曲 [明确完成功能->思路分析->代码实现]
功能说明: 用户打开软件,可以看到主菜单,可以退出软件.
思路分析: 在 HouseView.java 中,编写一个方法 mainMenu,显示菜单.
9.4.4 显示房屋列表的功能
功能说明: 用户输入对应的key,可以显示房屋信息列表
思路分析:
- 在 HouseView.java 中,编写一个方法 listHouses显示房屋信息列表.
- 在HouseService.java中,编写一个方法list可以返回所有的房屋信息
9.4.5 添加房屋信息的功能
功能说明:显示添加房屋信息的界面,用户输入相关信息,可以添加房屋信息到系统,新增的房屋id按照自增长来定
思路分析
- 在 HouseView.java 中,编写一个方法 addHouse接收用户输入
- 在HouseService.java中,编写一个方法add可以添加新增的房屋信息到系统。需要判断数组容量是否满了
9.4.6 删除房屋信息的功能
- 功能说明:
- 显示删除房屋信息的界面
- 用户输入房源编号(-1退出)
- Y确认删除,N 取消
- 思路分析
- 在 HouseView.java 中,编写一个方法 delHouse接收用户输入id
- 在HouseService.java中,编写一个方法del可以根据房源id从系统中删除相关信息。需要判断该id是否存在
9.4.7 退出确认功能
- 功能说明:显示退出界面,根据用户输入确认是否退出
9.4.8 查找房屋信息功能
- 功能说明:根据用户输入的id显示对应的房屋信息
- 思路分析:
- 在 HouseView.java 中,编写一个方法 findHouse接收用户输入id,并显示房屋信息
- 在HouseService.java中,编写一个方法find可以根据房源id从系统中查找相关信息。
9.4.9 修改房屋信息功能
- 功能说明:根据用户输入的id显示原始房屋信息,并可以修改
- 思路分析:
- 在 HouseView.java 中,编写一个方法 updateHouse接收用户输入id,并显示原始房屋信息。接收新的房屋信息。
- 在HouseService.java中,编写一个方法update可以根据用户输入的新信息进行更新
— 第二阶段 —
第十章 面向对象编程(高级)
10.1 类变量和类方法(static)
10.1.1 类变量快速入门
1 | package com.durango.static_; |
10.1.2 类变量内存布局
有不同说法:在堆中(jdk8以后); 在方法区的静态域中。与jdk版本有关
- 共识
- static变量是同一个类的所有对象共享的
- static变量在类加载时就生成了
- 参考文章
10.2.3 类变量基本介绍
概念
类变量也叫静态变量/静态属性,是该类的所有对象共享的变量,任何一个该类的对象去访问它时,取到的都是相同的值,同样任何一个该类的对象去修改它时,修改的也是同一个变量。
定义
1
2访问修饰符 static 数据类型 变量名; 【推荐】
static 访问修饰符 数据类型 变量名;访问
1
2类名.变量名; 【推荐】
对象名.变量名;
10.2.4 类变量注意事项
什么时候需要用类变量
当我们需要让某个类的**所有对象都共享一个变量时**,就可以考虑使用类变量(静态变量),比如:定义学生类,统计所有学生共交多少钱。Student (name, static fee)类变量与实例变量(普通属性)区别类变量是该类的所有对象共享的,而实例变量是每个对象独享的。类变量是该类的所有对象共享的,而实例变量是每个对象独享的.
加上static称为类变量或静态变量,否则称为实例变量/普通变量/非静态变量
类变量可以通过类名.变量名或者对象名.变量名来访问,但java设计者推荐类名.类变量名我们使用类名.类变量名方式访问。【前提是满足访问修饰符的访问权限和范围】
实例变量不能通过类名.类变量名方式访问。
类变量是在类加载时就初始化了,也就是说,即使你没有创建对象,只要类加载了,就可以使用类变量了。
类变量的生命周期是随类的加载开始,随着类消亡而销毁
10.2.5 类方法基本介绍
概念
类方法也叫静态方法,是该类的所有对象共享的方法
定义
1
2访问修饰符 static 返回数据类型 方法名; 【推荐】
static 访问修饰符 返回数据类型 方法名;访问
1
2类名.方法名; 【推荐】
对象名.方法名;快速入门
1
2
3
4
5
6
7
8
9
10
11
12
13
14
15
16
17
18
19
20
21
22
23
24
25
26
27
28
29
30
31
32
33package com.durango.static_;
public class StaticMethod {
public static void main(String[] args) {
Stu t1 = new Stu("tom");
Stu t2 = new Stu("tom1");
Stu t3 = new Stu("tom2");
t1.payFee(100);
t2.payFee(200);
t3.payFee(300);
Stu.showFee();
}
}
class Stu {
private String name;
// 静态变量累计学生交的学费
private static double fee = 0;
public Stu(String name) {
this.name = name;
}
// 静态方法
public static void payFee(double fee) {
Stu.fee += fee; //累计学费
}
public static void showFee() {
System.out.println("总学费=" + Stu.fee);
}
}
10.2.5 类方法使用场景
如果我们希望不创建实例,也可以调用某个方法时(当做工具来使用)

10.2.5 类方法注意事项
- 类方法和普通方法都是随着类的加载而加载,将结构信息存储在方法区。类方法中无this的参数,普通方法中隐含着this的参数
- 类方法可以通过类名调用,也可以通过对象名调用。
- 普通方法和对象有关,需要通过对象名调用,比如对象名.方法名(参数),不能通过类名调用。
- 类方法中不允许使用和对象有关的关键字,比如this和super。普通方法(成员方法)可以。
- **类方法(静态方法)中只能访问静态成员(变量和方法)**。
- 普通方法,既可以访问非静态成员,也可以访问静态成员。
10.2 main方法
10.2.1 深入理解main方法
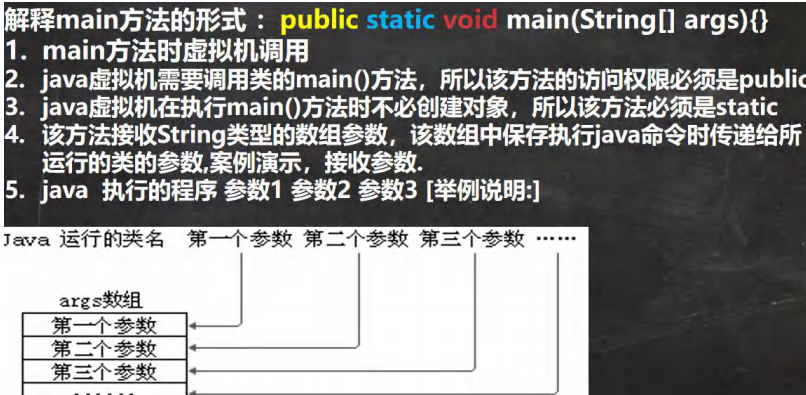
10.2.2 特别提示
- 在 main()方法中,我们可以直接调用 main 方法所在类的静态方法或静态属性。
- 但是,不能直接访问该类中的非静态成员,必须创建该类的一个实例对象后,才能通过这个对象去访问类中的非静态成员
1 | package com.durango.main_; |
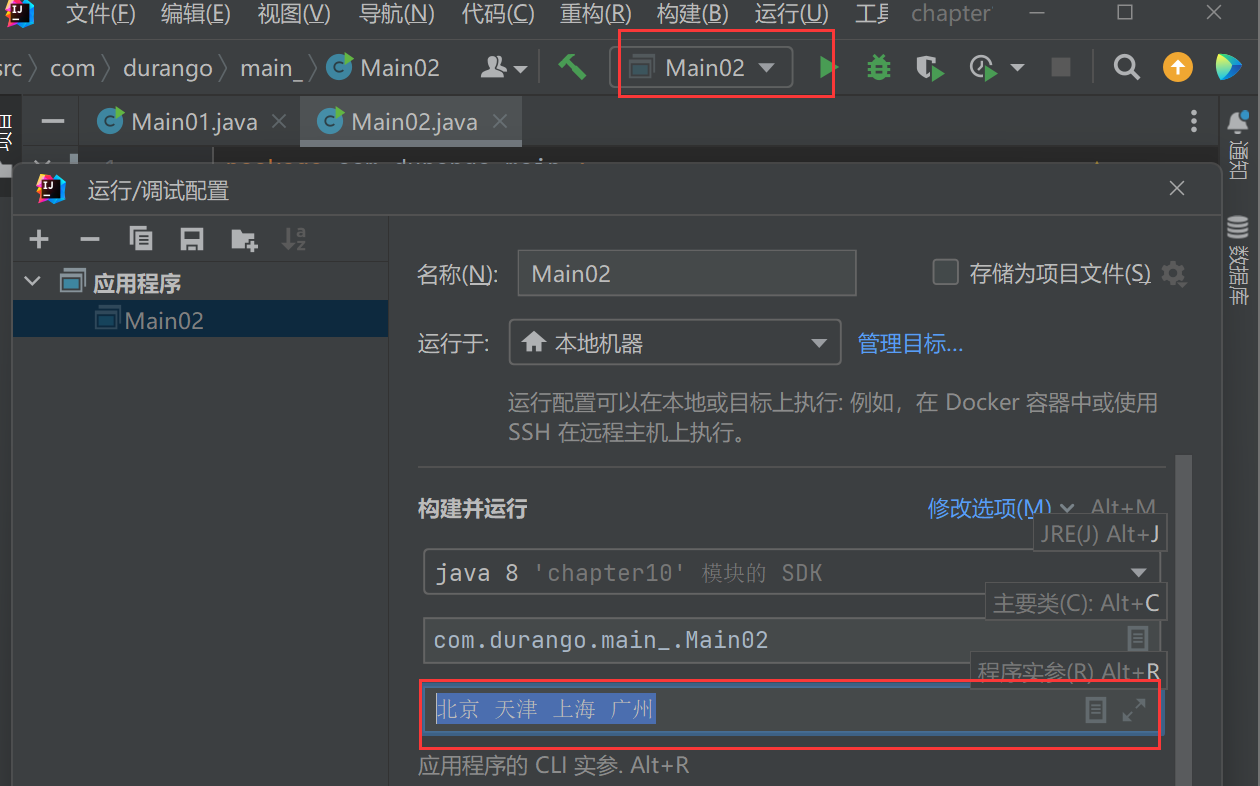
10.2.2 在IDEA中给Main()传参
10.3 代码块
10.3.1 基本介绍
- 代码化块又称为初始化块,属于类中的成员[即是类的一部分,类似于方法,将逻辑语句封装在方法体中,通过{ }包围起来
- 但和方法不同,没有方法名,没有返回,没有参数,只有方法体,而且不用通过对象或类显式调用,而是加载类时,或创建对象时隐式调用。
10.3.2 基本语法
- 语法:【修饰符】{ 代码块内容 };
- 【修饰符】可选项,写的话只能写static。分为静态代码块和普通代码块。“;”可以省略
10.3.3 使用场景和好处
- 相当于另外一种形式的构造器(对构造器的补充机制),可以做初始化的操作
- 场景: 如果多个构造器中都有重复的语句,可以抽取到初始化块中,提高代码的重用性。代码块调用的顺序优先于构造器
10.3.4 注意事项(重要!!)
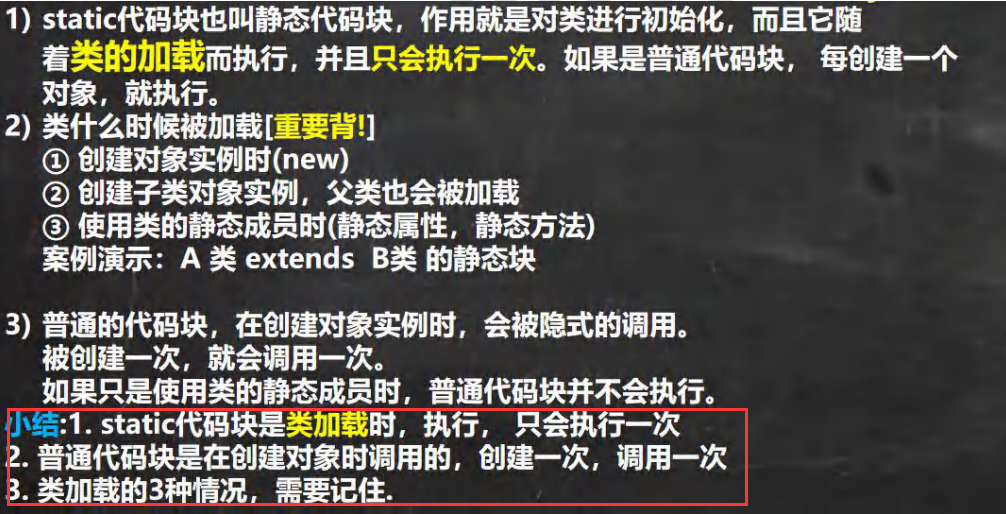
类加载时(3种情况)执行静态代码块,创建类对象时执行普通代码块
1 | package com.durango.codeblock_; |
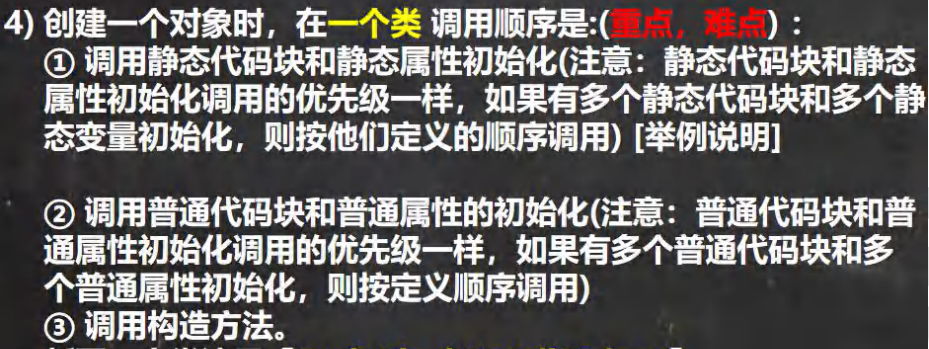
调用顺序(重点,难点)
1 | package com.durango.codeblock_; |
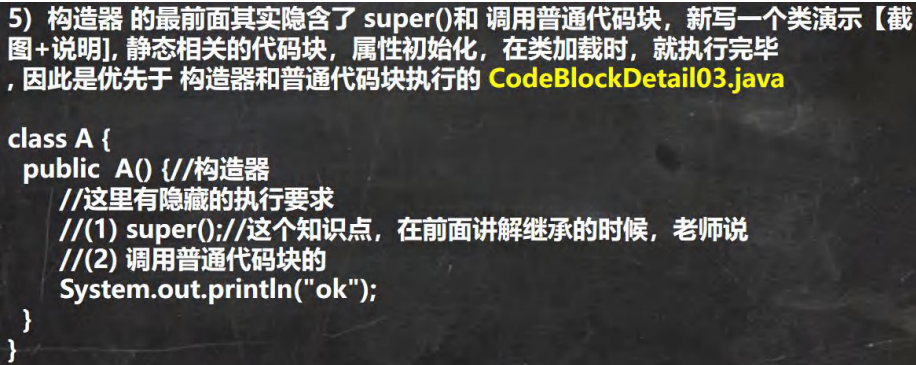
构造器前面其实隐含了super()、调用普通代码块和普通属性初始化!!!
1 | package com.durango.codeblock_; |
存在继承关系时,静态代码块,静态属性初始化,普通代码块,普通属性初始化,构造方法调用顺序</font
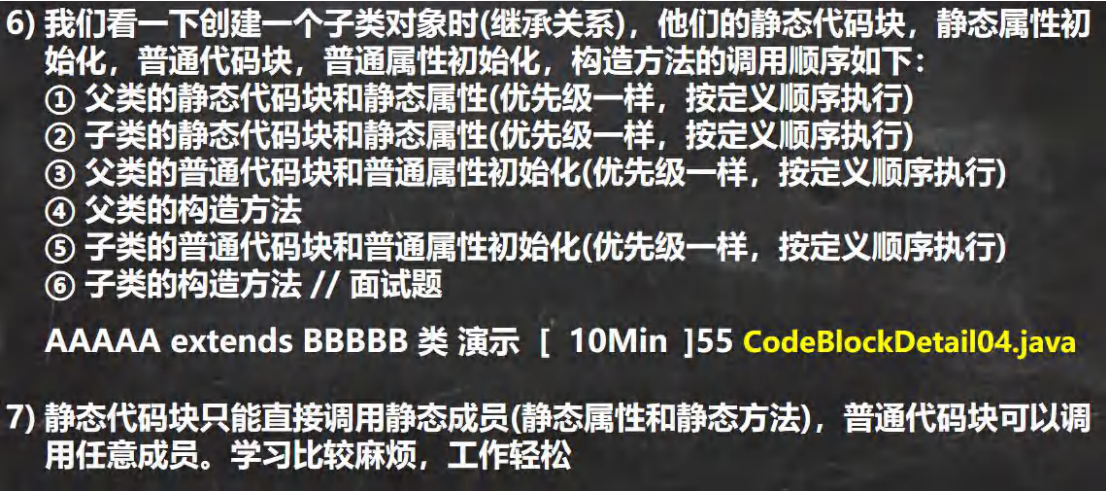
1 | package com.durango.codeblock_; |
10.4 单例设计模式(static实践)
10.4.1 设计模式
是为解决软件设计中通用问题而被提出的一套指导性思想。它是一种被反复验证、经过实践证明并被广泛应用的代码设计经验和思想总结,可以帮助开发者通过一定的模式来快速的开发高质量、可维护性强的软件。
10.4.2 单例模式
- 所谓类的单例设计模式,就是采取一定的方法保证在整个的软件系统中,对某个类只能存在一个对象实例, 并且该类只提供一个取得其对象实例的方法
10.4.3 设计步骤
- 先将构造器私有化,防止外部直接new 对象
- 在类的内部直接创建一个静态对象(恶汉式:在属性处创建;懒汉式:在方法中创建)
- 向外部暴露一个公共的静态方法,返回这个对象实例
10.4.4 恶汉式和懒汉式
恶汉式(类加载时就创建了实例,存在资源浪费问题)
1
2
3
4
5
6
7
8
9
10
11
12
13
14
15
16
17
18
19
20
21
22
23
24
25
26
27
28
29
30
31
32
33
34
35
36
37
38package com.durango.single_;
public class SingleTon01 {
public static void main(String[] args) {
System.out.println(GirlFriend.n1); // 此时已经创建对象实例
GirlFriend instance = GirlFriend.getInstance();
System.out.println(instance);
}
}
class GirlFriend {
private String name;
public static int n1 = 100;
private static GirlFriend gf = new GirlFriend("小花");
// 饿汉式
// 1. 先将构造器私有化
// 2. 在类的内部直接创建一个静态对象
// 3. 用公共的静态方法返回这个对象实例
private GirlFriend(String name) {
System.out.println("构造器被调用");
this.name = name;
}
public static GirlFriend getInstance() {
return gf;
}
public String toString() {
return "GirlFriend{" +
"name='" + name + '\'' +
'}';
}
}懒汉式(类使用时才创建实例,存在线程安全问题)
1
2
3
4
5
6
7
8
9
10
11
12
13
14
15
16
17
18
19
20
21
22
23
24
25
26
27
28
29
30
31
32
33
34
35
36
37
38
39
40
41
42
43
44
45package com.durango.single_;
public class SingleTon02 {
public static void main(String[] args) {
System.out.println(Cat.n1); // 此时不会创建对象实例
Cat cat = Cat.getInstance(); // 会创建单例
System.out.println(cat.toString());
Cat cat1 = Cat.getInstance(); // 不会重复创建实例
System.out.println(cat1.toString());
System.out.println(cat == cat1);
}
}
class Cat {
private String name;
public static int n1 = 999;
private static Cat cat;
// 懒汉式
// 1. 先将构造器私有化
// 2. 在类的内部(getInstance方法)直接创建一个静态对象
// 3. 用公共的静态方法返回这个对象实例
// 用户调用getInstance方法时才创建对象,重复调用会返回上次创建的对象
private Cat(String name) {
System.out.println("构造器被调用");
this.name = name;
}
public static Cat getInstance() {
if (cat == null) {
cat = new Cat("小花");
}
return cat;
}
public String toString() {
return "Cat{" +
"name='" + name + '\'' +
'}';
}
}
10.5 final关键字
10.5.1 基本介绍
- final可以修饰类、属性、方法、局部变量
- 修饰类时,该类不能被继承
- 修饰属性(成员变量)时,属性的值不能被修改
- 属性是基本数据类型,值是数值,不能被修改
- 属性是引用数据类型,值是地址,不能被修改
- 修饰方法时,方法不能被重写/覆盖
- 修饰局部变量时,变量的值不能被修改
10.5.2 注意事项
- final修饰的属性又叫常量,一般用XX_XX_XX来命名
- final修饰的属性在定义时,必须赋初值,并且以后不能再修改,赋值可以在如
下位置之一【选择一个位置赋初值即可】:
①定义时:如public final double TAX_RATE=0.08; ②在构造器中 ③在代码块中。 - 如果final修饰的属性是静态的,则初始化的位置只能是 ①定义时 ②在静态代码块。不能在构造器中赋值。
- final类不能继承,但是可以实例化对象。
- 如果类不是final类,但是含有final方法,则该方法虽然不能重写,但是可以被继承。
- 一般来说,如果一个类已经是final类了,就没有必要再将方法修饰成final方法。6) final不能修饰构造方法(即构造器
- final和 static往往搭配使用,效率更高,不会导致类加载!!!底层编译器做了优化处理。
1 | package com.durango.final_; |
10.6 抽象类
10.6.1 基本介绍
- 当父类的某些方法,需要声明,但是又不确定如何实现时,可以将其声明为抽象(abstract)方法, 那么这个类就是抽象类
- 抽象方法必须存在于抽象类中,用abstract关键字修饰。
- 抽象类的价值更多是在于设计,是设计者设计好后,让子类继承并实现抽象类()
10.6.2 注意事项 (面试常考)
- 抽象类不能被实例化
- 抽象类不一定要包含抽象方法;但是抽象方法一定要存在于抽象类
- abstract只能修饰类和方法,不能修饰属性和其他的
- 抽象类可以有任意成员,如非抽象方法、构造器、静态属性等等
- 抽象方法不能有方法体,即不能实现
- 如果一个类继承了抽象类,则他必须实现抽象类的所有抽象方法,除非它还是声明为抽象类
- 抽象方法不能用private、final和static来修饰,这些关键字都是和重写相违背的
1 | package com.durango.abstract_; |
10.7 模板设计模式(abstract实践)
有不同的几个类,需要完成不同的job,但都需要计算完成job的时间
1
2
3
4
5
6
7
8
9
10
11
12
13
14
15
16
17
18
19
20
21
22
23
24
25
26
27
28
29
30
31
32
33
34
35
36
37
38
39
40
41
42package com.durango.abstract_;
public class TemplateTest {
public static void main(String[] args) {
new AA().calculateTime();
new BB().calculateTime();
}
}
abstract class Template { // 模板类
public abstract void job(); // 模板方法
public void calculateTime() {
long start = System.currentTimeMillis();
job(); // 动态绑定机制
long end = System.currentTimeMillis();
System.out.println("job执行了" + (end - start) + "毫秒");
}
}
class AA extends Template {
public void job() {
long num = 0;
for (int i = 0; i < 100000; i++) {
num += i;
}
}
}
class BB extends Template {
public void job() {
long num = 0;
for (int i = 0; i < 100000; i++) {
num -= i;
}
}
}
10.8 接口(interface)
10.8.1 基本介绍
接口就是给出一些没有实现的方法,封装到一起,到某个类要使用的时候,在根据具体情况把这些方法写出来
语法
1
2
3
4
5
6
7
8
9
10interface 接口名 {
属性;(默认是public static final修饰的,需要赋初值)
方法;(1. 抽象方法【abstract可以省略】; 2.默认实现方法【default】;3.静态方法【static】)
}
class 类名 implements 接口名 {
自己的属性;
自己的方法;
必须实现的接口的抽象方法;
}小结
在JDK7以前,接口里的方法都是抽象方法,没有方法体
在JDK8以后,接口里面也可以有静态方法、默认方法(default),也就是说可以有方法具体实现。
1
2
3
4
5
6
7
8
9
10
11
12
13
14
15
16interface AInterface {
// 属性
public int n = 10;
// 抽象方法
public void hi();
//jdk8以后可以有默认方法和静态方法
default public void ok() {
System.out.println("ok~~~");
}
static public void hello() {
System.out.println("hello~~~");
}
}
10.8.2 应用场景
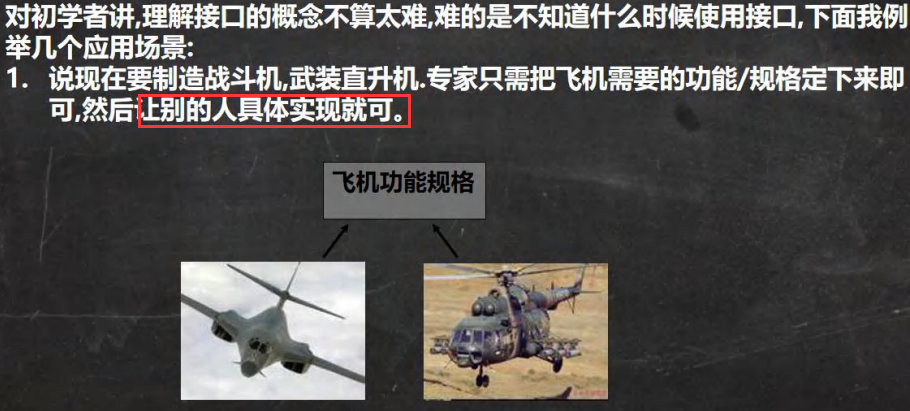
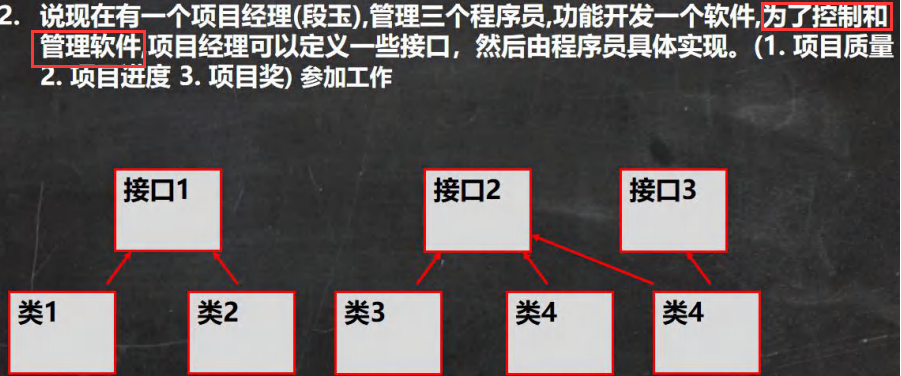
举例:项目需要实现对三个不同数据库的连接操作,如果直接编写三个连接的类,类中的连接方法名可能不统一;在项目使用数据库时,需要重载三种不同形参类型的方法。
1
2
3
4
5
6
7
8
9
10
11
12
13
14
15
16
17
18
19
20
21
22
23
24
25
26
27
28
29
30
31
32
33
34
35
36
37
38
39
40
41
42
43package com.durango.interface_;
public class Interface03 {
public static void main(String[] args) {
DBManager manager = new DBManager();
manager.toDatabase(new MysqlDB());
manager.toDatabase(new OracleDB());
}
}
class DBManager {
public void toDatabase(DBInterface dbInterface) {
dbInterface.connect();
dbInterface.close();
}
}
class MysqlDB implements DBInterface {
@Override
public void connect() {
System.out.println("连接Mysql数据库");
}
@Override
public void close() {
System.out.println("关闭Mysql数据库");
}
}
class OracleDB implements DBInterface {
@Override
public void connect() {
System.out.println("连接Oracle数据库");
}
@Override
public void close() {
System.out.println("关闭Oracle数据库");
}
}
10.8.3 注意事项
- 接口不能被实例化
- 接口中所有**方法都是public的(可以省略public),接口中的抽象方法可以不用abstract修饰**
- 普通类实现接口,就必须实现接口中的所有抽象方法。快捷键 alt+enter
- 抽象类实现接口,可以不用实现接口中的抽象方法
- 一个类可以实现多个接口。
- 接口中的**属性是public static final的,比如 int n1 = 100 实际上是 public static final int n1 = 100;(必须初始化)。实现了接口的类也可以调用接口中的属性,但是不能修改**(接口中的变量默认是public static final修饰的,需要赋初值)。
- 接口不能继承其他的类,但是可以继承多个别的接口
- 接口的修饰符只能是public和默认,这点和类的修饰符是一样的
10.8.4 实现接口 VS 继承类
- 接口和继承解决的问题不同
- 继承的价值在于:解决代码的复用性和可维护性
- 接口的价值在于:设计并设计好各种规范(方法),让其他类去实现这些方法,即更加灵活
- 接口比继承更加灵活
- 继承是 is-a 的关系
- 接口是 like-a 的关系
- 接口在一定程度上实现了代码解耦 【接口规范性+动态绑定】
10.8.5 接口的多态特性
多态参数
- 接口的引用可以指向实现了接口的类的对象,比如在前面的连接数据库案例中,DBInterface dbInterface既可以接收MysqlDB,也可以接收OrcalDB
多态数组
1
2
3
4
5
6
7
8
9
10
11
12USBInterface[] usbs = new USBInterface[2];
usbs[0] = new Phone();
usbs[1] = new Camera();
for (int i = 0; i < usbs.length; i++) {
usbs[i].start(); // 动态绑定
if (usbs[i] instanceof Phone) {
((Phone) usbs[i]).call();
} else if (usbs[i] instanceof Camera) {
((Camera) usbs[i]).photo();
}
usbs[i].end();
}多态传递
- 接口的父级接口的引用也可以指向实现了该接口的类的对象
1
2
3
4
5
6
7
8
9
10
11
12
13
14
15
16
17
18
19package com.durango.interface_;
public class InterfacePolyPass {
public static void main(String[] args) {
// Teacher实现了IG,IG继承了IH。
IG ig = new Teacher();
IH ih = new Teacher();
}
}
interface IH {
}
interface IG extends IH {
}
class Teacher implements IG {
}
10.9 内部类
10.9.1 基本介绍
类的五大成员:属性;方法;构造器;代码块;内部类
一个类的内部又完整的嵌套了另一个类结构。被嵌套的类称为内部类(inner class),嵌套其他类的类称为外部类(outer class)。内部类的最大特点:可以直接访问私有属性,并且可以体现类与类之间的包含关系
基本语法
1
2
3
4
5
6
7
8class Outer { // 外部类
class Inner { // 内部类
}
}
class Other{ // 外部其他类
}
10.9.2 分类
- 定义在外部类局部位置上(比如方法内,代码块中),本质是局部变量
- 局部内部类(有类名)
- 匿名内部类(无类名,重点!!!)
- 定义在外部类成员位置上,本质是类的成员
- 成员内部类(没有static修饰)
- 静态内部类(使用static修饰)
10.9.3 局部内部类
- 可以直接访问外部类的所有成员,包含私有的
- 不能添加访问修饰符, 因为它的地位就是一个局部变量。局部变量是不能使用修饰符的。但是可以使用final修饰, 因为局部变量也可以使用final
- 作用域: 仅仅在定义它的方法或代码块中。
- 局部内部类—访问—->外部类的成员,访问方式:直接访问
- 外部类—>访问—->局部内部类的成员,访问方式:创建对象, 再访问(注意:必须在作用域内)
- (1)局部内部类定义在方法中/代码块
- (2)作用域在方法体或者代码块中
- (3)本质仍然是个类
- 外部其他类—不能访问—–>局部内部类(因为局部内部类地位是一个局部变量)
- 如果外部类和局部内部类的成员重名时,默认遵循就近原则,如果想访问外部类的成员,则可以使用**(外部类名.this.成员**)去访问【演示】
1 | package com.durango.innerclass_; |
10.9.4 匿名内部类(重要!!!)
- (1)本质是类;(2)内部类;(3)该类没有名字;(4)同时还是一个对象
- new 类或接口(参数列表){ 类体 };
- 因为匿名内部类既是一个类的定义,同时它本身也是一个对象,因此从语法上看,它既有定义类的特征,也有创建对象的特征。调用匿名内部类的成员有两种方式:赋值后调用;直接调用。
- 可以直接访问外部类成员,包括私有的
- 不能添加访问修饰符,本质是一个局部变量,可以加final修饰
- 作用域:定义它的方法或代码块中
- 匿名内部类 –> 访问 –> 外部类 成员 : 直接访问
- 外部类 –> 访问 –> 匿名内部类 成员:new对象赋值后调用; new对象直接调用
- 如果外部类和匿名内部类的成员重名时,匿名内部类访问的话,默认遵循就近原则,如果想访问外部类的成员,则可以使用(外部类名.this.成员)去访问
- 底层给匿名内部类分配的名字为:外部类名$X,可以用**getClass()**查看,即运行类型
基于接口实现的匿名内部类
1
2
3
4
5
6
7
8
9
10
11
12
13
14
15
16
17
18
19
20
21
22
23
24
25
26
27
28
29
30
31
32
33
34
35
36
37
38
39
40
41
42
43package com.durango.innerclass_;
public class AnonymousInnerClass {
public static void main(String[] args) {
Outer04 outer04 = new Outer04();
outer04.method();
}
}
class Outer04 {
private int n1 = 10;
public void method() {
// 基于接口的匿名内部类
// 1. 需求:使用A接口,并创建对象
// 2. 传统做法:写一个类实现A接口,然后创建这个类的对象
// 3. 需求是 Tiger/Dog 类只是使用一次,后面不再使用
// 4. 可以使用匿名内部类来简化开发
// 5. tiger 的编译类型 ? A
// 6. tiger 的运行类型 ? 就是匿名内部类 (名字由jvm分配为Outer04$1)
// 7. jvm底层在创建匿名内部类Outer04$1,并创建了Outer04$1实例把地址返回给tiger
// 8. 这个匿名内部类只能使用一次,是指不能再创建这个匿名内部类的实例了。
// tiger是已经创建的唯一匿名内部类对象,可以使用多次
A tiger = new A() {
public void cry() {
System.out.println("老虎叫唤");
}
};
System.out.println("tiger的运行类型=" + tiger.getClass());
tiger.cry();
tiger.cry();
}
}
interface A {
void cry();
}
输出:
tiger的运行类型=class com.durango.innerclass_.Outer04$1
老虎叫唤
老虎叫唤
基于类或抽象类继承的匿名内部类
1
2
3
4
5
6
7
8
9
10
11
12
13
14
15
16
17
18
19
20
21
22
23
24
25
26
27
28
29
30
31
32
33
34
35
36
37
38
39
40
41
42
43
44package com.durango.innerclass_;
public class AnonymousInnerClass {
public static void main(String[] args) {
Outer04 outer04 = new Outer04();
outer04.method();
}
}
class Outer04 {
private int n1 = 10;
public void method() {
// 基于类的匿名内部类
// 1. father 编译类型 Father
// 2. father 运行类型 Outer04$2
// 3. 底层会创建匿名内部类Outer04$2继承Father,并创建Outer04$2实例返回给father
Father father = new Father("jack") {
public void test() {
System.out.println("这是匿名内部类的Test");
}
};
System.out.println("father对象的运行类型=" + father.getClass());
father.test();
}
}
class Father {
private String name;
public Father(String name) {
this.name = name;
System.out.println("接收到name");
}
public void test() {
System.out.println("这是Father的test");
}
}
输出:
接收到name
father对象的运行类型=class com.durango.innerclass_.Outer04$2
这是匿名内部类的Test
调用匿名内部类的成员
1
2
3
4
5
6
7
8
9
10
11
12
13
14
15
16
17
18
19
20
21
22class Outer05 {
private int n1 = 99;
public void f1() {
// 先赋值再调用
Person p = new Person(){
public void hi() {
System.out.println("匿名内部类重写了hi方法");
}
};
p.hi(); //动态绑定,运行类型时Outer05$1
//也可以直接调用,匿名内部类创建类并返回了一个实例
new Person(){
public void hi() {
System.out.println("匿名内部类重写了hi方法");
}
}.hi();
}
}
10.9.5 匿名内部类最佳实践
匿名内部类当作实参直接传递,简洁高效
1
2
3
4
5
6
7
8
9
10
11
12
13
14
15
16
17
18
19
20
21
22
23
24
25
26
27
28
29
30
31
32
33package com.durango.innerclass_;
public class InnerClassExercise01 {
public static void main(String[] args) {
// 匿名内部类当做实参直接传递
f1(new IL() {
public void show() {
System.out.println("匿名内部类当做实参直接传递");
}
});
//传统方式
f1(new Tr());
}
// 静态方法,形参是接口类型
public static void f1(IL il) {
il.show();
}
}
interface IL {
void show();
}
class Tr implements IL{
public void show() {
System.out.println("传统方式,实现接口再传参");
}
}形参有多个接口,实参可以是多个匿名内部类
1
2
3
4
5
6
7
8
9
10
11
12
13
14
15
16
17
18
19
20
21
22
23
24
25
26
27
28
29
30
31
32
33
34
35
36
37package com.durango.innerclass_;
public class InnerClassExercise02 {
public static void main(String[] args) {
CellPhone cp = new CellPhone();
cp.alarmClock(new Bell() {
public void ring() {
System.out.println("懒猪起床了");
}
}, new Bell() {
public void ring() {
System.out.println("上班要迟到了");
}
});
}
}
interface Bell {
void ring();
}
class CellPhone {
// 形参是接口类型,实参可以用匿名内部类
public void alarmClock(Bell b1, Bell b2){
b1.ring();
System.out.println(b1.getClass());
b2.ring();
System.out.println(b2.getClass());
}
}
输出:
懒猪起床了
class com.durango.innerclass_.InnerClassExercise02$1
上班要迟到了
class com.durango.innerclass_.InnerClassExercise02$2
10.9.6 成员内部类
可以直接访问外部类成员,包括私有的
可以添加任意访问修饰符,本质是类的成员
作用域:定义它的整个类体
成员内部类访问外部类成员:直接访问
外部类访问内部类成员:创建对象访问
成员重名时遵循就近原则,可以通过 外部类名.this.成员 访问外部成员
外部其他类 可以 访问 内部类:有两种方式如下
1
2
3
4
5
6
7
8
9
10
11
12
13
14public class MemberInnerClass01 {
public static void main(String[] args) {
Outer08 outer08 = new Outer08();
outer08.hi();
// 外部其他类,使用成员内部类的三种方式(遵循访问权限)
// 1. new Outer08().new Inner08()相当于把new Inner08()当做是new Outer08()的成员
Outer08.Inner08 inner08 = new Outer08().new Inner08();
// 2. 在外部类中编写一个方法,放回Inner08的实例
Outer08.Inner08 inner08_1 = new Outer08().getInner();
}
}1
2
3
4
5
6
7
8
9
10
11
12
13
14
15
16
17
18
19
20
21
22
23
24
25
26class Outer08 { //外部类
private int n1 = 100;
public String name = "jack";
// 成员内部类
public class Inner08 { // 可以添加访问修饰符
private int n1 = 99;
public void say() {
// 可以直接访问外部类成员,包括私有的
System.out.println("n1 = " + n1 + " name=" + name);
// 重名时遵守就近原则,通过"外部类.this.成员"访问外部类成员
System.out.println("Outer n1="+Outer08.this.n1);
}
}
public void hi() {
// 成员内部类的作用域是定义它的整个类体
// 外部类访问内部类成员,需要new对象
Inner08 inner08 = new Inner08();
inner08.say();
}
public Inner08 getInner() {
return new Inner08();
}
}
10.9.6 静态内部类
可以直接访问外部类静态的成员,包括私有的。不能访问外部类非静态成员
可以添加任意访问修饰符,本质是类的成员
作用域:定义它的整个类体
成员内部类访问外部类静态的成员:直接访问
外部类访问静态内部类成员:创建对象访问
成员重名时遵循就近原则,可以通过 外部类名.成员 访问外部成员
外部其他类 可以 访问 静态内部类:有两种方式如下
1
2
3
4
5
6
7
8
9
10
11public class MemberInnerClass02 {
public static void main(String[] args) {
// 外部其他类访问静态内部类
// 1. 静态成员可以直接通过类名访问Outer09.Inner09(),无需创建外部类对象
Outer09.Inner09 inner09 = new Outer09.Inner09();
// 2.编写一个(静态)方法,可以返回静态内部类的对象实例
Outer09.Inner09 inner09_1 = new Outer09().getInner();
Outer09.Inner09 inner09_2 = Outer09.getInner_();
}
}1
2
3
4
5
6
7
8
9
10
11
12
13
14
15
16
17
18
19
20
21
22
23
24
25
26
27
28
29
30
31class Outer09 { //外部类
private static int n1 = 100;
public static String name = "jack";
// 静态内部类
public static class Inner09 { // 可以添加访问修饰符
private int n1 = 99;
public void say() {
// 可以直接访问外部类的静态成员(不能访问非静态成员)
System.out.println("n1 = " + n1 + " name=" + name);
// 重名时遵守就近原则,通过"外部类.成员"访问外部类成员
System.out.println("Outer n1=" + Outer09.n1);
}
}
public void hi() {
// 静态内部类的作用域是定义它的整个类体
// 外部类访问静态内部类成员,需要new对象
Inner09 inner09 = new Inner09();
inner09.say();
}
public Inner09 getInner() {
return new Inner09();
}
public static Inner09 getInner_() {
return new Inner09();
}
}
第十一章 枚举和注解
11.1 自定义类实现枚举
构造器私有化,防止直接new对象
本类内部创建一组对象 [四个 春夏秋冬]
对外暴露对象(通过为对象添加 public final static 修饰符)
可以提供 get 方法,但是不要提供 set
1
2
3
4
5
6
7
8
9
10
11
12
13
14
15
16
17
18
19
20
21
22
23class Season {
private String name;
private String desc;
//定义了四个对象, 固定.
public static final Season SPRING = new Season("春天", "温暖");
public static final Season WINTER = new Season("冬天", "寒冷");
public static final Season AUTUMN = new Season("秋天", "凉爽");
public static final Season SUMMER = new Season("夏天", "炎热");
private Season(String name, String desc) {
this.name = name;
this.desc = desc;
}
public String getName() {
return name;
}
public String getDesc() {
return desc;
}
}
11.2 enum关键字实现枚举
11.2.1 说明
- 用enum关键字替代class
- 将定义的常量对象写在最前面,常量名(实参列表),多个常量用 “,”隔开
- 最后加上构造器和get方法
1 | public class Enumeration02 { |
11.2.2 注意事项
- 当我们使用 enum 关键字开发一个枚举类时,默认会继承 Enum 类, 而且是一个 final 类[如何证明],使用 javap 工具来演示
传统的 public static final Season2 SPRING = new Season2(“春天”, “温暖”); 简化成 SPRING(“春天”, “温暖”), 这里必须知道,它调用的是哪个构造器.
如果使用无参构造器 创建 枚举对象,则实参列表和小括号都可以省略
当有多个枚举对象时,使用”,”间隔,最后有一个分号结尾
枚举对象必须放在枚举类的行首
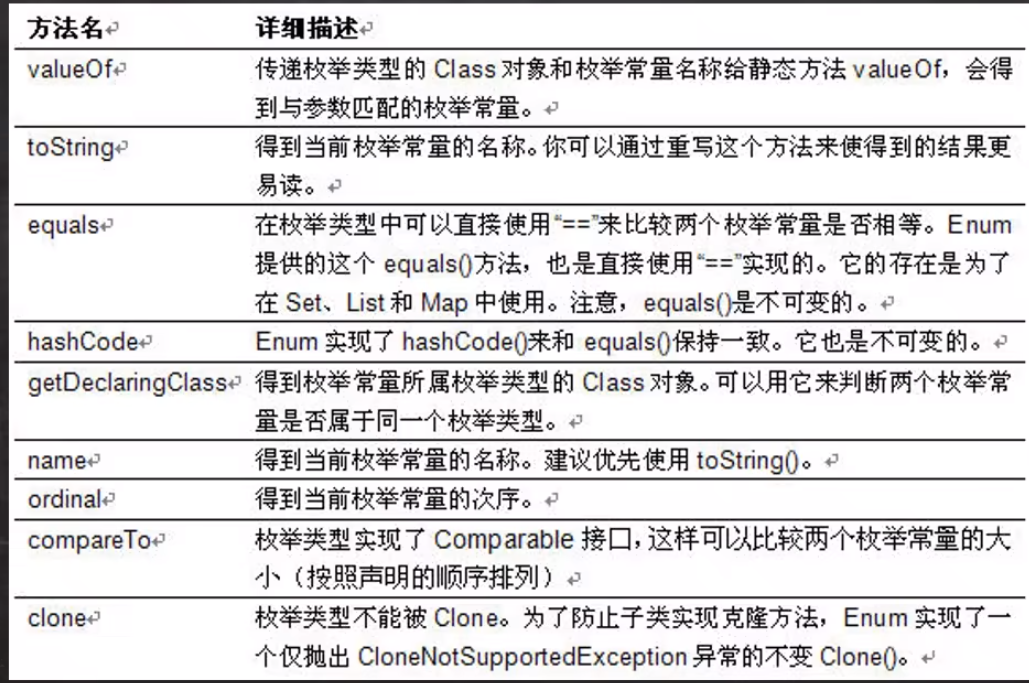
11.2.3 Enum类常用方法
- 说明:使用关键字 enum 时,会隐式继承 Enum 类, 这样我们就可以使用 Enum 类相关的方法。
1 | public class EnumMethod { |
11.2.4 enum实现接口
- 使用 enum 关键字后,就不能再继承其它类了,因为 enum 会隐式继承 Enum,而 Java 是单继承机制。
- 枚举类和普通类一样,可以实现接口,如下形式。enum 类名 implements 接口 1,接口 2{}
11.3 注解(Annotation)
注解(Annotation)也被称为元数据(Metadata),用于修饰解释 包、类、方法、属性、构造器、局部变量等数据信息。
和注释一样,注解不影响程序逻辑,但注解可以被编译或运行,相当于嵌入在代码中的补充信息。
在 JavaSE 中,注解的使用目的比较简单,例如标记过时的功能,忽略警告等。在 JavaEE 中注解占据了更重要的角色,例如用来配置应用程序的任何切面,代替 java EE 旧版中所遗留的繁冗代码和 XML 配置等。
11.4 三个基本的Annotation
@Override: 限定某个方法,是重写父类方法, 该注解只能用于方法

@Deprecated: 用于表示某个程序元素(类, 方法等)已过时

@SuppressWarnings: 抑制编译器警告

- (1) 放置的位置就是 TYPE, FIELD, METHOD, PARAMETER, CONSTRUCTOR, LOCAL_VARIABLE
- (2) 该注解类有数组 String[] values() 设置一个数组比如 {“rawtypes”, “unchecked”, “unused”}
11.5 JDK的元注解(了解)
11.5.1 基本介绍
- JDK 的元 Annotation 用于修饰其他 Annotation
- 四种
- Retention //指定注解的作用时间范围,三种 SOURCE,CLASS,RUNTIME
- Target // 指定注解可以在哪些地方使用
- Documented //指定该注解是否会在 javadoc 体现
- Inherited //子类会继承父类注解
11.5.2 Retention
只能用于修饰一个 Annotation 定义, 用于指定该 Annotation 可以保留多长时间, @Rentention 包含一个 RetentionPolicy类型的成员变量, 使用 @Rentention 时必须为该 value 成员变量指定值:
@Retention 的三种值
- RetentionPolicy.SOURCE: 编译器使用后,直接丢弃这种策略的注释
- RetentionPolicy.CLASS: 编译器将把注解记录在 class 文件中. 当运行 Java 程序时, JVM 不会保留注解。 这是默认值
- RetentionPolicy.RUNTIME:编译器将把注解记录在 class 文件中. 当运行 Java 程序时, JVM 会保留注解. 程序可以通过反射获取该注解
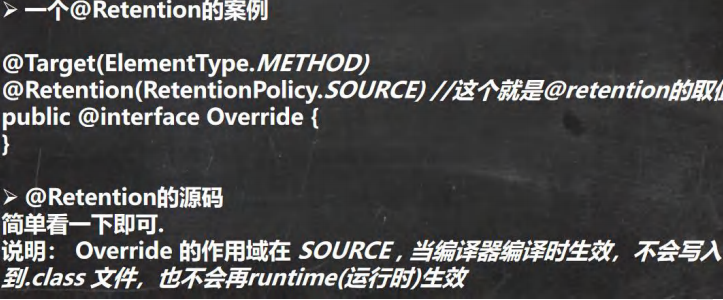
11.5.3 Target
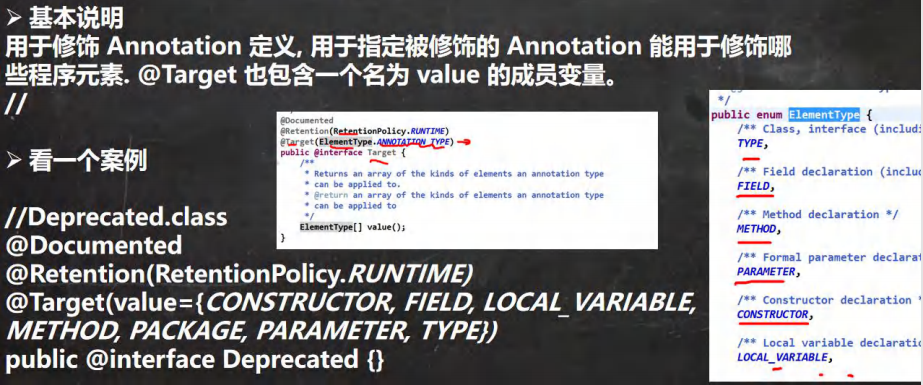
11.5.4 Documented
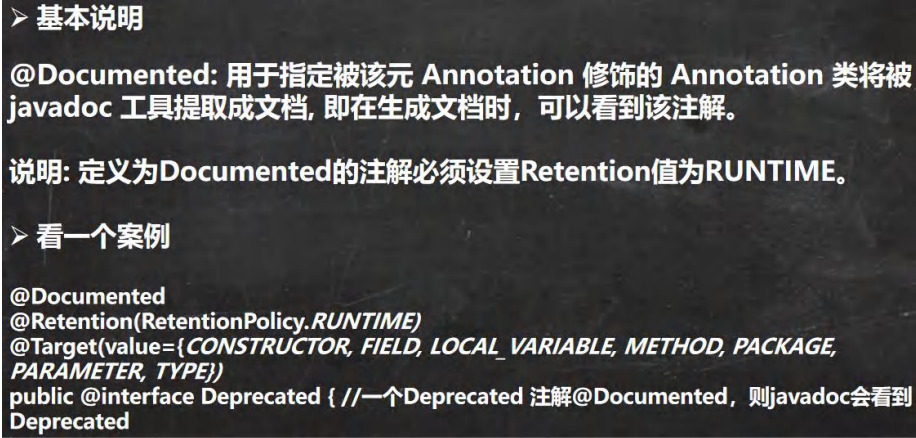
11.5.5 Inherited

第十二章 异常
12.1 基本概念
- Java语言中,将程序执行中发生的不正常情况称为“异常”。(开发过程中的语法错误和逻辑错误不是异常)
- 执行过程中所发生的异常事件可分为两大类
- Error(错误): Java虚拟机无法解决的严重问题。如:JVM系统内部错误、资源耗尽等严重情况。比如:StackOverflowError[栈溢出]和OOM(out of memory). Error是严重错误,程序会崩溃。
- Exception(异常): 其它因编程错误或偶然的外在因素导致的一般性问题,可以使用针对性的代码进行处理。例如空指针访问,试图读取不存在的文件,网络连接中断等等,Exception分为两大类: 运行时异常[程序运行时,发生的异常]和编译时异常[编程时,编译器检查出的异常]。
- 处理异常快捷键:Ctrl +Alt + T
12.2 异常体系图


12.3 常见运行时异常
- NullPointerException 空指针异常
- 当应用程序试图在需要对象的地方使用 null 时,抛出该异常
- ArithmeticException 数学运算异常
- 当出现异常的运算条件时,抛出此异常。例如,一个整数“除以零”时
- ArrayIndexOutOfBoundsException 数组下标越界异常
- 用非法索引访问数组时抛出的异常。如果索引为负或大于等于数组大小,则该索引为非法索引
- ClassCastException 类型转换异
- 当试图将对象强制转换为不是实例的子类时,抛出该异常。
- NumberFormatException 数字格式不正确异常
- 当应用程序试图将字符串转换成一种数值类型,但该字符串不能转换为适当格式时,抛出该异常
12.4 常见编译异常
- SQLException 操作数据库时,查询表可能发生异常
- IOException 操作文件时,发生的异常
- FileNotFoundException 当操作一个不存在的文件时,发生异常
- ClassNotFoundException 加载类,,而该类不存在时,异常
- EOFException 操作文件,到文件末尾,发生异常
- IllegalArguementException 参数异常
12.5 异常处理
**try-catch-finally**:程序员在代码中捕获发生的异常,自行处理
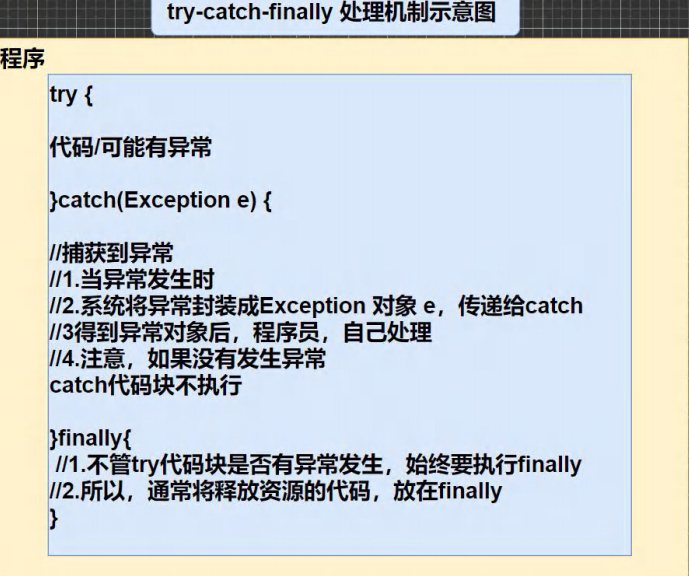
**throws**:将发生的异常抛出,交给调用者(方法)来处理,最顶级的处理者就是JVM。如果没有try-catch处理,则默认采用throws处理
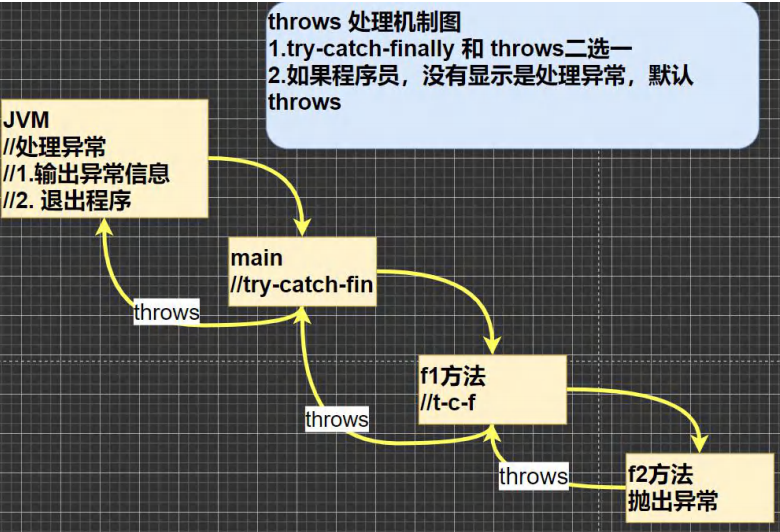
12.6 try-catch 异常处理
如果异常发生了,则异常发生后面的代码不会执行,直接进入到catch块;如果异常没有发生,则顺序执行try的代码块,不会进入到catch.
如果异常没有发生,则顺序执行 try 的代码块,不会进入到 catch
如果希望不管是否发生异常,都执行某段代码(比如关闭连接,释放资源等)则使用如下代码- finally
可以有多个catch语句,捕获不同的异常(进行不同的业务处理),**要求父类异常在后,子类异常在前**,比如(Exception在后,NullPointerException在前),如果发生异常,只会匹配一个catch
1
2
3
4
5
6
7
8
9
10
11
12
13
14
15
16
17
18
19
20
21public class TryCatchDetail02 {
public static void main(String[] args) {
//1.如果 try 代码块有可能有多个异常
//2.可以使用多个 catch 分别捕获不同的异常,相应处理
//3.要求子类异常写在前面,父类异常写在后面
try {
Person person = new Person();
// person = null;
System.out.println(person.getName());//NullPointerException
int n1 = 10;
int n2 = 0;
int res = n1 / n2;//ArithmeticException
} catch (NullPointerException e) {
System.out.println("空指针异常=" + e.getMessage());
} catch (ArithmeticException e) {
System.out.println("算术异常=" + e.getMessage());
} catch (Exception e) {
System.out.println(e.getMessage());
} finally {}
}
}可以进行try-finally 配合使用,这种用法相当于没有捕获异常,因此程序会直接崩掉/退出。应用场景,就是执行一段代码,不管是否发生异常,都必须执行某个业务逻辑
1
2
3
4
5
6
7
8
9
10
11
12
13
14
15public class TryCatchDetail02 {
public static void main(String[] args) {
try {
int n1 = 100;
int n2 = 0;
System.out.println(n1 / n2);
} finally {
System.out.println("执行了finally...");
}
System.out.println("程序继续执行...");
}
}
输出:
执行了finally...
12.7 try-catch 异常处理练习
Exercise01
1
2
3
4
5
6
7
8
9
10
11
12
13
14
15
16
17
18
19
20
21
22
23
24public class TryCatchExercise01 {
public static void main(String[] args) {
System.out.println(method());
}
public static int method() {
try {
String[] names = new String[3];
if (names[1].equals("durango")) {
System.out.println(names[1]);
} else {
names[3] = "zlx";
}
return 1;
} catch (ArrayIndexOutOfBoundsException e) {
return 2;
} catch (NullPointerException e) {
return 3;
}finally { // finally必须执行
return 4;
}
}
}
输出:4Exercise02
1
2
3
4
5
6
7
8
9
10
11
12
13
14
15
16
17
18
19
20
21
22
23
24
25
26
27
28public class TryCatchExercise02 {
public static void main(String[] args) {
System.out.println(method());
}
public static int method() {
int i = 1;
try {
i++; // i=2
String[] names = new String[3];
if (names[1].equals("durango")) {
i++;
System.out.println(names[1]);
} else {
i++;
names[3] = "zlx";
}
return 1;
} catch (ArrayIndexOutOfBoundsException e) {
return 2;
} catch (NullPointerException e) {
return ++i; // i=3
}finally { // finally必须执行
return ++i; // i=4
}
}
}
输出:4Exercise03
1
2
3
4
5
6
7
8
9
10
11
12
13
14
15
16
17
18
19
20
21
22
23
24
25
26
27
28
29
30
31
32package com.durango.trycatch_;
public class TryCatchExercise03 {
public static void main(String[] args) {
System.out.println(method());
}
public static int method() {
int i = 1;
try {
i++; // i=2
String[] names = new String[3];
if (names[1].equals("durango")) {
System.out.println(names[1]);
} else {
names[3] = "zlx";
}
return 1;
} catch (ArrayIndexOutOfBoundsException e) {
return 2;
} catch (NullPointerException e) {
return ++i; // i=3 ==> 保存到临时变量temp=3并执行完finally后再return!!
} finally { // finally必须执行
++i; // i=4
System.out.println("i=" + i);
}
}
}
输出:
i=4
3
12.8 throws异常处理
如果一个方法(中的语句执行时)可能生成某种异常,但是并不能确定如何处理这种异常,则此方法应显示地声明抛出异常,表明该方法将不对这些异常进行处理,而由该方法的调用者负责处理。
在方法声明中用throws语句可以声明抛出异常的列表,throws后面的异常类型可以是方法中产生的异常类型,也可以是它的父类。
注意事项:
- 对于编译异常,程序中必须显式地处理,比如try-catch或者throws
- 对于运行时异常,程序中如果没有处理,默认就是抛出的方式处理(隐式地处理)
- 子类重写父类的方法时,对抛出异常的规定: 子类重写的方法,所抛出的异常类型要么和父类抛出的异常一致,要么为父类抛出的异常的类型的子类型
- 在throws 过程中,如果有方法 try-catch,就相当于处理异常,就可以不必throws
throw和throws的区别

一个练习
1
2
3
4
5
6
7
8
9
10
11
12
13
14
15
16
17
18
19
20
21
22
23
24
25
26
27
28
29
30
31
32
33
34
35
36
37
38
39package com.durango.throws_;
public class ThrowExercise01 {
public static void main(String[] args) {
try {
ReturnExceptionDemo.methodA();
} catch (Exception e) {
System.out.println(e.getMessage());
}
ReturnExceptionDemo.methodB();
}
}
class ReturnExceptionDemo {
static void methodA() {
try {
System.out.println("进入方法A");
throw new RuntimeException("制造异常");
} finally {
System.out.println("A方法的finally");
}
}
static void methodB() {
try {
System.out.println("进入方法B");
return;
} finally {
System.out.println("B方法的finally");
}
}
}
输出:
进入方法A
A方法的finally
制造异常
进入方法B
B方法的finally
12.9 自定义异常
12.9.1 基本概念
当程序中出现了某些“错误”,但该错误信息并没有在Throwable子类中描述处理,这个时候可以自己设计异常类,用于描述该错误信息。
12.9.2 步骤
- 定义类:自定义异常类名(程序员自己写)继承Exception或RuntimeException
- 如果继承Exception,属于编译异常
- 如果继承RuntimeException,属于运行异常(一般来说,继承RuntimeException,好处是可以使用默认处理机制)
1 | public class CustomException { |
第十三章 常用类
13.1 包装类
13.1.1 包装类的分类
针对八种基本数据类型相应的引用类型—包装类
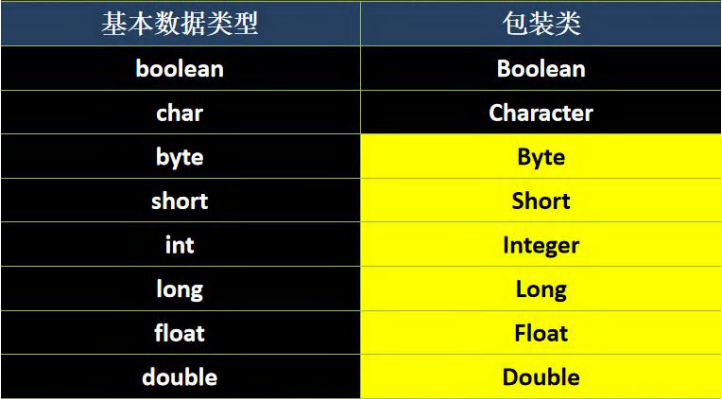


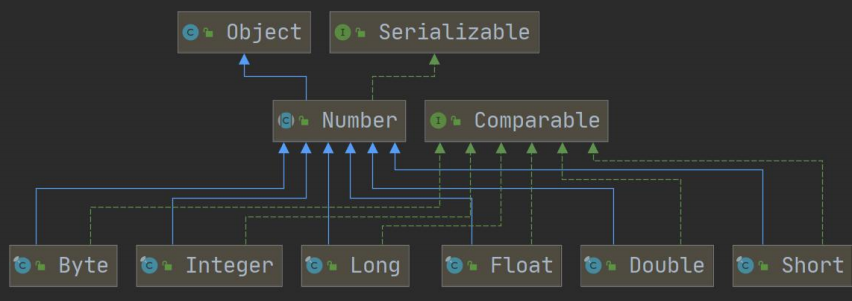
13.1.2 包装类与基本数据类型转换
jdk5前的手动装箱和拆箱方式,装箱: 基本类型->包装类型,反之,拆箱
jdk5 以后(含jdk5)的自动装箱和拆箱方式
自动装箱底层调用的是valueOf方法,比如Integer.valueOf()
其它包装类的用法类似,不举例
基本方法:Interger.valueOf(n),integer.intValue()
1
2
3
4
5
6
7
8
9
10
11
12
13
14
15
16
17
18package com.durango.wrapper_;
public class Integer01 {
public static void main(String[] args) {
//int <--> Integer
//jdk5以前是手动装箱和拆箱
int n1 = 100;
Integer integer = new Integer(n1);
Integer integer1 = Integer.valueOf(n1);
int i = integer.intValue();
//jdk5以后,就可以自动装箱和拆箱
int n2 = 100;
Integer integer2 = n2; //底层仍然是使用Integer.valueOf(n2)
int j = integer2; //底层仍然使用的是 intValue()方法
}
}一个经典面试题
1
2
3
4
5
6
7
8
9
10Object obj = true ? new Integer(1) : new Double(2.0);
System.out.println(obj); // 输出为1.0,三元运算符是一个整体,结果会向高精度类型转换
Object obj2;
if(true){
obj2 = new Integer(1);
} else {
obj2 = new Double(2.0);
}
System.out.println(obj2); // 输出为1
13.1.3 包装类与String相互转化
1 | package com.durango.wrapper_; |
13.1.4 Integer类 和 Character类的常用方法
- 即用即查
1 | System.out.println(Integer.MIN_VALUE); //返回最小值 |
13.1.5 经典面试题
Exercise01
1
2
3
4
5
6
7
8
9
10Object obj = true ? new Integer(1) : new Double(2.0);
System.out.println(obj); // 输出为1.0,三元运算符是一个整体,结果会向高精度类型转换
Object obj2;
if(true){
obj2 = new Integer(1);
} else {
obj2 = new Double(2.0);
}
System.out.println(obj2); // 输出为1
Exercise02:查看valueOf源码
1
2
3
4
5
6
7
8
9
10
11
12
13
14
15
16
17
18
19
20
21Integer i = new Integer(1);
Integer j = new Integer(1);
System.out.println(i == j); //false
//1. 如果 i 在 IntegerCache.low(-128)~IntegerCache.high(127),就直接从数组返回
//2. 如果不在 -128~127,就 new Integer(i)
/*
public static Integer valueOf(int i) {
if (i >= IntegerCache.low && i <= IntegerCache.high)
return IntegerCache.cache[i + (-IntegerCache.low)];
return new Integer(i);
}
*/
Integer m = Integer.valueOf(1); // 查看valueOf源码
Integer n = Integer.valueOf(1);
System.out.println(m == n); //true
Integer x = 128; // 自动包装,底层也是调用Integer.valueOf,看源码
Integer y = 128;
System.out.println(x == y); //falseExercise03
1
2
3
4
5
6
7
8
9
10
11
12
13
14
15
16
17
18
19
20
21
22
23
24
25
26
27
28Integer i1 = new Integer(127);
Integer i2 = new Integer(127);
System.out.println(i1 == i2); //false
Integer i3 = new Integer(128);
Integer i4 = new Integer(128);
System.out.println(i3 == i4); //false
Integer i5 = 127;
Integer i6 = 127;
System.out.println(i5 == i6); //true
Integer i7 = 128;
Integer i8 = 128;
System.out.println(i7 == i8); //false
Integer i9 = 127;
Integer i10 = new Integer(127);
System.out.println(i9 == i10); //false
// 只要有基本数据类型,判断的就是值是否相等
Integer i11 = 127;
int i12 = 127;
System.out.println(i11 == i12); //true
Integer i13 = 128;
int i14 = 128;
System.out.println(i13 == i14); //true
13.2 String类 (重要!)
13.2.1 String基本介绍


- 构造器
- String s1 = new String();
- String s2 = new String(String original);
- String s3 = new String(char[] a);
- String s4 = new String(char[] a,int startIndex,int count)
- String s5 = new String(byte[] b)
- String 类实现了接口 Serializable【String 可以串行化:可以在网络传输】 接口 Comparable [String 对象可以比较大小]
- String 是 final 类,因此不能被其他的类继承
- String 有属性 private final char value[]; 用于存放字符串内容
- **一定要注意**:value 是一个 final 类型(的引用类型), 不可以修改:即 value 不能指向新的地址,但是单个字符内容是可以变化
13.2.2 创建 String 对象的两种方式

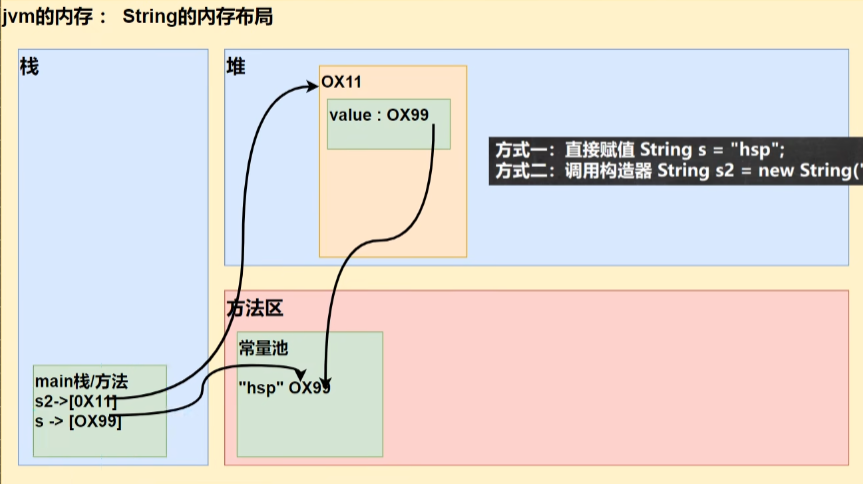
1 | // 创建String对象 |
13.2.3 练习题
Exercise01
1
2
3
4String a = "abc";
String b = "abc";
System.out.println(a.equals(b)); //true 查看equals源码,equals比较的是value数组的每一个字符
System.out.println(a == b); //true 都是指向常量池中的"abc",==比较的是地址Exercise02
1
2
3
4String c = new String("abc");
String d = new String("abc");
System.out.println(c.equals(d)); //true
System.out.println(c == b); //false c和d指向堆中不同的对象空间,都维护了value属性指向常量池中的"abc"Exercise03
- 当调用intern方法时,如果池已经包含一个等于此String对象的字符串(用equals(Object)方法确定),则返回池中的字符串。否则,将此 String 对象加到池中,并返回此String 对象的引用
1
2
3
4
5
6
7String a = "abc";
String b = new String("abc");
System.out.println(a.equals(b)); //true
System.out.println(a == b); //false
System.out.println(a == b.intern()); // true b.intern()返回的是常量池的地址(value指向的地址)
System.out.println(b == b.intern()); // false
13.3 字符串特性及面试题
13.3.1 字符串特性
String是一个final类,代表不可变的字符序列
字符串是不可变的。一个字符串对象一旦被分配,其内容是不可变的。(区分对象的引用和对象本身)
- ```java
String s1 = “hello”;
s1 = “haha”;
// 创建了几个对象,画出内存布局图1
2
3
4
5
6
7
8
9
10
11
12
13
14
15
16
17
18
19
20
21
22
23
24
25
26
27
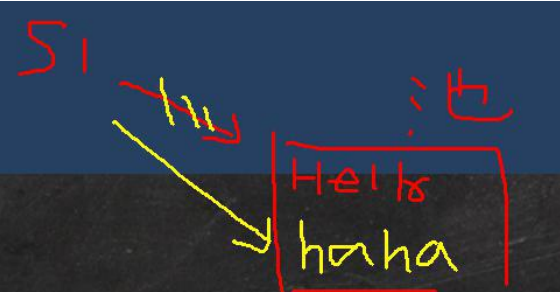
### 13.3.2 面试题
- 题目1

- 题目2
- <font color='red'>两个字符串**常量相加**,直接在**池**中创建新常量。引用直接指向池中的这个常量</font>
- <font color='red'>两个字符串**变量相加**,在**堆**中创建字符串对象,value[]指向池中的新常量。引用指向的是堆中的字符串对象。</font>
- 常量相加指向池,变量相加指向堆
```java
String a = "hello";
String b = "haha";
String c = "hello" + "haha";
// 优化等价于String c = "hellohaha";
// c指向池中的"hellohaha"
System.out.println(c == "hellohaha"); // true
1
2
3
4
5
6
7
8
9
10String a = "hello";
String b = "haha";
String c = a + b;
// 1. 先创建一个StringBuilder sb = StringBuilder()
// 2. 执行 sb.append("hello")
// 3. 执行 sb.append("haha")
// 4. 调用 sb.toString(), 返回一个new String("hellohaha")给c
// 最终效果,c指向堆中的对象(String), value[]指向池中的"hellohaha"
System.out.println(c == "hellohaha"); // false- ```java
题目3
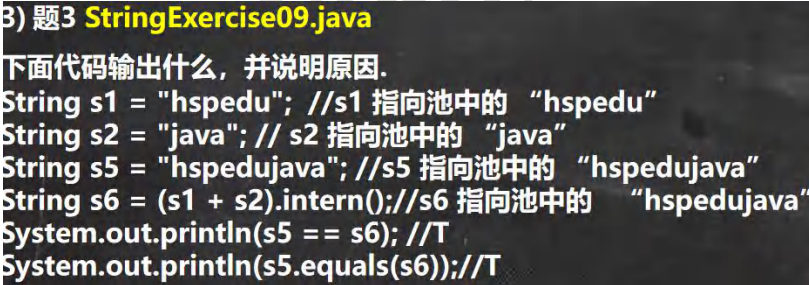
题目4
1
2
3
4
5
6
7
8
9
10
11
12
13
14
15
16
17
18
19
20
21
22
23
24
25
26
27package com.durango.string_;
public class String07 {
public static void main(String[] args) {
Test1 ex = new Test1();
ex.change(ex.str, ex.ch);
System.out.println(ex.str); //hsp
System.out.println(ex.ch); //hava
int[] a = new int[4];
// ex.ch = new char[]{'a', 'b'}; 报错,ex.ch是final类型,不能重新指向新对象
}
}
class Test1 {
String str = new String("hsp");
final char[] ch = {'j', 'a', 'v', 'a'};
public void change(String str, char[] ch) {
//str是形参,调用时指向实参对象
str = "java"; //str重新指向新的对象后不会影响实参对象
ch[0] = 'h';
ch = new char[]{'a', 'b'};
System.out.println(str); //java
System.out.println(ch); // ab
}
}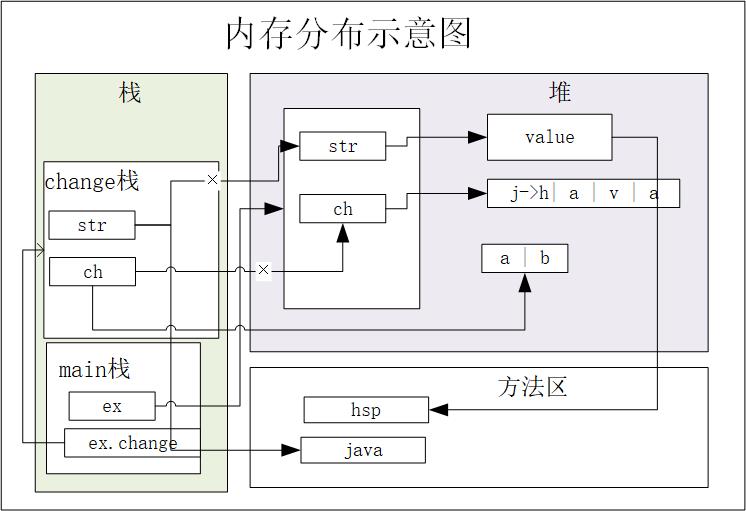
13.4 String类常见方法

1 | //1. equals 比较内容是否相同,区分大小写 |
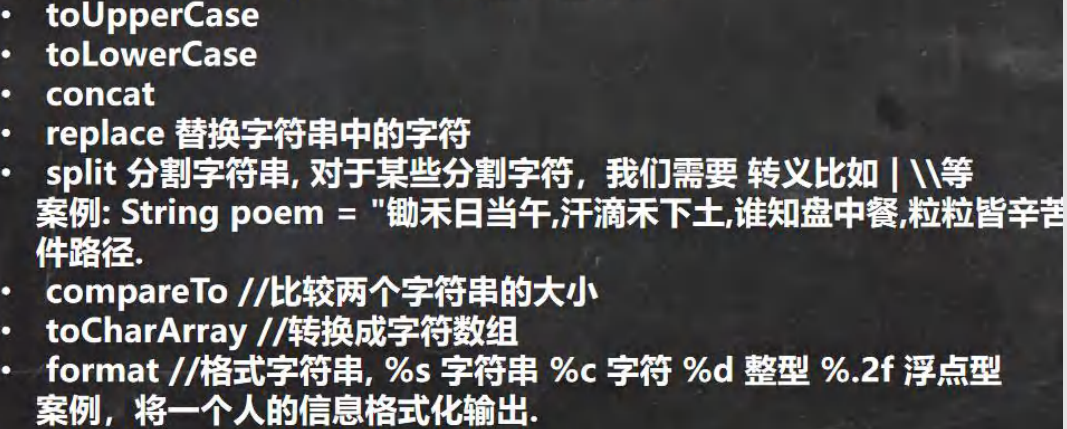
1 | // 1.toUpperCase 转换成大写 |
13.5 StringBuffer类
13.5.1 基本介绍
- String类是保存字符串常量的。每次更新都需要重新开辟空间(new 对象),效率较低, 因此java设计者还提供了String Builder 和 StringBuffer 来增强String的功能并提高效率。
- java.lang.StringBuffer代表可变的字符序列,可以对字符串内容进行增删
- 很多方法与String相同,但StringBuffer是可变长度的。
- StringBuffer是一个容器。
继承关系图
- StringBuffer 的直接父类 是 AbstractStringBuilder
- StringBuffer 实现了 Serializable, 即 StringBuffer 的对象可以串行化
- 在父类中 AbstractStringBuilder 有属性 char[] value, 不是 final, 该value数组存放字符串内容,存放在堆中(而不是存放在常量池)
- StringBuffer 是一个 final 类,不能被继承
- 因为 StringBuffer字符内容是存放在 char[] value, 所以变化(增加/删除),不用每次都更换地址(即不是每次创建新对象), 所以效率高于 String
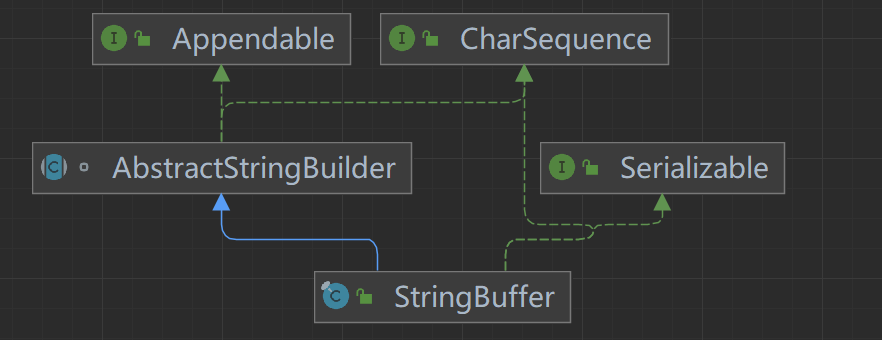
13.5.2 StingBuffer VS String (重要!)
String通过 private final char value[]属性 保存的是字符串常量,保存在常量池。
- value是private的,且String内部没有提供setValue方法修改value数组里面的内容,即从String类外部无法修改value数组里面的内容(不代表不能修改)【value内容的不可变性】;
- value是final的,所以value不能重新指向新的字符串常量【value地址的不可变性】
- 因为有这两个不可变性,我们对String的更新既不能通过改变value的内容实现,也不能通过改变value的地址实现。每次String类的更新,实际上是在堆中new了一个新的String对象,这个对象的value属性指向了常量池中新的字符串常量,因此效率较低 。
StringBuffer通过 char[] value属性 保存的是字符串变量,保存在堆中。
- value数组里面的内容可以修改,value的地址也可以修改。
- StringBuffer的更新实际上可以修改内容,不用每次修改地址(除非数组要扩容),因此效率较高。
1 | final String a = "avd"; |
13.5.3 StringBuffer与String相互转化
StringBuffer构造器
1
2
3
4
5
6//StringBuffer构造器
//1. 创建一个大小为 16 的char[] value,用于存放字符内容
StringBuffer stringBuffer = new StringBuffer();
//2. 通过构造器指定char[] value的大小
stringBuffer = new StringBuffer(100);
//3. 通过给一个String创建StringBuffer,char[] value大小是str.length()+16String–>StringBuffer
1
2
3
4
5
6
7// String --> StringBuffer
// 1. 通过构造器
String str = "hello";
StringBuffer stringBuffer1 = new StringBuffer(str);
// 2.通过append
StringBuffer stringBuffer2 = new StringBuffer();
stringBuffer2.append(str);StringBuffer–>String
1
2
3
4
5
6//StringBuffer ->String
StringBuffer stringBuffer3 = new StringBuffer("hello,world");
//1.使用构造器来搞定
String s = new String(stringBuffer3);
//2. 使用 StringBuffer 提供的 toString 方法
String s1 = stringBuffer3.toString();
13.5.4 StringBuffer常用方法
- 增
- s.append(string)
- 删
- s.delete(start, end),删除索引在区间 [start,end) 处的字符
- 改
- s.replace(start, end, string),替换区间[start,end) 处的字符
- 查
- s.indexOf(string),查找指定的子串在字符串第一次出现的索引,如果找不到返回-1
- 插
- s.insert(index, string),在指定索引index前插入
- 长度
- s.length()
- 注意!!String类型的修改会返回一个新的String对象,不会影响原String对象,因此需要一个新的引用或者将原引用指向这个新的String对象。StringBuffer的修改会直接影响到原StringBuffer对象,原引用即指向修改后的StringBuffer对象。
1 | StringBuffer s = new StringBuffer("hello"); |
13.5.5 测试题
Exercise01 区分空指针 和 空字符串
1
2
3
4
5
6
7
8
9
10
11
12
13
14
15
16
17
18
19
20
21
22
23String str = null; // str是个空指针,没有赋值(地址)
StringBuffer stringBuffer = new StringBuffer();
stringBuffer.append(str); ////需要看源码,底层调用的是AbstractStringBuilder的appendNull
System.out.println(stringBuffer.length()); // 4
System.out.println(stringBuffer); // null
//下面的构造器,会抛出NullpointerException
try {
StringBuffer stringBuffer1 = new StringBuffer(str); // 看底层源码super(str.length()+16);
} catch (Exception e) {
throw new RuntimeException(e);
}
String str1 = ""; //str1不是空指针,指向看内存中一个空字符串
StringBuffer stringBuffer2 = new StringBuffer();
stringBuffer.append(str1); ////需要看源码,底层调用的是AbstractStringBuilder的appendNull
System.out.println(stringBuffer2.length()); // 0
System.out.println(stringBuffer2); // 无输出
//下面的构造器,不会报错
StringBuffer stringBuffer3 = new StringBuffer(str1); // 看底层源码super(str.length()+16);
System.out.println(stringBuffer2.length()); // 0
System.out.println(stringBuffer3); //无输出Exercise02 将价格格式化
1
2
3
4
5
6
7
8String price = "123443545123.57";
StringBuffer sb = new StringBuffer(price);
for (int i = sb.lastIndexOf(".") - 3; i > 0; i -= 3) {
sb.insert(i, ",");
}
System.out.println(sb);//123,443,545,123.57
13.6 StringBuilder
13.6.1 基本介绍
- 一个可变的字符序列。此类提供一个与 StringBuffer兼容的API, 但不保证同步(StringBuilder 不是线程安全)。该类被设计用作 StringBuffer的一个简易替换,用在字符串缓冲区被单个线程使用的时候。如果可能,建议优先采用该类因为在大多数实现中,它比 StringBuffer 要快[后面测]。
- 在StringBuilder上的主要操作是 append和insert方法,可重载这些方法,以接受任意类型的数据。
继承关系图
- StringBuilder 继承 AbstractStringBuilder 类
- 实现了 Serializable ,说明 StringBuilder 对象是可以串行化(对象可以网络传输,可以保存到文件)
- StringBuilder 是 final 类, 不能被继承
- StringBuilder 对象字符序列仍然是存放在其父类AbstractStringBuilder 的 char[] value; 因此,字符序列是堆中
- StringBuilder 的方法,没有做互斥的处理,即没有 synchronized 关键字,因此在单线程的情况下使用
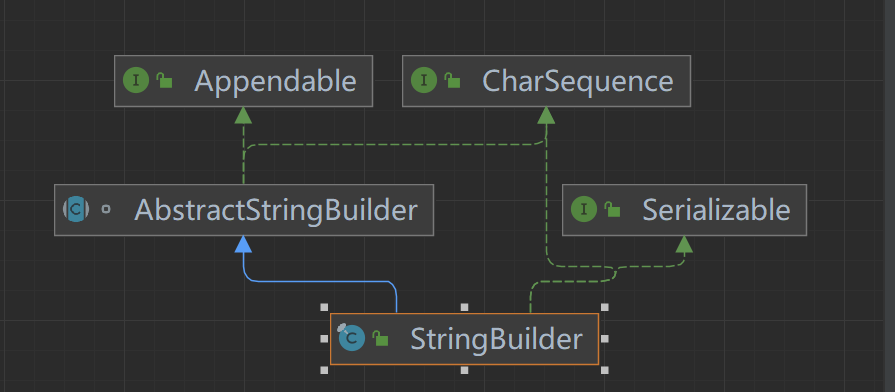
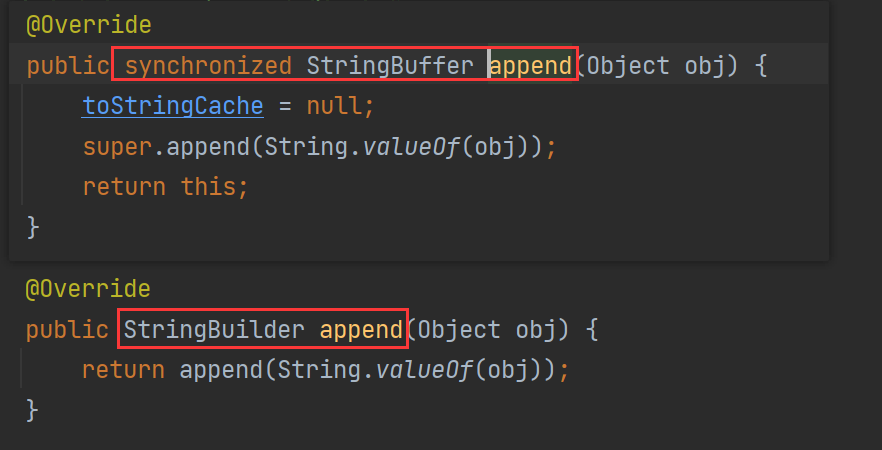
13.6.2 String StringBuffer StringBuilder比较(重要!)
字符串生成器和StringBuffer非常类似,均代表可变的字符序列,而且方法也一样
字符串:不可变字符序列(final char value[]),效率低,但是复用率高.
StringBuffer:可变字符序列(char[] value)、效率较高(增删)、线程安全,看源码
StringBuilder:可变字符序列、效率最高、线程不安全
如何选择

13.6.3 效率测试
1 | long startTime = 0L; |
13.7 Math类
1 | //看看 Math 常用的方法(静态方法) |
13.8 Arrays类
13.8.1 常用方法
toString:返回数组的字符串形式
1
2Integer[] integers = {1, 23, 44};
System.out.println(Arrays.toString(integers)); // [1, 23, 44]sort:默认排序或定制排序
1
2
3
4
5
6
7
8
9
10
11
12
13
14
15
16
17
18
19
20
21
22
23
24
25
26
27
28
29
30
31
32
33
34
35
36
37
38
39
40//2. sort:默认排序和定制排序
// 数组是引用类型,排序后会直接印象实参
// 重载的sort,也可以通过传入一个接口 Comparator 实现定制排序
// 调用 定制排序 时,传入两个参数
// (1) 排序的数组 arr
// (2) 实现了 Comparator 接口的匿名内部类 , 要求实现 compare 方法
Integer[] arr = {1, -1, 3, 7, 88, 20};
Arrays.sort(arr); //默认排序(从小到大)
System.out.println(Arrays.toString(arr));
// 定制排序
Arrays.sort(arr, new Comparator<Integer>() {
public int compare(Integer o1, Integer o2) {
return o2 - o1;
}
});
System.out.println(Arrays.toString(arr));
// 源码分析
//(1) Arrays.sort(arr, new Comparator(){});
//(2) 最终到 TimSort 类的 private static <T> void binarySort(T[] a, int lo, int hi, int start, Comparator<? super T> c)()
//(3) 执行到 binarySort 方法的代码, 会根据动态绑定机制 c.compare()执行我们传入的匿名内部类的 compare ()
// while (left < right) {
// int mid = (left + right) >>> 1;
// if (c.compare(pivot, a[mid]) < 0)
// right = mid;
// else
// left = mid + 1;
// }
//(4) new Comparator() {
// @Override
// public int compare(Object o1, Object o2) {
// Integer i1 = (Integer) o1;
// Integer i2 = (Integer) o2;
// return i2 - i1;
// }
//
//(5) public int compare(Object o1, Object o2) 返回的值>0 还是 <0
// 会影响整个排序结果, 这就充分体现了 接口编程+动态绑定+匿名内部类的综合使用
// 将来的底层框架和源码的使用方式,会非常常见1
2
3
4
5
6
7
8
9
10
11
12
13
14
15
16
17
18
19
20
21
22
23
24
25
26
27
28
29
30
31
32
33
34
35
36
37
38
39
40
41
42
43
44
45
46//定制冒泡排序
public class ArraySortCustom {
public static void main(String[] args) {
int[] arr = {1, -1, 8, 0, 20};
bubble(arr);
System.out.println(Arrays.toString(arr));
bubble(arr, new Comparator() {
public int compare(Object o1, Object o2) {
int i1 = (Integer)o1;
int i2 = (Integer)o2;
return i2 - i1;
}
});
System.out.println(Arrays.toString(arr));
}
public static void bubble(int[] arr) {
int temp = 0;
for (int i = 0; i < arr.length - 1; i++) {
for (int j = 0; j < arr.length - 1 - i; j++) {
if (arr[j] > arr[j + 1]) {
temp = arr[j];
arr[j] = arr[j + 1];
arr[j + 1] = temp;
}
}
}
}
public static void bubble(int[] arr, Comparator c) {
int temp = 0;
for (int i = 0; i < arr.length - 1; i++) {
for (int j = 0; j < arr.length - 1 - i; j++) {
// 排序规则由c.compare(arr[j], arr[j + 1])返回值决定
if (c.compare(arr[j], arr[j + 1]) > 0) {
temp = arr[j];
arr[j] = arr[j + 1];
arr[j + 1] = temp;
}
}
}
}
}
binarySearch:二分查找
1
2
3
4
5
6
7
8Integer[] arr = {1, 2, 90, 123, 567};
// binarySearch 通过二分搜索法进行查找,要求必须排好
//1. 使用 binarySearch 二叉查找
//2. 要求该数组是有序的. 如果该数组是无序的,不能使用 binarySearch
//3. 如果数组中不存在该元素,就返回 return -(low + 1); // key not found.
// low是指元素应该插入的位置
int index = Arrays.binarySearch(arr, 100);
System.out.println("index=" + index); // -4
copyOf:数组拷贝
1
2
3
4
5
6
7
8// copyOf 数组拷贝
//1. 从 arr 数组中,拷贝 length 个元素到 newArr 数组中
//2. 如果拷贝的长度length > oldArr.length 就在新数组的后面 增加 null
//3. 如果拷贝长度length < 0 就抛出异常 NegativeArraySizeException
//4. 该方法的底层使用的是 System.arraycopy()
Integer[] newArr = Arrays.copyOf(oldArr, length);
System.out.println("==拷贝执行完毕后==");
System.out.println(Arrays.toString(newArr));fill:数组填充
1
2
3
4
5
6//fill 数组元素的填充
Integer[] num = new Integer[]{9,3,2};
//1. 使用 99 去填充 num 数组,可以理解成是替换原理的元素
Arrays.fill(num, 99);
System.out.println("==num 数组填充后==");
System.out.println(Arrays.toString(num));
equals:数组比对
1
2
3
4
5
6//equals 比较两个数组元素内容是否完全一致
Integer[] arr2 = {1, 2, 90, 123};
//1. 如果 arr 和 arr2 数组的元素一样,则方法 true;
//2. 如果不是完全一样,就返回 false
boolean equals = Arrays.equals(arr, arr2);
System.out.println("equals=" + equals);
asList:将一组数据转换成 list
1
2
3
4
5
6
7
8//1. asList 方法,会将 (2,3,4,5,6,1)数据转成一个 List 集合
//2. 返回的 asList编译类型:List(是接口)
//3. 返回的 asList运行类型:java.util.Arrays#ArrayList,
// ArrayList是 Arrays 类的静态内部类 private static class ArrayList<E> extends AbstractList<E>
// implements RandomAccess, java.io.Serializable
List asList = Arrays.asList(2,3,4,5,6,1);
System.out.println("asList=" + asList);
System.out.println("asList 的运行类型" + asList.getClass());
13.8.2 练习题
1 | // 定制排序 |
13.9 System类
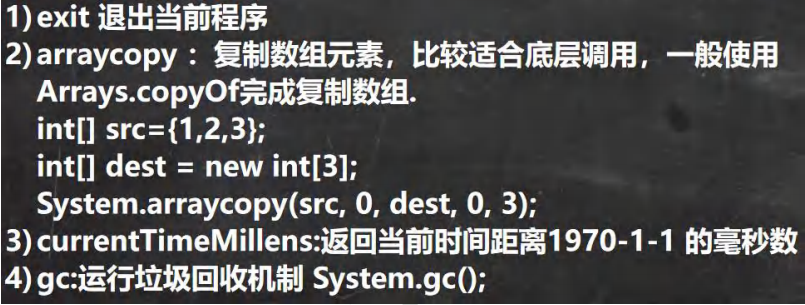
1 | //exit 退出当前程序 |
13.10 BigInteger 和 BigDecimal 类
应用场景:
- Biglnteger适合保存比较大的整型
- BigDecimal适合保存精度更高的浮点型(小数)
1
2
3
4
5
6
7// 当我们编程中,需要处理很大的整数,long 不够用
// 可以使用 BigInteger 的类来搞定
//long l = 23788888899999999999999999999l;
//System.out.println("l=" + l);
BigInteger bigInteger = new BigInteger("23788888899999999999999999999");
System.out.println(bigInteger);1
2
3
4
5
6
7// 当我们需要保存一个精度很高的数时,double 不够用
// 可以用 BigDecimal
//double d = 1999.11111111111999999999999977788d;
//System.out.println(d); //会缩减精度
BigDecimal bigDecimal = new BigDecimal("1999.11");
BigDecimal bigDecimal2 = new BigDecimal("3");
System.out.println(bigDecimal);加、减、乘、除操作
1
2
3
4
5
6
7
8
9
10//1. 在对 BigInteger 进行加减乘除的时候,需要使用对应的方法,不能直接进行 + - * /
//2. 可以创建一个 要操作的 BigInteger 然后进行相应操作
BigInteger add = bigInteger.add(bigInteger2);
System.out.println(add);//加
BigInteger subtract = bigInteger.subtract(bigInteger2);
System.out.println(subtract);//减
BigInteger multiply = bigInteger.multiply(bigInteger2);
System.out.println(multiply);//乘
BigInteger divide = bigInteger.divide(bigInteger2);
System.out.println(divide);//除1
2
3
4
5
6
7
8
9//1. 如果对 BigDecimal 进行运算,比如加减乘除,需要使用对应的方法
//2. 创建一个需要操作的 BigDecimal 然后调用相应的方法即可
System.out.println(bigDecimal.add(bigDecimal2));
System.out.println(bigDecimal.subtract(bigDecimal2));
System.out.println(bigDecimal.multiply(bigDecimal2));
//System.out.println(bigDecimal.divide(bigDecimal2));//可能抛出异常ArithmeticException,无限循环小数
//在调用 divide 方法时,指定精度即可. BigDecimal.ROUND_CEILING
//如果有无限循环小数,就会保留 和“被除数”一致的 精度
System.out.println(bigDecimal.divide(bigDecimal2, BigDecimal.ROUND_CEILING));
13.11 日期类
13.11.1 第一代日期类 Date
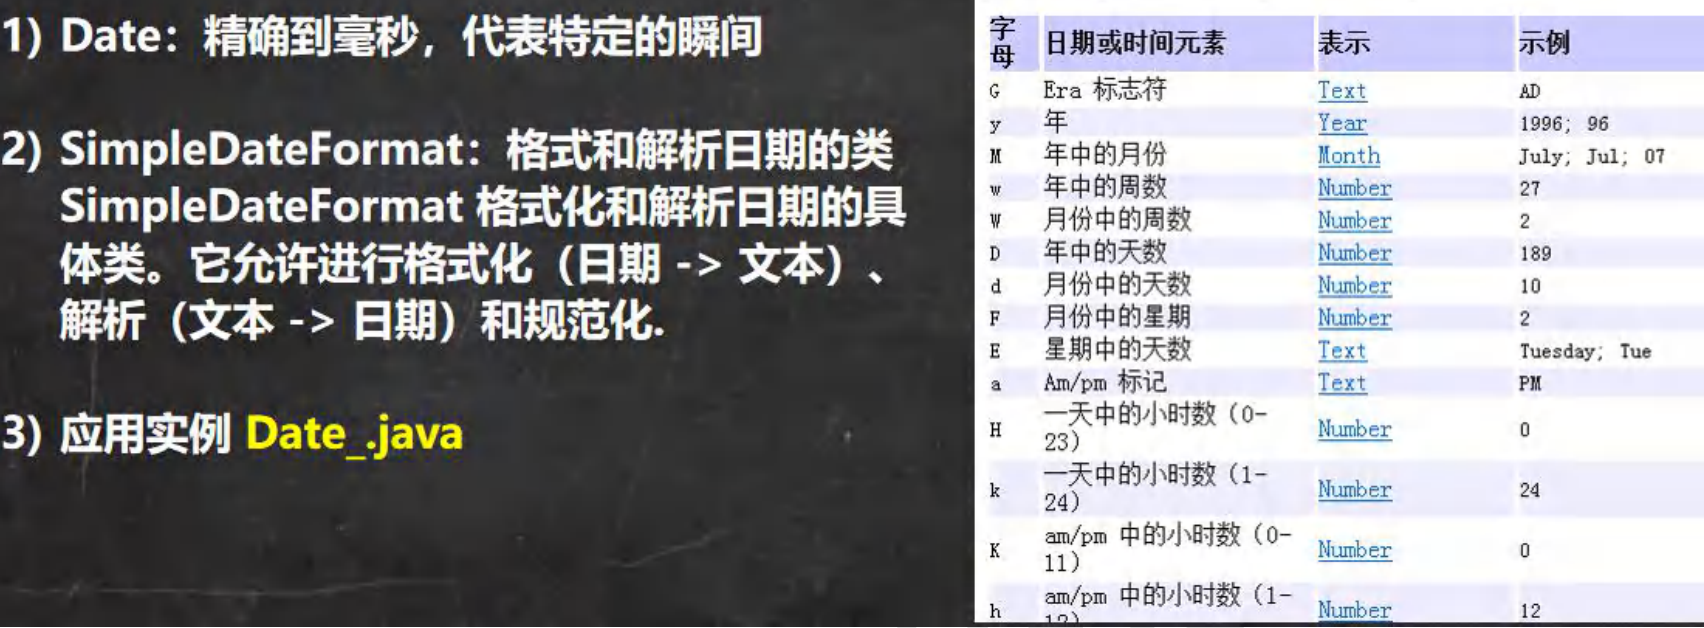
获取日期
1
2
3
4
5
6
7
8
9
10//1. 获取当前系统时间
//2. 这里的 Date 类是在 java.util 包的
//3. 默认输出的日期格式是国外的方式, 因此通常需要对格式进行转换
Date d1 = new Date(); //获取当前系统时间
System.out.println("当前日期=" + d1);
Date d2 = new Date(9234567); //通过指定毫秒数得到时间
System.out.println("d2=" + d2);
System.out.println(d1.getTime()); //获取某个时间对应的毫秒数Date转格式化String
1
2
3
4
5//1. 创建 SimpleDateFormat 对象,将Date转换成格式化字符串
//2. 这里的格式使用的字母是规定好,不能乱写
SimpleDateFormat sdf = new SimpleDateFormat("yyyy年MM月dd日 hh:mm:ss E");
String format = sdf.format(d1); // format:将日期转换成指定格式的字符串
System.out.println("当前日期=" + format);格式化String转Date
1
2
3
4
5
6//1. 可以把一个格式化的 String 转成对应的 Date
//2. 得到 Date 在输出时,仍然还是按照国外的形式,如果希望指定格式输出,还是需要转换
//3. 在把 String -> Date , String 的格式 需要和 定义的sdf格式 一致,否则会抛出转换异常
String s = "1996 年 01 月 01 日 10:20:30 星期一";
Date parse = sdf.parse(s); //可能会报异常ParseException
System.out.println("parse=" + sdf.format(parse));
13.11.2 第二代日期类 Calendar

获取Calendar对象
1
2
3
4
5
6
7//1. Calendar 是一个抽象类, 并且构造器是 private
//2. 可以通过 getInstance() 来获取实例
//3. 提供大量的方法和字段提供给程序员
//4. Calendar 没有提供对应的格式化的类,因此需要程序员自己组合来输出(灵活)
//5. 如果我们需要按照 24 小时进制来获取时间, Calendar.HOUR ==改成=> Calendar.HOUR_OF_DAY
Calendar c = Calendar.getInstance(); //创建日历类对象,比较简单,自由
System.out.println("c=" + c); //会输出很多字段信息获取日历字段
1
2
3
4
5
6
7
8//获取日历对象的某个日历字段
System.out.println("年:" + c.get(Calendar.YEAR));
// 这里为什么要 + 1, 因为 Calendar 返回月时候,是按照 0 开始编号
System.out.println("月:" + (c.get(Calendar.MONTH) + 1));
System.out.println("日:" + c.get(Calendar.DAY_OF_MONTH));
System.out.println("小时:" + c.get(Calendar.HOUR));
System.out.println("分钟:" + c.get(Calendar.MINUTE));
System.out.println("秒:" + c.get(Calendar.SECOND));格式化输出
1
2
3
4//Calender 没有专门的格式化方法,所以需要程序员自己来组合显示
System.out.println(c.get(Calendar.YEAR) + "-" + (c.get(Calendar.MONTH) + 1) + "-" +
c.get(Calendar.DAY_OF_MONTH) +
" " + c.get(Calendar.HOUR_OF_DAY) + ":" + c.get(Calendar.MINUTE) + ":" + c.get(Calendar.SECOND) );
13.11.3 第三代日期类 LocalDateTime


获取日期时间
1
2
3
4
5//1. 使用 now() 返回表示当前日期时间的 对象
LocalDateTime ldt = LocalDateTime.now();
System.out.println(ldt);
LocalDate now = LocalDate.now(); //可以获取年月日
LocalTime now2 = LocalTime.now();//获取到时分秒格式化输出
1
2
3
4
5
6
7
8
9
10
11
12
13
14//2. 使用 DateTimeFormatter 对象来进行格式化
// 创建 DateTimeFormatter 对象
DateTimeFormatter dateTimeFormatter = DateTimeFormatter.ofPattern("yyyy-MM-dd HH:mm:ss");
String format = dateTimeFormatter.format(ldt);
System.out.println("格式化的日期=" + format);
// 也可以向Calendar一样输出各个字段,组合显示
System.out.println("年=" + ldt.getYear());
System.out.println("月=" + ldt.getMonth());
System.out.println("月=" + ldt.getMonthValue());
System.out.println("日=" + ldt.getDayOfMonth());
System.out.println("时=" + ldt.getHour());
System.out.println("分=" + ldt.getMinute());
System.out.println("秒=" + ldt.getSecond());对当前时间进行加减
1
2
3
4
5
6
7//提供 plus 和 minus 方法可以对当前时间进行加或者减
//看看 890 天后,是什么时候 把 年月日-时分秒
LocalDateTime ldt2 = ldt.plusDays(890);
System.out.println("890 天后=" + dateTimeFormatter.format(ldt2));
//看看在 3456 分钟前是什么时候,把 年月日-时分秒输出
LocalDateTime ldt3 = ldt.minusMinutes(3456);
System.out.println("3456 分钟前 日期=" + dateTimeFormatter.format(ldt3));
第十四章 集合
14.1 集合介绍
- 数组的不足
- 长度开始时必须指定,而且一旦指定,不能更改
- 保存的必须为同一类型的元素
- 使用数组进行增加/删除元素比较麻烦(需要创建一个新数组)
- 集合的好处
- 可以动态保存任意多个对象,使用比较方便!
- 提供了一系列方便的操作对象的方法:add、remove、set、get等
- 使用集合添加,删除新元素的代码-简洁明了
14.2 框架体系图(必背)
集合主要是两组(单列集合 , 双列集合)
Collection 接口有两个重要的子接口 List和Set , 他们的实现子类都是单列集合
Map 接口的实现子类 是双列集合,存放的是 K-V
- Collection
- List
- Vector
- ArrayList
- LinkedList
- Set
- TreeSet
- HashSet
- List
- Map
- TreeMap
- HashMap
- LinkedHashMap
- Hashtable
- Properties
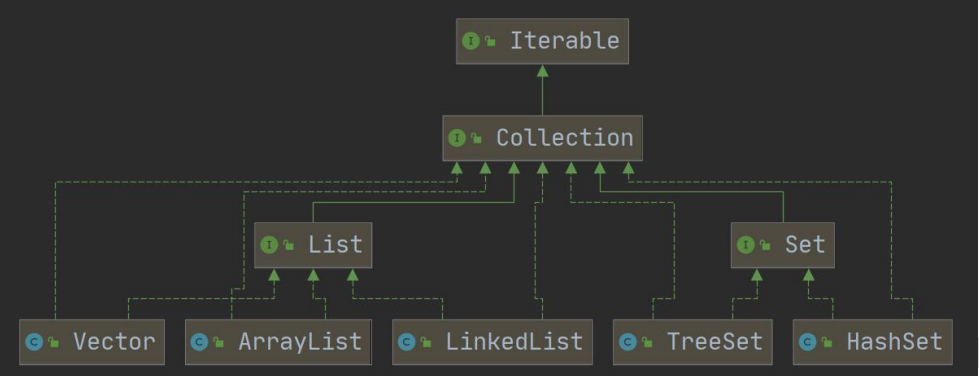
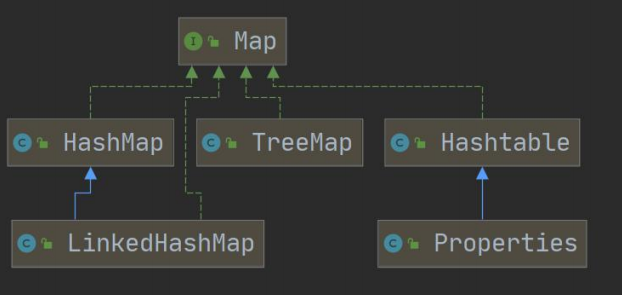
14.3 Collection接口
14.3.1 实现类的特点和常用方法
收集实现子类可以存放多个元素,每个元素可以是Object
有些Collection的实现类,可以存放重复的元素,有些不可以
有些的实现类,有些是有序的(List),有些是无序的(Set)
集合接口没有直接的实现子类,是通过它的子接口Set和List来实现的
常用方法:以ArrayList为例
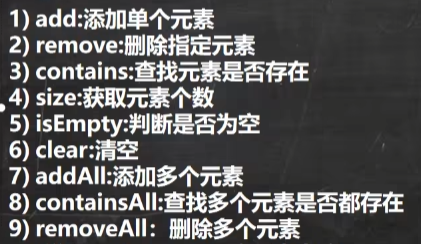
1 | List list = new ArrayList(); |
14.3.2 遍历1 - Iterator迭代器
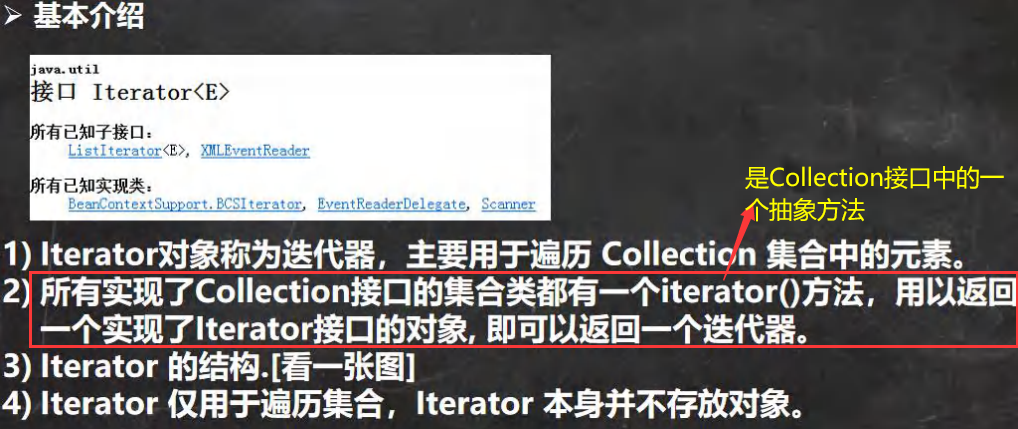
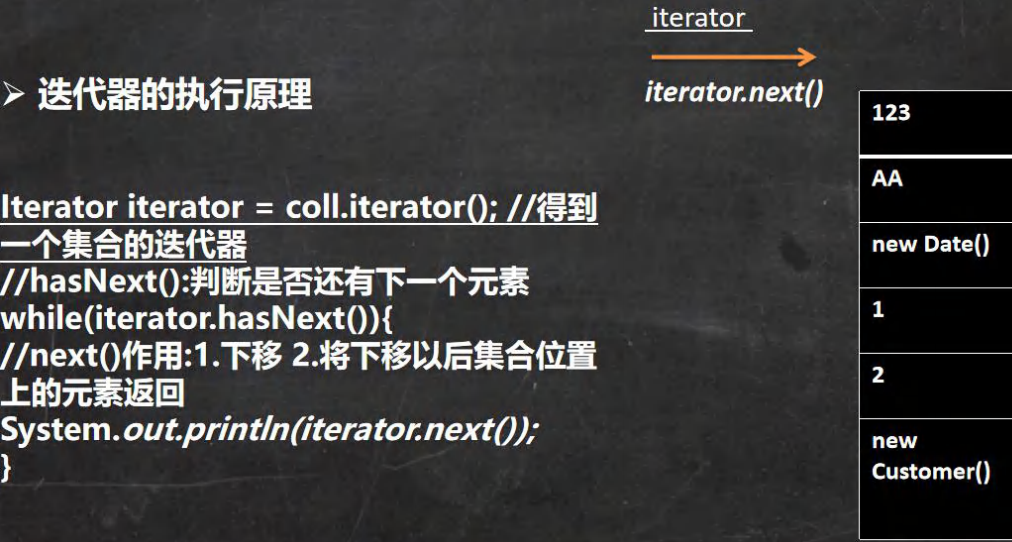
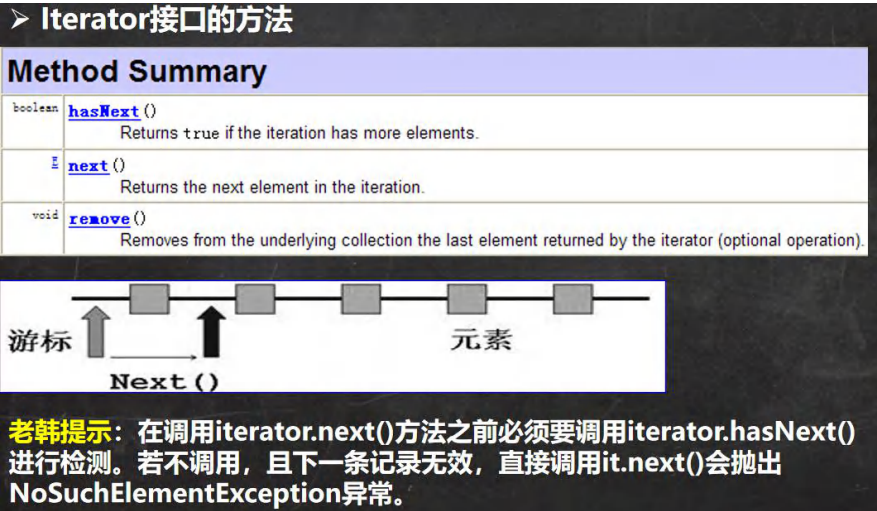
- 快捷键 itit
1 | Collection col = new ArrayList(); |
14.3.2 遍历3 - for循环增强
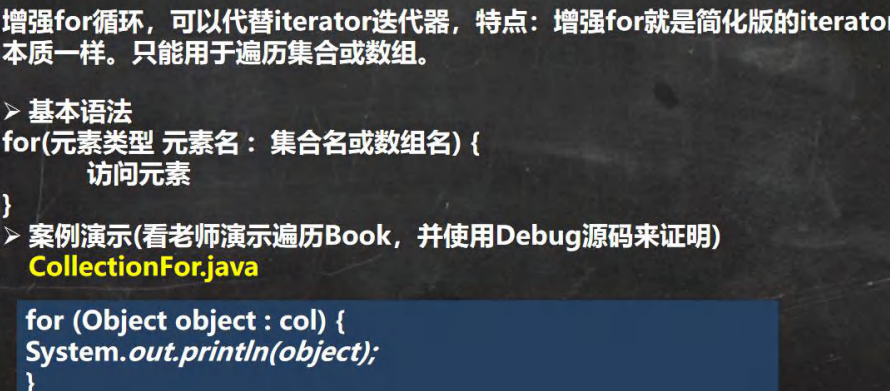
- 快捷键:I
1 | Collection col = new ArrayList(); |
14.4 List接口
14.4.1 基本介绍
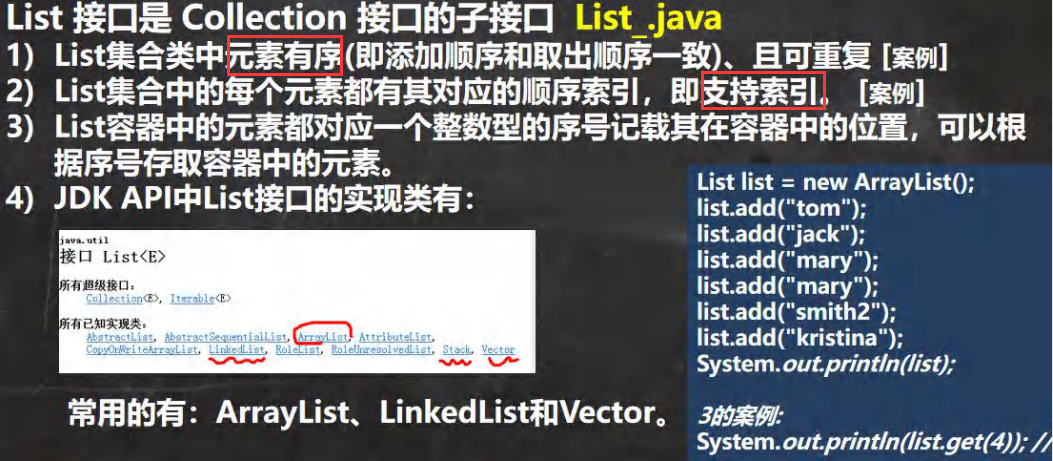
1 | //1. List 集合类中元素有序(即添加顺序和取出顺序一致)、且可重复 |
14.4.2 常用方法
- add
- addAll
- get
- indexOf
- lastIndexOf
- remove
- set:替换或设置
- subList:子集合或切片
1 | List list = new ArrayList(); |
14.3.3 遍历方式
Iterator迭代器
1
2
3
4
5
6
7
8
9
10
11
12
13
14ArrayList list = new ArrayList();
list.add(new Book("三国演义", "罗贯中", 10.1));
list.add(new Book("小李飞刀", "古龙", 5.1));
list.add(new Book("红楼梦", "曹雪芹", 34.6));
System.out.println("list=" + list);
// 1.先得到list的Iterator对象
Iterator iterator = list.iterator();
// 2. 使用while循环遍历 快捷键 itit (ctrl+j可以查看所有快捷键)
while (iterator.hasNext()) {
Object obj = iterator.next();
System.out.println("obj=" + obj);
}增强for循环
1
2
3
4
5
6// 使用增强for循环遍历集合
// 底层仍然使用的是Iterator,debug看源码
// 快捷键 I
for(Object obj : list) {
System.out.println("obj=" + obj);
}普通for循环
1
2
3for(int i = 0; i < list.size(); i++) {
System.out.println("obj=" + list.get(i))
}
14.5 List - ArrayList
14.5.1 注意事项
- ArrayList允许所有元素,包括null;ArrayList可以加入null、并且多个
- ArrayList是由数组来实现数据存储的
- ArrayList基本等同于Vector,除了ArrayList是线程不安全(执行效率高)看源码。在多线程情况下,不建议使用数组列表
14.5.2 底层操作机制(重要!)
- ArrayList中维护了一个**Object类型的数组elementData. [debug 看源码]。transient Object[] elementData; //transient表示瞬间,短暂的,表示该属性不会被序列号**
- 当创建ArrayList对象时,如果使用的是无参构造器,则初始elementData容量为**0,第1次添加,则扩容elementData为10,如需要再次扩容,则扩容elementData为1.5**倍(即第一次扩容为15,第二次22……)。
- 如果使用的是指定大小的构造器,则初始elementData容量为**指定大小,如果需要扩容,则直接扩容elementData为1.5**倍。
1 | // 使用无参构造器创建 ArrayList 对象 |
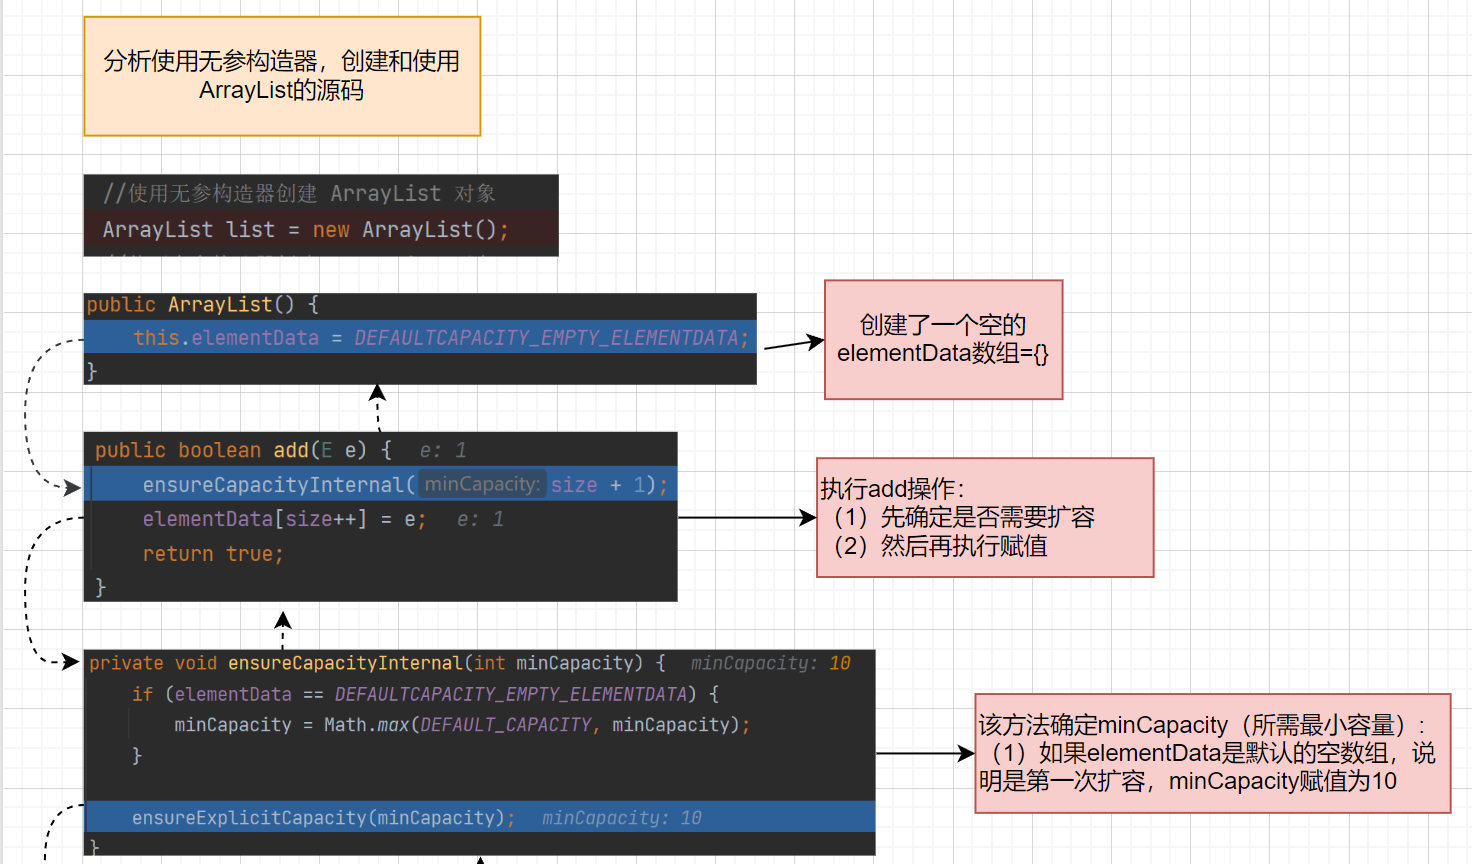
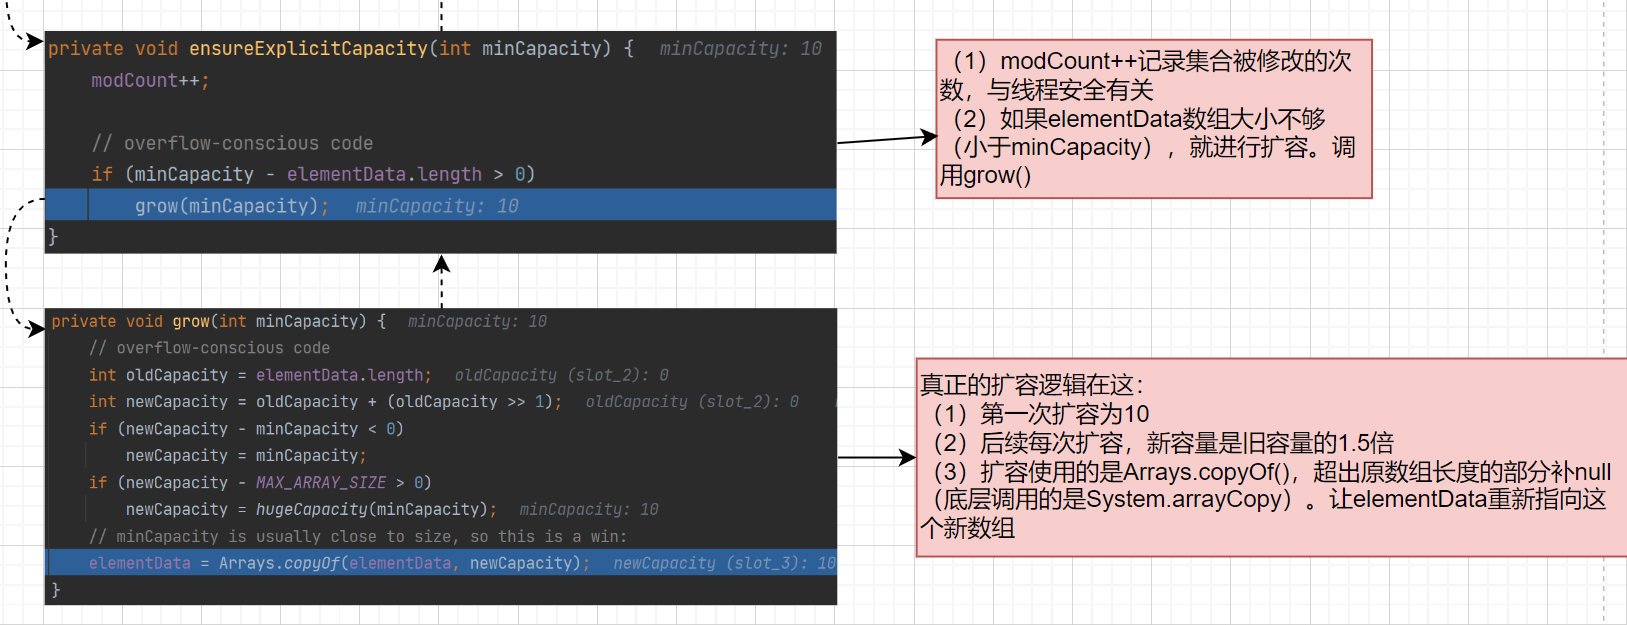
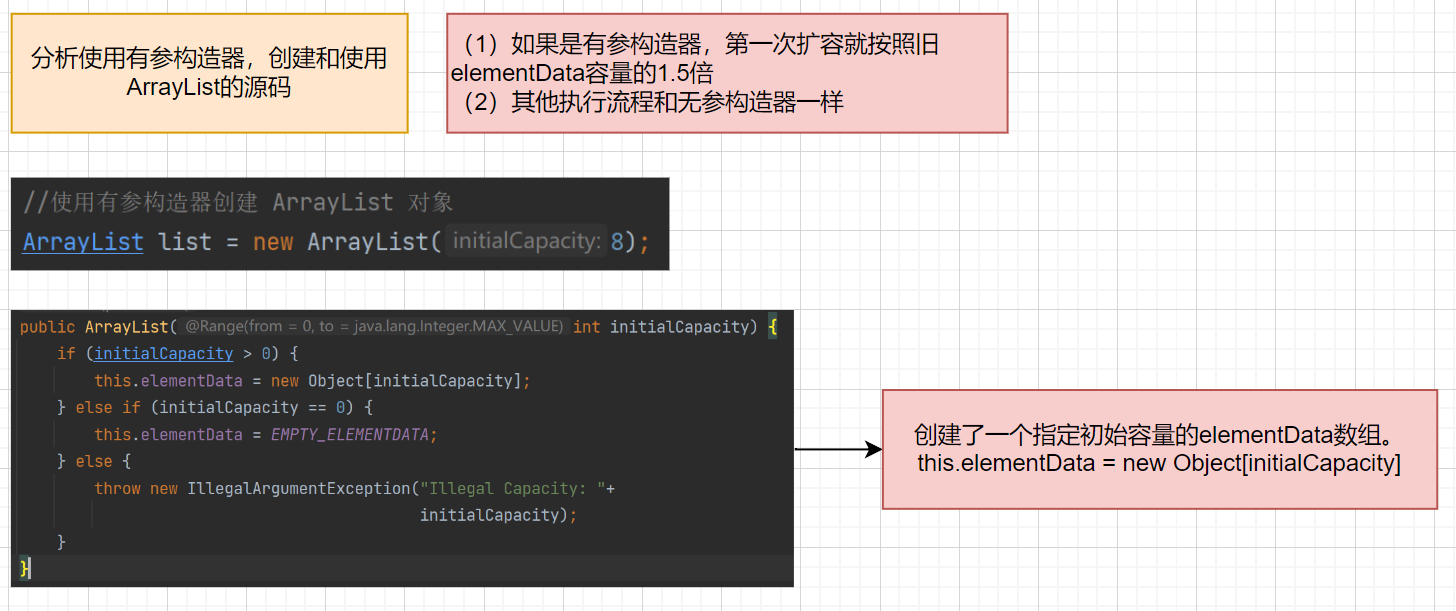
14.6 List - Vector
14.6.1 注意事项
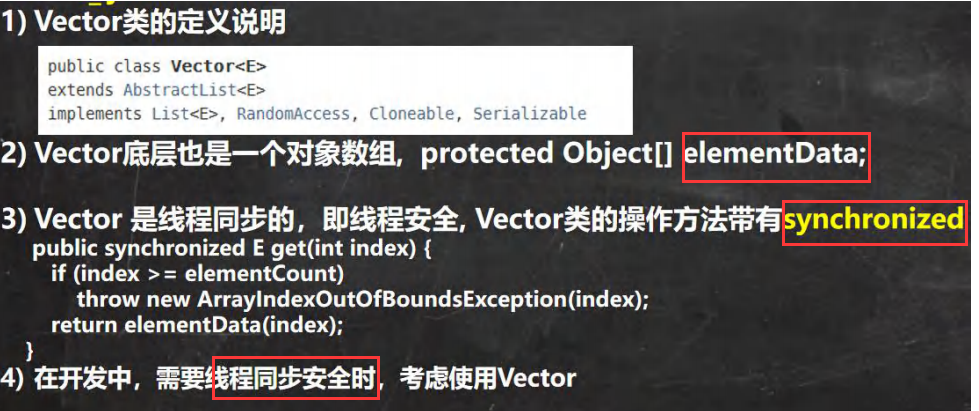
14.6.2 底层操作机制(重要!)
- Vector中维护了一个**Object类型的数组elementData. 。protected Object[] elementData**;
- 当创建Vector对象时,如果使用的是无参构造器,则初始elementData容量为**10(调用有参构造器super(10)),之后每次扩容为原容量的 2 **倍,即20, 40, 80…
- 如果使用的是指定大小的构造器,则初始elementData容量为**指定大小,如果需要扩容,则扩容elementData为原容量的 2 **倍。
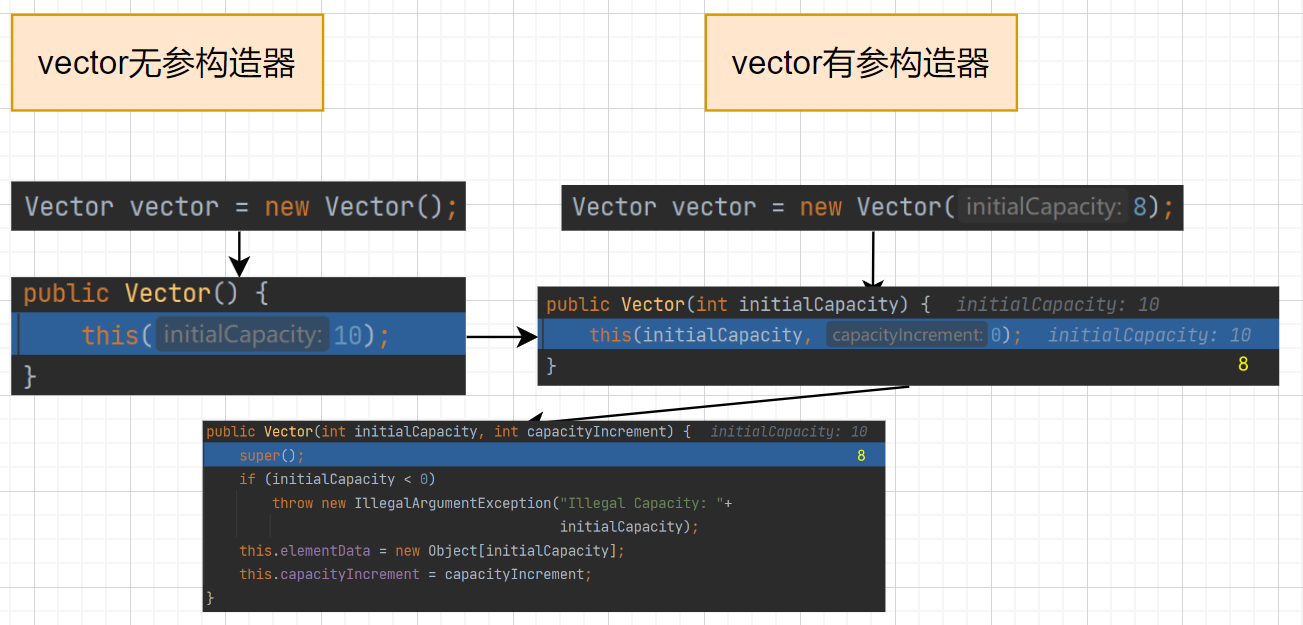
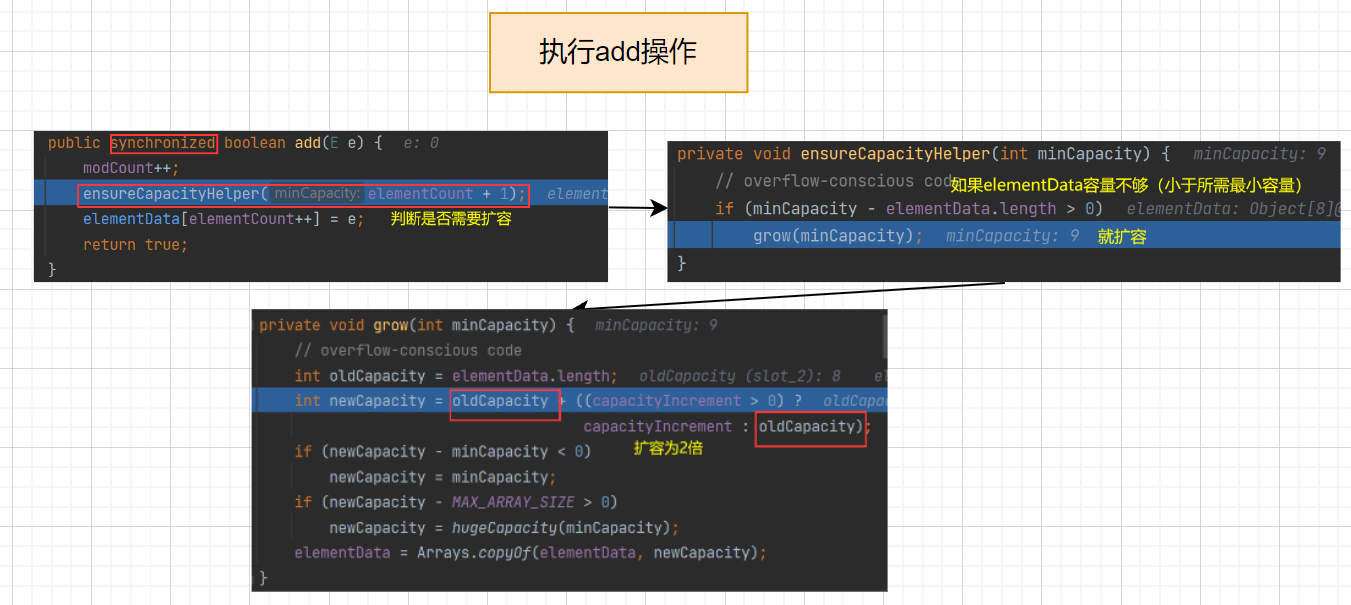
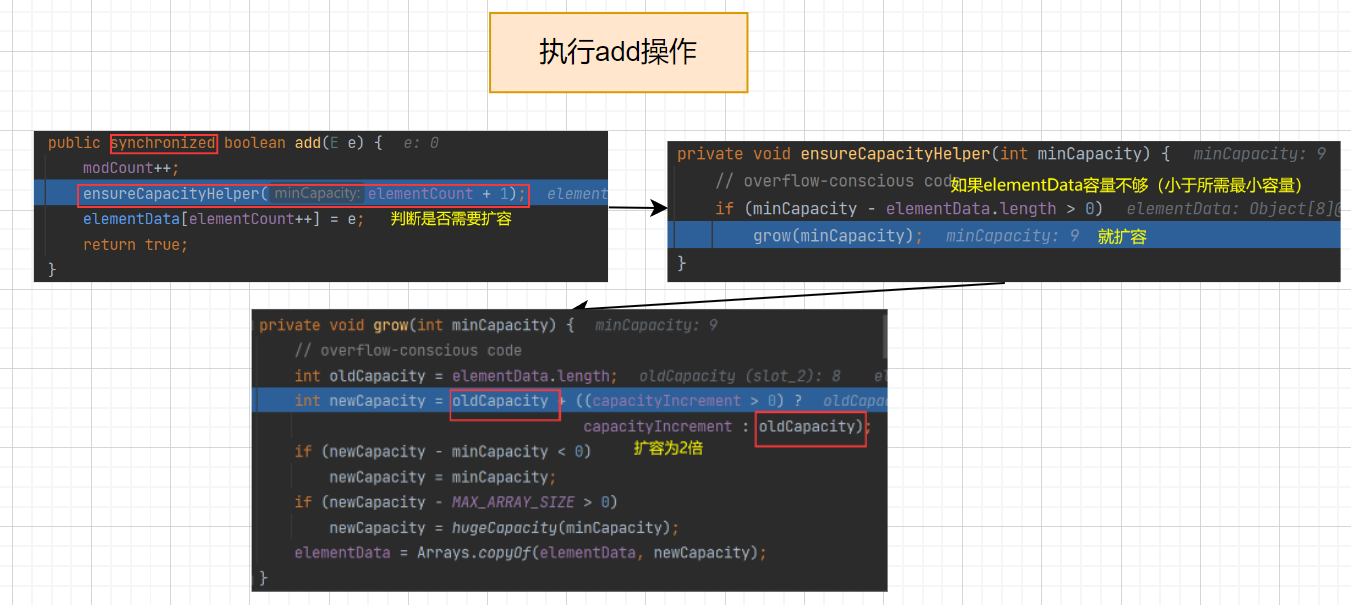
14.6.3 Vector 和 ArrayList 的比较
| 底层结构 | 版本 | 线程安全(同步)效率 | 扩容倍数 | |
|---|---|---|---|---|
| ArrayList | 可变数组 transient Object[] elementData | jdk1.2 | 不安全,效率高 | (1)无参构造器:默认容量0,第一次扩容为10,后面每次扩容为1.5倍;(2)有参构造器:1.5倍 |
| Vector | 可变数组 protected Object[] elementData | jdk1.0 | 安全,效率低 | (1)无参构造器:默认容量为10,后面每次扩容为2倍;(2)有参构造器:2倍 |
14.7 List - LinkedList
14.7.1 LinkedList 的全面说明

14.7.2 底层操作机制
- LinkedList底层维护了一个**双向链表**
- LinedList中维护了两个属性 first 和 last,分别只想首节点和为节点
- 每个节点(Node)里面又维护了 pre、next、item三个属性。pre指向前一个、next指向后一个节点,item存储数据
- 所以LinkedList元素的添加和删除不是通过数组完成,相对来说效率较高
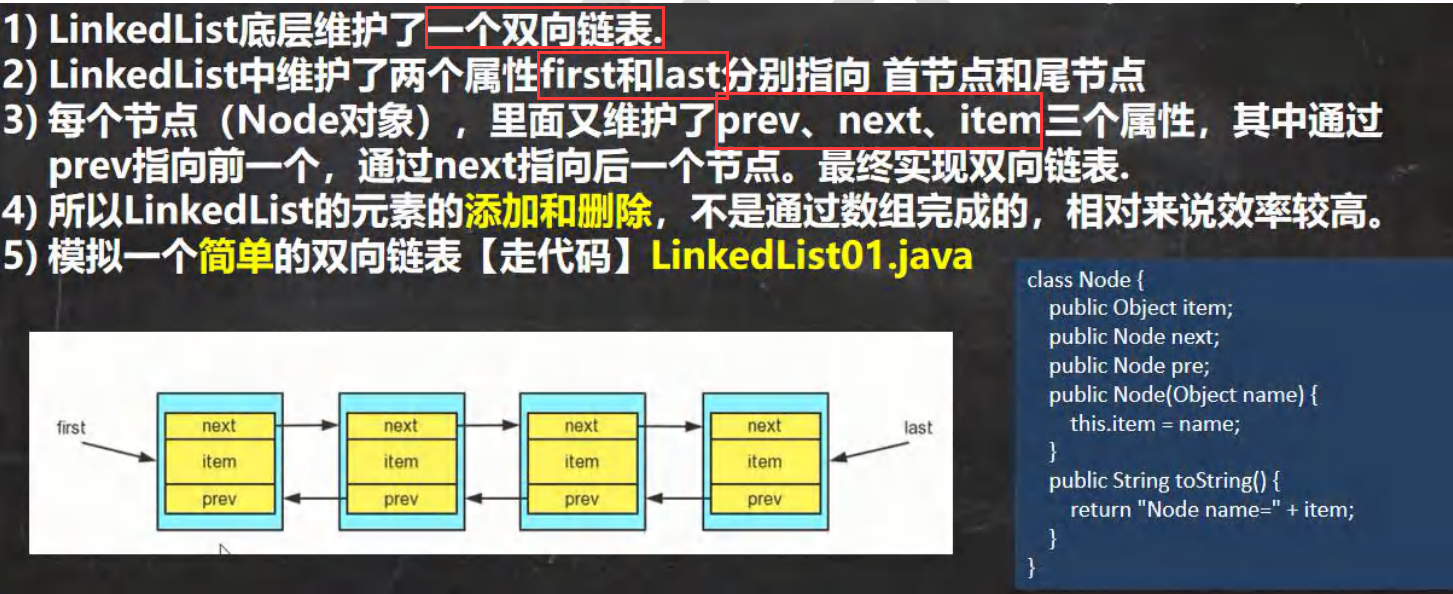
模拟一个简单的双向链表
1
2
3
4
5
6
7
8
9
10
11
12
13
14
15
16
17
18
19
20
21
22
23
24
25
26
27
28
29
30
31
32
33
34
35
36
37
38
39
40
41
42
43
44
45
46
47
48
49
50
51
52
53
54
55
56
57
58
59
60
61
62
63
64
65
66
67public class LinkedList01 {
public static void main(String[] args) {
//模拟一个简单的双向链表
Node jack = new Node("jack");
Node tom = new Node("tom");
Node hsp = new Node("老韩");
//连接三个结点,形成双向链表
//jack -> tom -> hsp
jack.next = tom;
tom.next = hsp;
//hsp -> tom -> jack
hsp.pre = tom;
tom.pre = jack;
Node first = jack;//让 first 引用指向 jack,就是双向链表的头结点
Node last = hsp; //让 last 引用指向 hsp,就是双向链表的尾结点
//演示,从头到尾进行遍历
System.out.println("===从头到尾进行遍历===");
Node cur = first;
while (true) {
if(cur == null) {
break;
}
//输出 first 信息
System.out.println(cur);
cur = cur.next;
}
//演示,从尾到头的遍历
System.out.println("====从尾到头的遍历====");
cur = last;
while (true) {
if(cur == null) {
break;
}
//输出 last 信息
System.out.println(cur);
cur = cur.pre;
}
//演示 链表的添加对象/数据
//要求,是在 tom 和 hsp 之间,插入一个对象 smith
//1. 先创建一个 Node 结点,name 就是 smith
Node smith = new Node("smith");
//下面就把 smith 加入到双向链表了
smith.next = hsp;
smith.pre = tom;
hsp.pre = smith;
tom.next = smith;
}
}
//定义一个 Node 类,Node对象 表示双向链表的一个结点
class Node {
public Object item; //真正存放数据
public Node next; //指向后一个结点
public Node pre; //指向前一个结点
public Node(Object name) {
this.item = name;
}
public String toString() {
return "Node name=" + item;
}
}
LinkedList增删改查及其源码分析
1
2
3
4
5
6
7
8
9
10
11
12
13
14
15
16
17
18
19
20
21
22
23
24
25
26
27
28
29
30
31
32
33
34
35
36
37
38
39public class LinkedListMethod {
public static void main(String[] args) {
// 增删改查及其源码分析
LinkedList linkedList = new LinkedList();
linkedList.add(1);
linkedList.add(2);
linkedList.add(3);
linkedList.add(4);
System.out.println("linkedlist=" + linkedList);
linkedList.remove(); // 默认删除第一个节点
linkedList.remove(1); //删除第二个节点
System.out.println("linkedlist=" + linkedList);
linkedList.set(1, 999);
System.out.println("linkedlist=" + linkedList);
linkedList.get(1);
// 3种遍历
Iterator iterator = linkedList.iterator();
while (iterator.hasNext()) { // 快捷键itit
Object next = iterator.next();
System.out.println(next);
}
for (Object o : linkedList) { // 快捷键I
System.out.println(o);
}
for (int i = 0; i < linkedList.size(); i++) {
System.out.println(linkedList.get(i));
}
}
}增
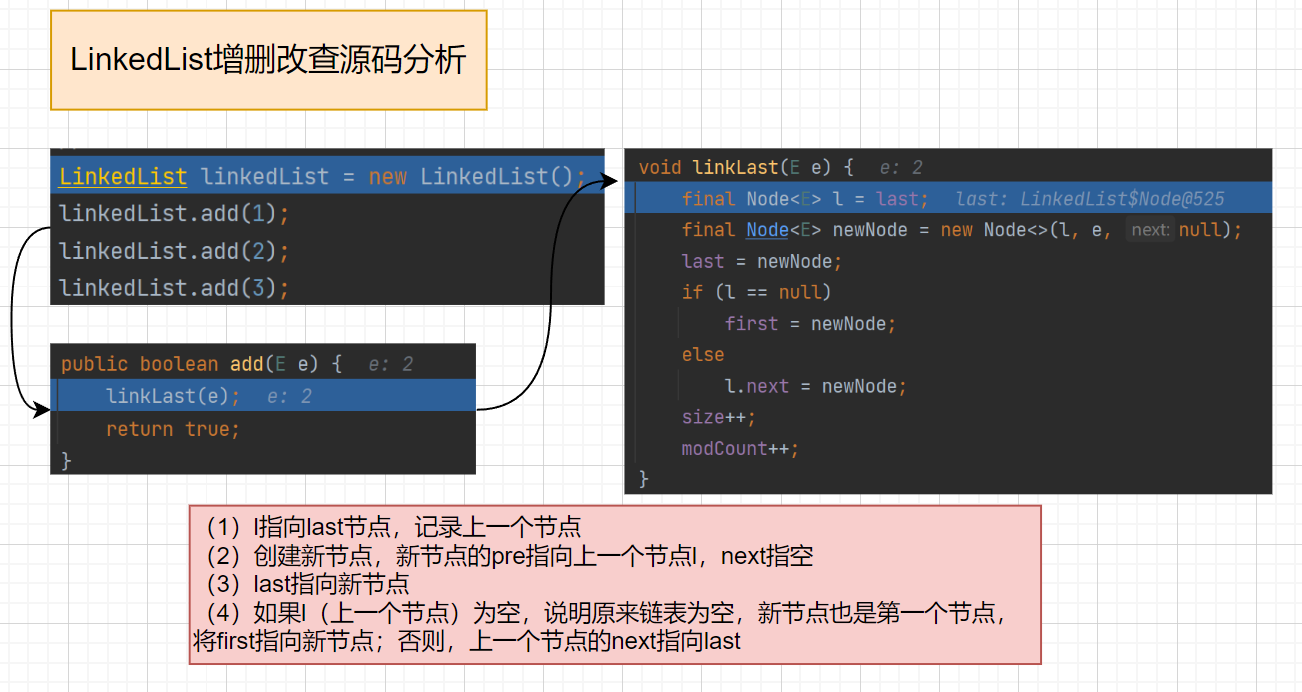
删
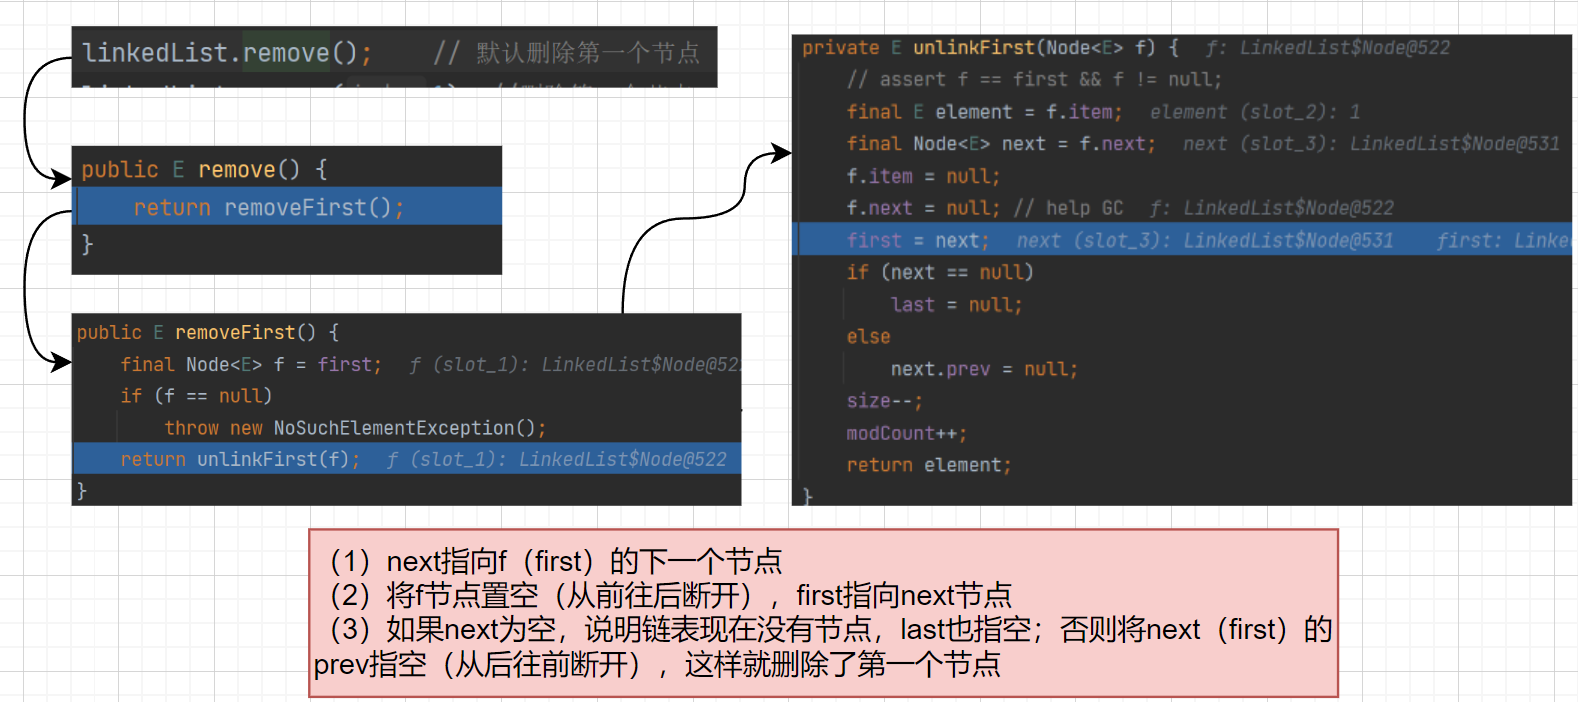
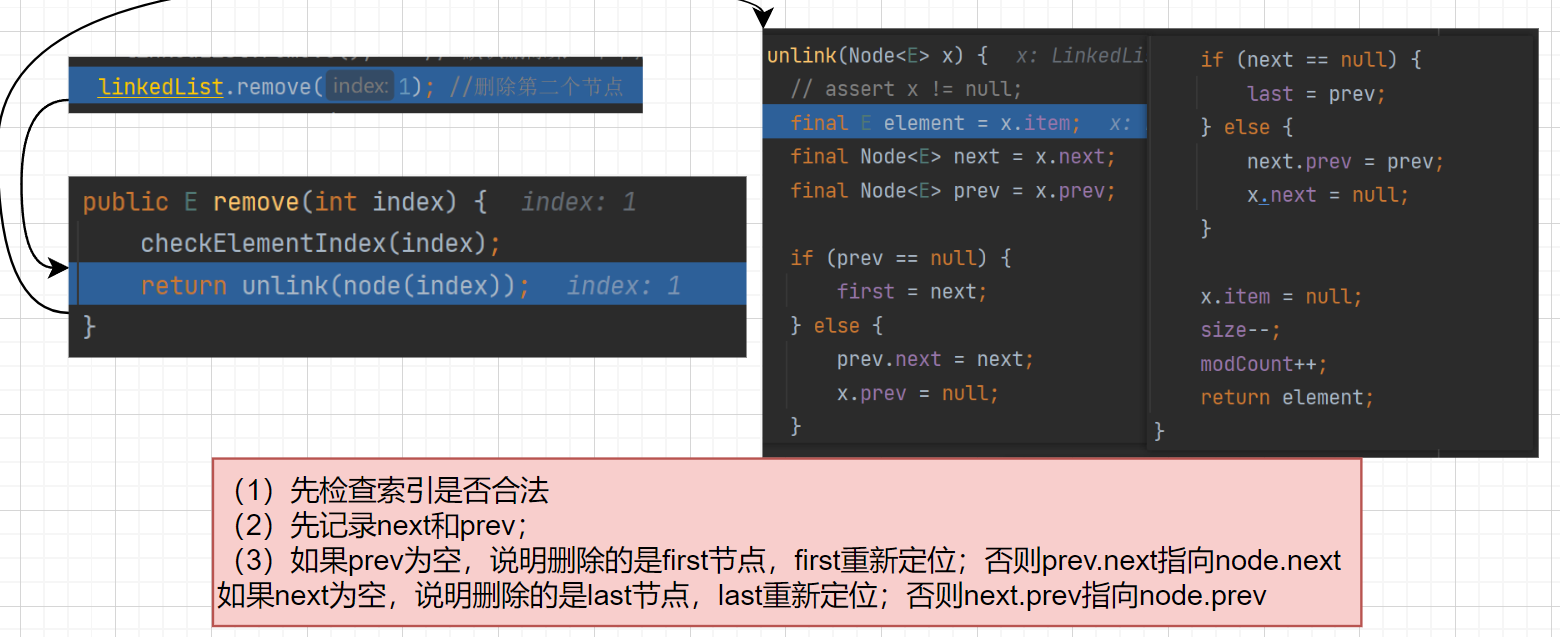
改
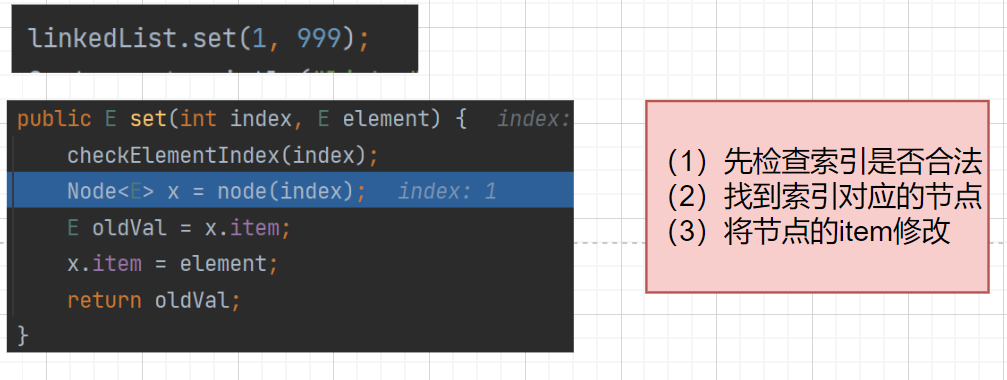
查

14.7.3 ArrayList和Linked比较
| 底层结构 | 增删效率 | 改查效率 | |
|---|---|---|---|
| ArrayList | 可变数组 | 较低(数组扩容,创建新数组,数组拷贝) | 较高(顺序存储,通过索引直接定位目标) |
| LinkedList | 双向链表 | 较高(通过链表追加和删除节点) | 较低(非顺序存储,通过索引不能直接定位目标节点,需要顺着链表依次定位到目标节点) |
- 怎么选择ArrayList和LinkedList
- 如果我们改查的操作多,选择ArrayList
- 如果我们增删的操作多,选择LinkedList
- 一般来说,在程序中,80%-90%的都是查询,因此大部分情况下会选择ArrayList
- 在一个项目中,根据业务灵活选择,也可能这样,一个模块使用的是ArrayList,另外一个模块是LinkedList。
14.8 Set接口
14.8.1 基本介绍
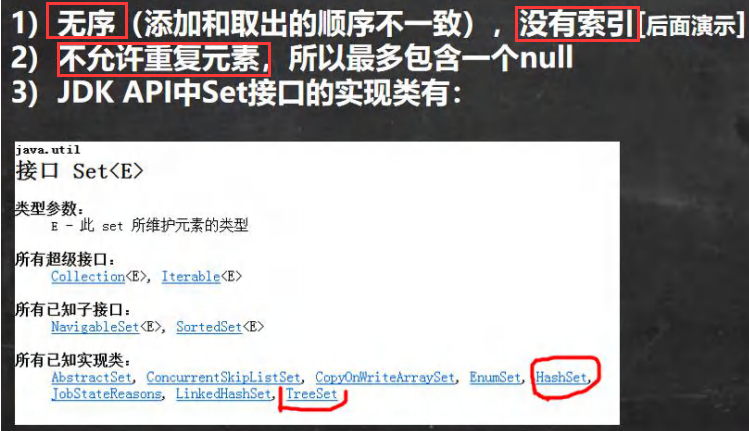
14.8.2 常用方法
和 List 接口一样, Set 接口也是 Collection 的子接口,因此,常用方法和 Collection 接口一样.
1
2
3
4
5
6
7
8
9
10
11
12
13
14
15
16
17
18
19// 以HashSet为例,说明Set的方法
//1. 以 Set 接口的实现类 HashSet 来讲解 Set 接口的方法
//2. set 接口的实现类的对象(Set 接口对象), 不能存放重复的元素, 可以添加一个 null
//3. set 接口对象存放数据是无序(即添加的顺序和取出的顺序不一致)
//4. 注意:取出的顺序的顺序虽然不是添加的顺序,但是他的固定.
Set set = new HashSet();
set.add("john");
set.add("lucy");
set.add("john");//重复
set.add("jack");
set.add("hsp");
set.add("mary");
set.add(null);//
set.add(null);//再次添加 null
System.out.println("set=" + set);
// 其他方法参考Collection
输出:
set=[null, hsp, mary, john, lucy, jack]
14.8.3 遍历方式
1 | //遍历 |
14.9 Set - HashSet
14.9.1 基本说明
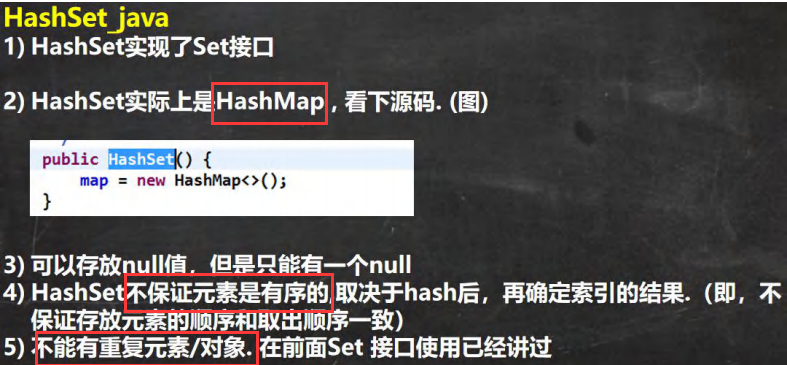
1 | HashSet set = new HashSet(); |
怎么理解**不能添加重复的元素或对象**
1
2
3
4
5
6
7
8
9
10HashSet set = new HashSet();
set.add("lucy");//添加成功T
set.add("lucy");//加入不了F
set.add(new Dog("tom"));//T
set.add(new Dog("tom"));//T(是两个不同的对象)
System.out.println("set=" + set);
set.add(new String("hsp"));//T
set.add(new String("hsp"));//F 添加失败,为什么?看add源码(调用equals进行比较)
System.out.println("set=" + set);
14.9.2 HashSet底层机制
HashSet底层是**HashMap**,底层原理是 数组 + 链表 + 红黑树
HashSet只使用到了HashMap中的Key,value是一个常量PRESENT。
模拟一个简单的 数组+链表结构
1
2
3
4
5
6
7
8
9
10
11
12
13
14
15
16
17
18
19
20
21
22
23
24
25
26
27
28public class HashSetStructure {
public static void main(String[] args) {
// 模拟HashSet底层的 数组+链表结构
// 1.创建数组(也叫作表)
Node[] table = new Node[16];
// 2.创建节点
Node john = new Node("john", null);
table[2] = john;
Node jack = new Node("jack", null);
john.next = jack; //挂载到john节点之后
Node rose = new Node("rose", null);
jack.next = rose;
Node lucy = new Node("lucy", null);
table[3] = lucy;
}
}
class Node {
Object item; //存放数据
Node next; //指向下一个节点
public Node(String john, Object o) {
item = john;
next = (Node) o;
}
}
- HashSet底层是HashMap
- 添加一个元素时,先得到**hash值-会转成->索引值**
- 找到存储数据表table,看这个索引位置是否已经存放的有元素
- 如果没有,直接加入
- 如果有,调用 equals 比较。如果相同,就放弃添加;如果不相同,则添加到最后
- 在Java 8中,如果一条链表的元素个数到达TREEIFY_THRESHOLD(默认是8),并且table的大小>=
MIN_TREEIFY_CAPACITY(默认64),就会进行树化(红黑树)
1 | HashSet hashSet = new HashSet(); |


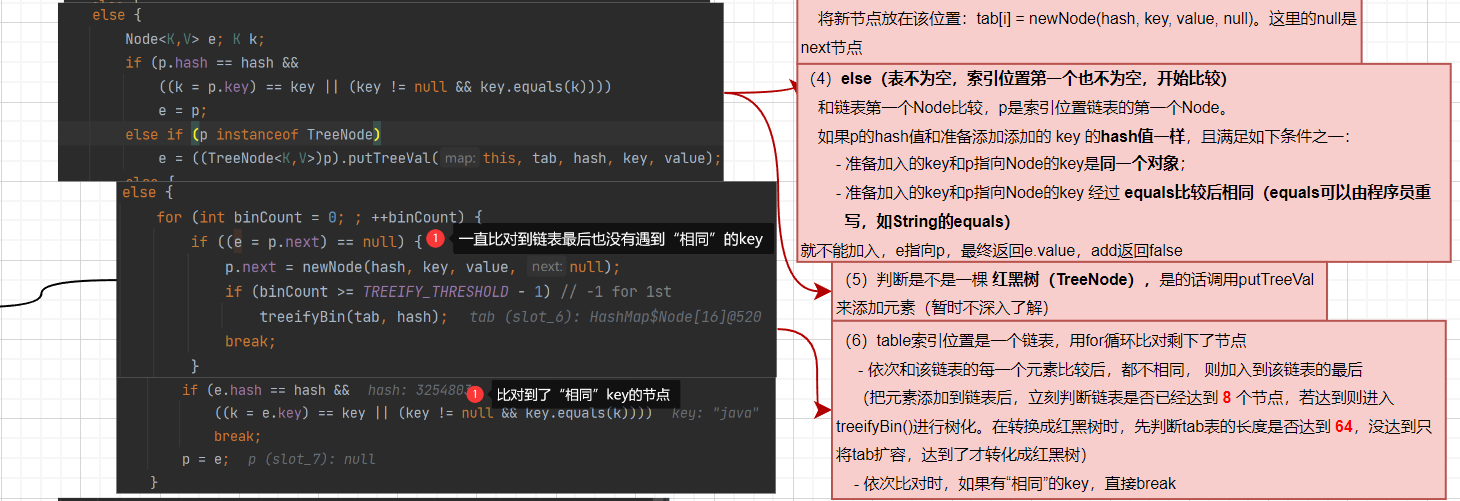


- 扩容和转化成红黑树机制
- HashSet底层是HashMap,第一次添加时,table数组扩容到**16,临界值(threshold)是12** 【16 * 加载因子
(loadFactor)0.75 = 12】 - 如果table数组使用到了临界值12,就会扩容到16 * 2 = 32,新的临界值就是32 * 0.75 =24,依次类推
- 在Java8中, 如果一条链表的元素个数到达 TREEIFY_THRESHOLD(默认是8).并且table的大小>=MIN TREEIFY CAPACITY(默认64),就会进行**树化**(红黑树),否则仍然采用数组扩容机制
【小技巧】怎么让不同对象挂载到table的统一条列表。重写类的hashCode方法使其返回同一个固定值。
1 | HashSet hashSet = new HashSet(); |

1 | for (int i = 1; i <= 12; i++) { |


14.9.3 HashSet练习题
定义一个Employee类,该类包含:私有成员属性名称,年龄要求;
1.创建3个雇员对象放入HashSet中
2.当名称和Aage的值相同时,认为是相同员工,不能添加到HashSet集合中1
2
3
4
5
6
7
8
9
10
11
12
13
14
15
16
17
18
19
20
21
22
23
24
25
26
27
28
29
30class Employee {
private String name;
private int age;
public Employee(String name, int age) {
this.name = name;
this.age = age;
}
public String toString() {
return "Employee{" +
"name='" + name + '\'' +
", age=" + age +
'}';
}
public boolean equals(Object o) {
if (this == o) return true;
if (o == null || getClass() != o.getClass()) return false;
Employee employee = (Employee) o;
return age == employee.age && Objects.equals(name, employee.name); //当name和age相同时会返回true
}
public int hashCode() {
return Objects.hash(name, age); //name和age(哈希值)相同会返回相同哈希值
}
}定义一个Employee类,该类包含:private成员属性name,sal,birthday(MyDate类型),其中 birthday 为MyDate类型(属性包括:year, month, day),要求:
1.创建3个Employee放入HashSet中
2.当name和birthday的值相同时,认为是相同员工,不能添加到HashSet集合中1
2
3
4
5
6
7
8
9
10
11
12
13
14
15
16
17
18
19
20
21
22
23
24
25
26
27
28
29
30
31
32
33
34
35
36
37
38
39
40
41
42
43
44
45
46
47
48
49class Employee2 {
private String name;
private double sal;
private MyDate birthday;
public Employee2(String name, double sal, MyDate birthday) {
this.name = name;
this.sal = sal;
this.birthday = birthday;
}
public boolean equals(Object o) {
if (this == o) return true;
if (o == null || getClass() != o.getClass()) return false;
Employee2 employee2 = (Employee2) o;
return Objects.equals(name, employee2.name) && Objects.equals(birthday, employee2.birthday);
}
public int hashCode() {
return Objects.hash(name, birthday);
}
}
class MyDate {
private int year;
private int month;
private int day;
public MyDate(int year, int month, int day) {
this.year = year;
this.month = month;
this.day = day;
}
public boolean equals(Object o) {
if (this == o) return true;
if (o == null || getClass() != o.getClass()) return false;
MyDate myDate = (MyDate) o;
return year == myDate.year && month == myDate.month && day == myDate.day;
}
public int hashCode() {
return Objects.hash(year, month, day); // year,month,day的哈希值相同,会返回相同的哈希值
}
}看看Objects.hash()源码

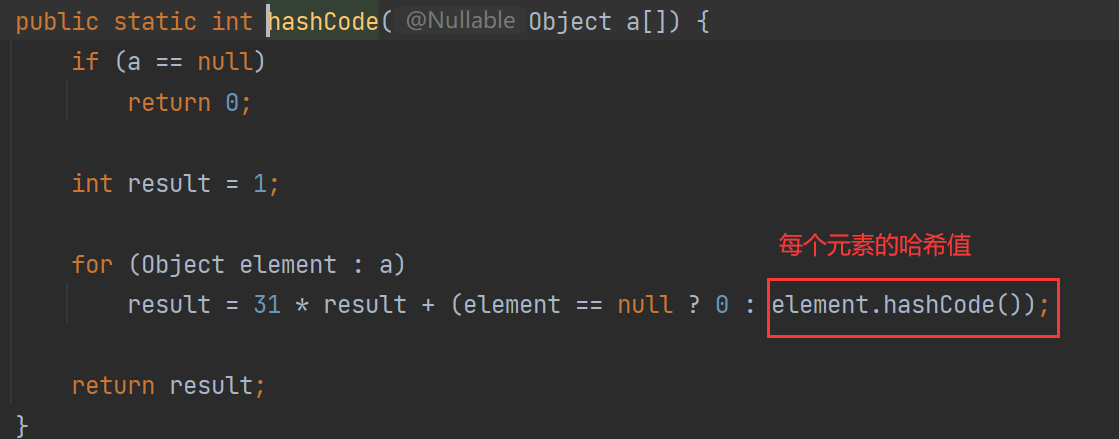
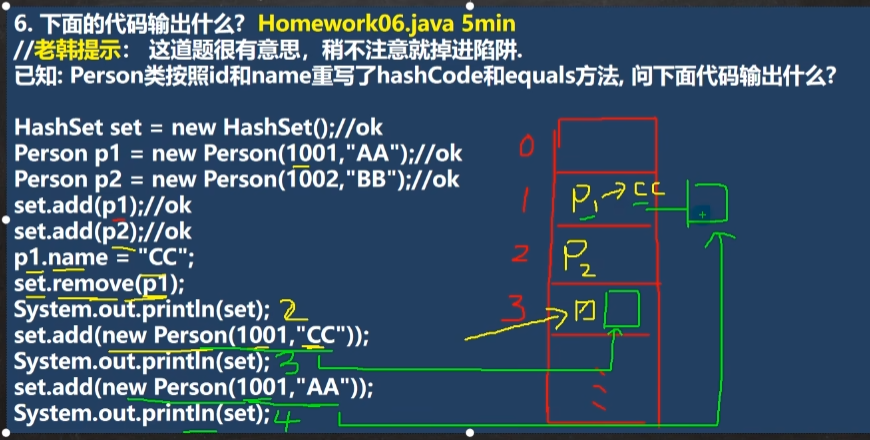
1
2
3
4
5
6
7
8
9
10
11
12
13
14
15
16
17
18
19
20
21
22
23
24
25
26
27
28
29
30/**
说明:修改之后的p1对象和原p1对象的hash值不一致,所以p1.name="CC"以后,现在的p1对象用的是原p1对象的hash值索引位置,而不是它现在的hash值索引位置。
当set.add(new Person(1001, "CC"))后,在该对象的hash值索引位置不会比较到相同元素(原因如上),所以可以添加成功
当set.add(new Person(1001, "AA"))后,该对象会加在现p1对象链表的后面,因为hash值相同且和p1不equals
*/
public class HashSetExercise3 {
public static void main(String[] args) {
HashSet set = new HashSet();
Person p1 = new Person(1001, "AA");
Person p2 = new Person(1002, "BB");
set.add(p1);
set.add(p2);
System.out.println(set);
//[Person{name='BB', age=1002}, Person{name='AA', age=1001}]
p1.name = "CC";
System.out.println(set);
//[Person{name='BB', age=1002}, Person{name='CC', age=1001}]
System.out.println(set.remove(p1)); //false
set.add(new Person(1001, "CC"));
System.out.println(set);
//[Person{name='BB', age=1002}, Person{name='CC', age=1001}, Person{name='CC', age=1001}]
set.add(new Person(1001, "AA"));
System.out.println(set);
//[Person{name='BB', age=1002}, Person{name='CC', age=1001}, Person{name='CC', age=1001}, Person{name='AA', age=1001}]
}
}
14.10 Set - LinkedHashSet
14.10.1 基本说明
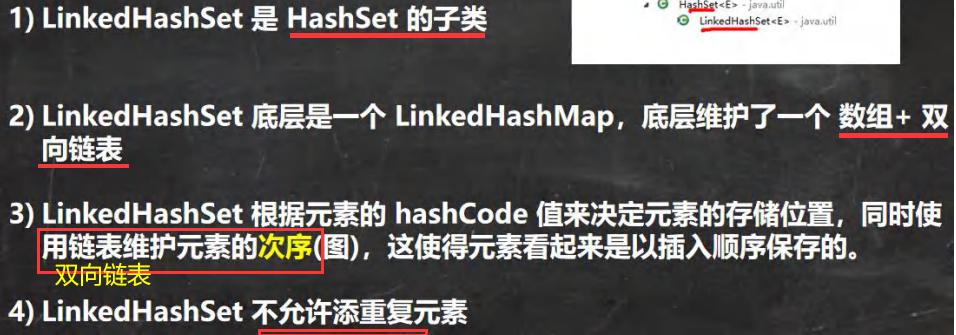
14.10.2 LinkedHashSet底层机制
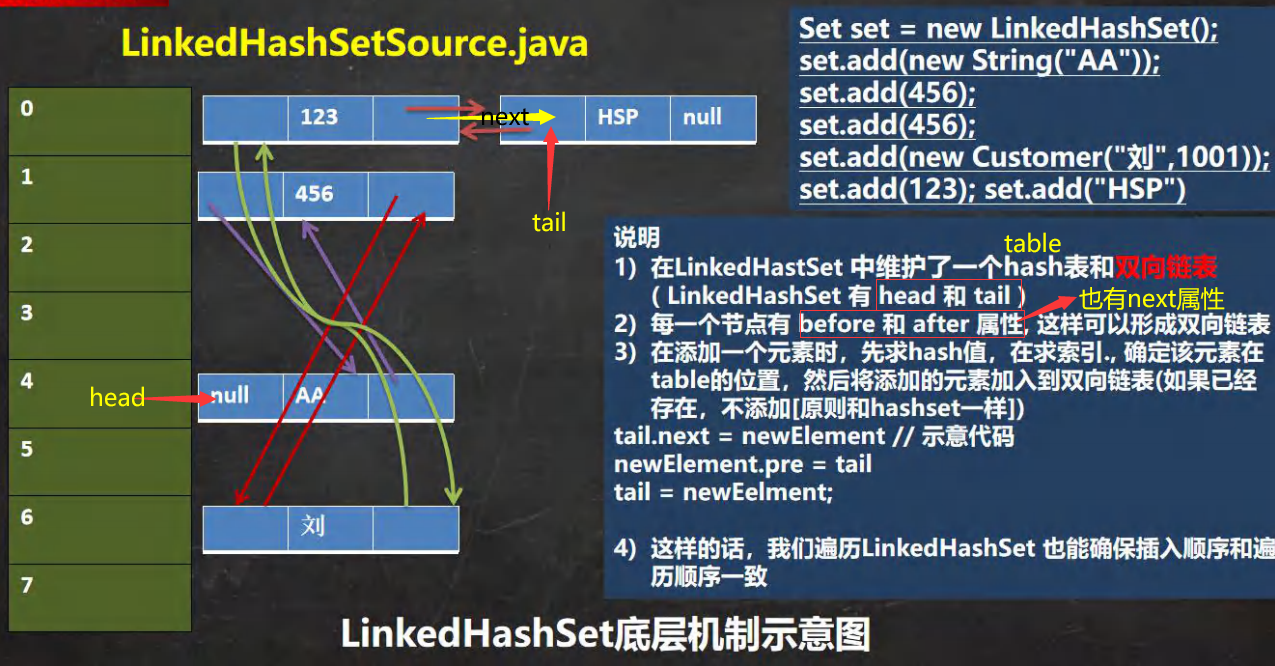
- 节点是LinkedHashMap$Entry类型(继承了HashMap$Node),有自身的before和tail属性,同时也有父类的next属性
- p.next = newNode(hash, key, value, null); 其实做了两件事:一是创建新节点(Entry类型),且将新节点 **linkNodeLast()**接到双向列表tail尾节点处;二是将p.next指向新节点
- 疑问?afterNodeAccess(e);和afterNodeInsertion(evict);的作用是什么
1 | public class LinkedHashSetSource { |
14.11 Map接口
14.11.1 基本介绍
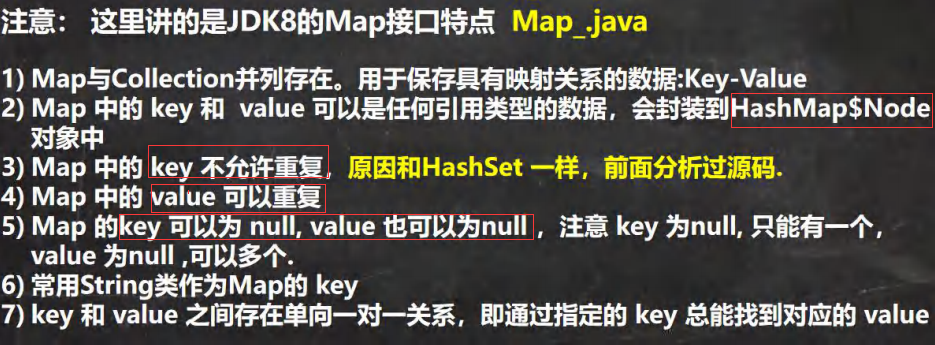
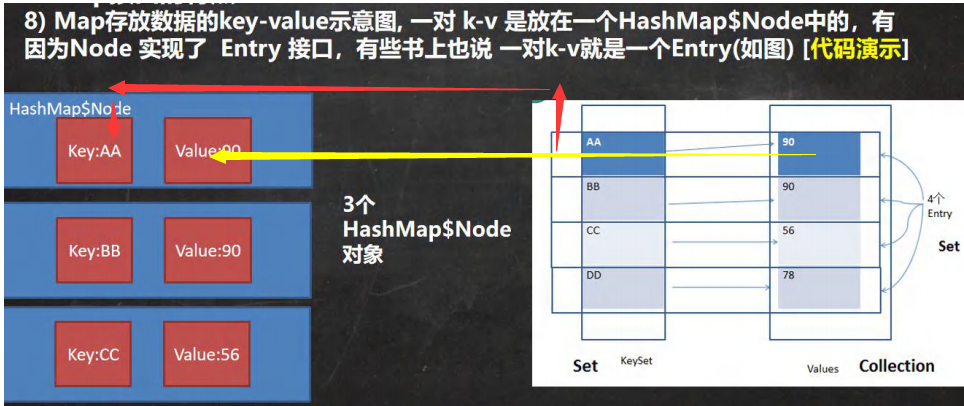
1 | public static void main(String[] args) { |
14.11.2 常用方法
- put:添加k-v,若k存在则更新v
- remove:根据键删除映射关系
- get:根据键获取值
- size:获取元素个数
- isEmpty:判断个数是否为 0
- clear:清除 所有k-v
- containsKey:查找键是否存在
1 | public class MapMethod { |
14.11.3 遍历方式
第一组: 先取出 所有的 Key , 通过 Key 取出对应的 Value
1
2
3
4
5
6
7
8
9
10
11
12
13Set keyset = map.keySet();
//(1) 增强 for
System.out.println("-----第一种方式-------");
for (Object key : keyset) {
System.out.println(key + "-" + map.get(key));
}
//(2) 迭代器
System.out.println("----第二种方式--------");
Iterator iterator = keyset.iterator();
while (iterator.hasNext()) {
Object key = iterator.next();
System.out.println(key + "-" + map.get(key));
}第二组: 把所有的 values 取出
1
2
3
4
5
6
7
8
9
10
11
12
13
14Collection values = map.values();
//这里可以使用所有的 Collections 使用的遍历方法
//(1) 增强 for
System.out.println("---取出所有的 value 增强 for----");
for (Object value : values) {
System.out.println(value);
}
//(2) 迭代器
System.out.println("---取出所有的 value 迭代器----");
Iterator iterator2 = values.iterator();
while (iterator2.hasNext()) {
Object value = iterator2.next();
System.out.println(value);
}第三组: 通过 EntrySet 来获取 k-v
1
2
3
4
5
6
7
8
9
10
11
12
13
14
15
16
17
18Set entrySet = map.entrySet();// EntrySet<Map.Entry<K,V>>
//(1) 增强 for
System.out.println("----使用 EntrySet 的 for 增强(第 3 种)----");
for (Object entry : entrySet) {
//将 entry 转成 Map.Entry
Map.Entry m = (Map.Entry) entry;
System.out.println(m.getKey() + "-" + m.getValue());
}
//(2) 迭代器
System.out.println("----使用 EntrySet 的 迭代器(第 4 种)----");
Iterator iterator3 = entrySet.iterator();
while (iterator3.hasNext()) {
Object entry = iterator3.next();
//System.out.println(entry.getClass());//HashMap$Node -实现-> Map.Entry (getKey,getValue)
//向下转型 Map.Entry
Map.Entry m = (Map.Entry) entry;
System.out.println(m.getKey() + "-" + m.getValue());
}
14.12 Map - HashMap
14.12.1 基本说明

14.12.2 HashMap底层源码
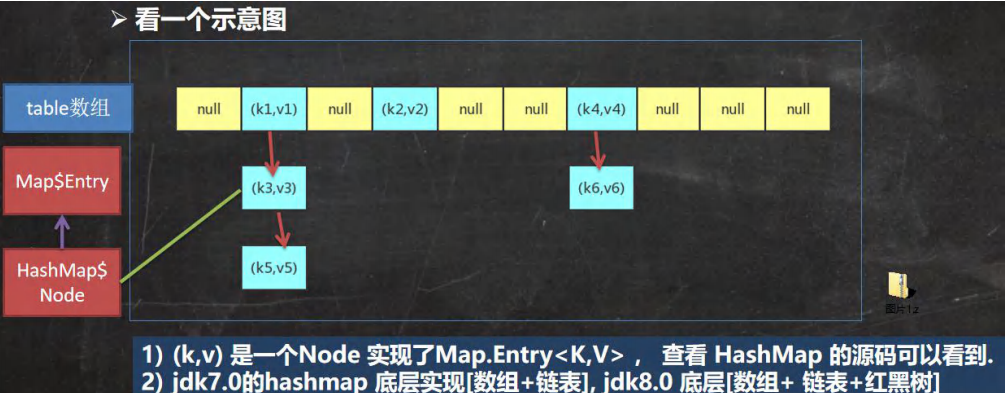
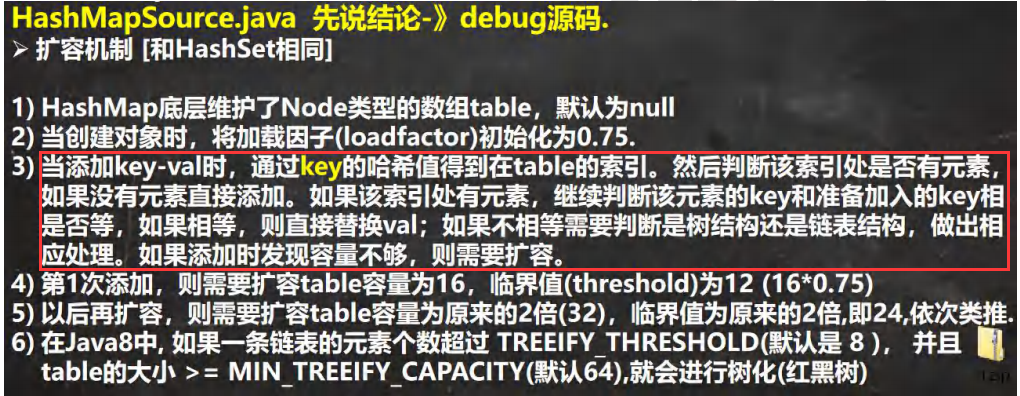
put底层源码分析:具体流程与HashSet底层机制一样
需要补充的一点:当Key相同时,会更新对应的Value
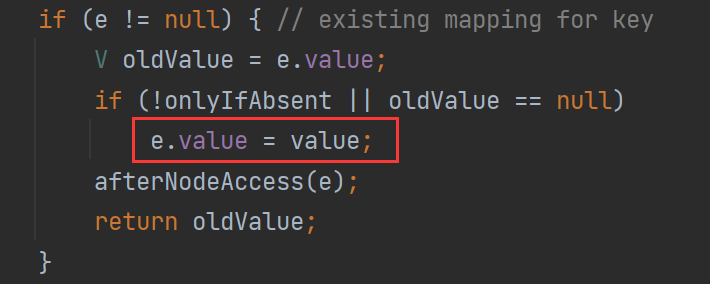
扩容和树化机制
14.13 Map - Hashtable
14.13.1 基本介绍

14.13.2 底层机制
- 底层有Entry[]类型的数组table 初始化大小为**11**
- 初始临界值 threshold 8 = 11 * 0.75
- 扩容机制:
- 执行 addEntry(hash, key, value, index); 封装k-v到一个Entry
- 当if (count >= threshold) 满足时就扩容,指向rehash()
- 按照 int newCapacity = (oldCapacity << 1) + 1; 方式扩容
14.13.2 Hashtable VS HashMap

14.14 Map - Properties
14.14.1 基本介绍

14.15 开发中如何选择集合实现类(记住!)
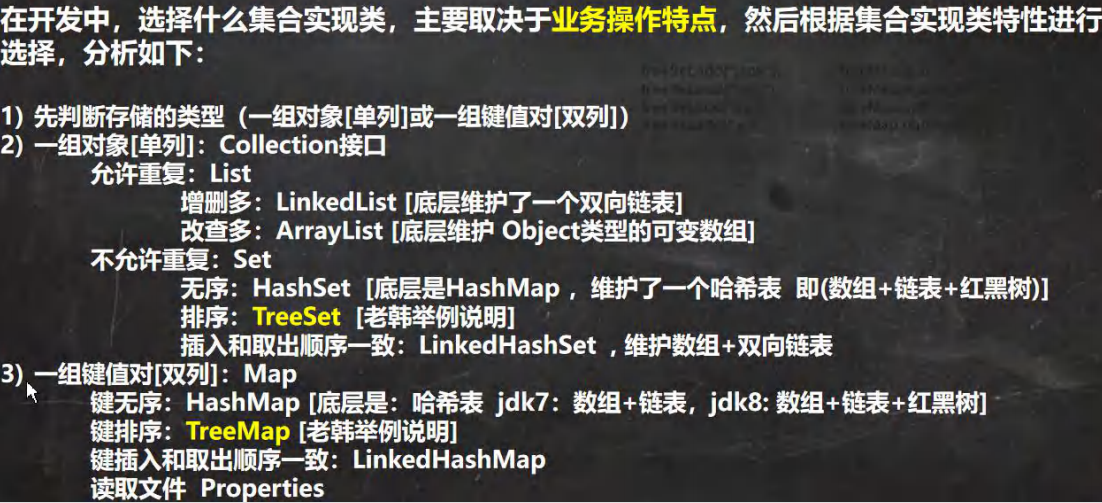
14.16 TreeSet 和 TreeMap
14.16.1 TreeSet
- 注意:如果TreeSet使用的是无参构造器,即没有传入Comparator接口的匿名内部类。使用add(key)时,底层会调用key实现的Comparable接口进行比较,Comparable<? super K> k = (Comparable<? super K>) key; 如果Key没有实现Comparable接口,则会报错 ClassCastException

1 | public class TreeSet_ { |
14.16.2 TreeMap
1 | public class TreeMap_ { |
14.17 Collections工具类


1 | //创建 ArrayList 集合,用于测试. |

1 | // 1)Object max(Collection):根据元素的自然顺序,返回给定集合中的最大元素 |
第十五章 泛型
15.1 泛型入门
15.1.1 传统方法问题分析
- 不能对加入到集合ArrayList中的数据类型进行约束(不安全)
- 遍历的时候,需要进行类型转换,如果集合中的数据量较大,对效率有影响
15.1.2 泛型的好处

1 | //1. 当我们 ArrayList<Dog> 表示存放到 ArrayList 集合中的元素是 Dog 类型 (细节后面说...) |
15.2 泛型介绍
- 泛型又称**参数化类型,是Jdk5.0出现的新特性,解决数据类型的安全性问题**
- 在类声明或实例化时只要指定好需要的具体的类型即可。
- JAVA泛型可以保证如果程序在编译时没有发出警告,运行时就不会产生ClassCastException异常.同时,代码更加简洁、健壮
- 泛型的作用是:可以在类声明时通过一个标识表示类中某个属性的类型,或者是某个方法返回值的类型,或者是某个方法的参数类型.
15.3 泛型的语法
声明

实例化

举例
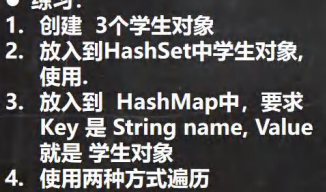
1
2
3
4
5
6
7
8
9
10
11
12
13
14
15
16
17
18
19
20
21
22
23
24
25
26
27
28
29
30
31
32
33
34
35
36
37
38
39
40
41
42
43
44
45
46
47
48
49
50
51
52
53
54
55
56
57
58
59
60
61
62
63
64
65
66
67
68
69
70
71
72
73
74
75public class GenericExercise {
public static void main(String[] args) {
//使用泛型方式给 HashSet 放入 3 个学生对象
HashSet<Student> students = new HashSet<Student>();
students.add(new Student("jack", 18));
students.add(new Student("tom", 28));
students.add(new Student("mary", 19));
//遍历
for (Student student : students) {
System.out.println(student);
}
//使用泛型方式给 HashMap 放入 3 个学生对象
//K -> String V->Student
HashMap<String, Student> hm = new HashMap<String, Student>();
/*
public class HashMap<K,V> {}
*/
hm.put("milan", new Student("milan", 38));
hm.put("smith", new Student("smith", 48));
// 遍历
/*
public Set<Map.Entry<K,V>> entrySet() {
Set<Map.Entry<K,V>> es;
return (es = entrySet) == null ? (entrySet = new EntrySet()) : es;
}
*/
Set<Map.Entry<String, Student>> entries = hm.entrySet();
/*
public final Iterator<Map.Entry<K,V>> iterator() {
return new EntryIterator();
}
*/
Iterator<Map.Entry<String, Student>> iterator = entries.iterator();
while (iterator.hasNext()) {
Map.Entry<String, Student> next = iterator.next();
System.out.println(next.getKey() + "=" + next.getValue());
}
}
}
class Student {
private String name;
private int age;
public Student(String name, int age) {
this.name = name;
this.age = age;
}
public String getName() {
return name;
}
public void setName(String name) {
this.name = name;
}
public int getAge() {
return age;
}
public void setAge(int age) {
this.age = age;
}
public String toString() {
return "Student{" +
"name='" + name + '\'' +
", age=" + age +
'}';
}
}
15.4 注意事项
- 泛型的参数化类型只能是引用类型,不能是基本数据类型
- 在给泛型指定具体类型后,可以传入该类型或其子类类型。
- 不指定泛型的具体类型时,默认的泛型是Object
- 泛型的使用形式:
- List<Integer> list1 = new ArrayList<Integer>();
- List<Integer> list1 = new ArrayList<>(); 【推荐】
15.5 练习题
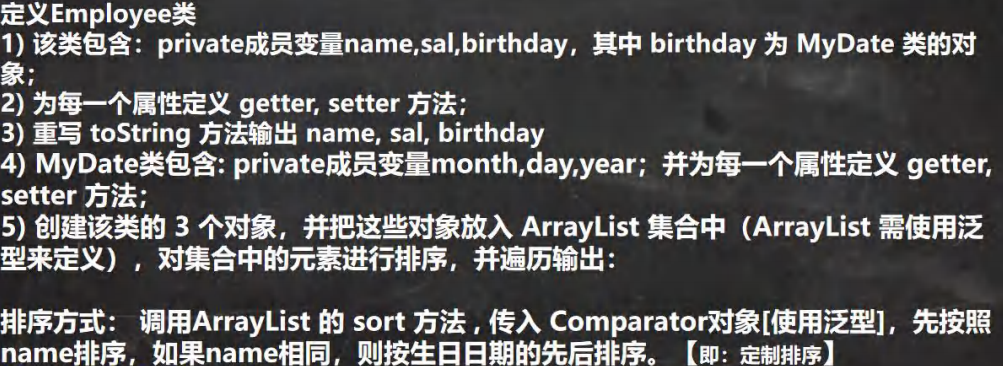
1 | public class GenericExercise01 { |
15.6 自定义泛型
15.6.1 自定义泛型类
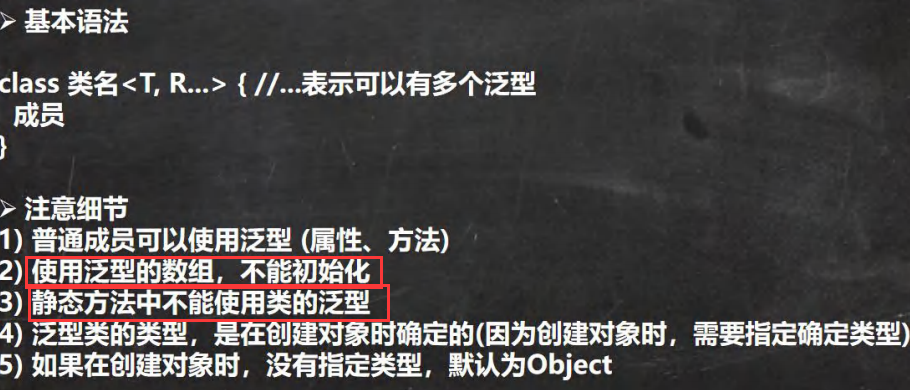
1 | //1. Tiger 后面泛型,所以我们把 Tiger 就称为自定义泛型类 |
15.6.2 自定义泛型接口
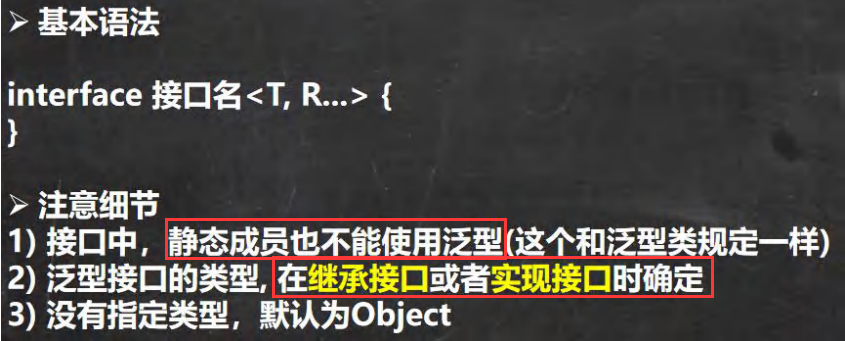
1 | /** |
15.6.3 自定义泛型方法
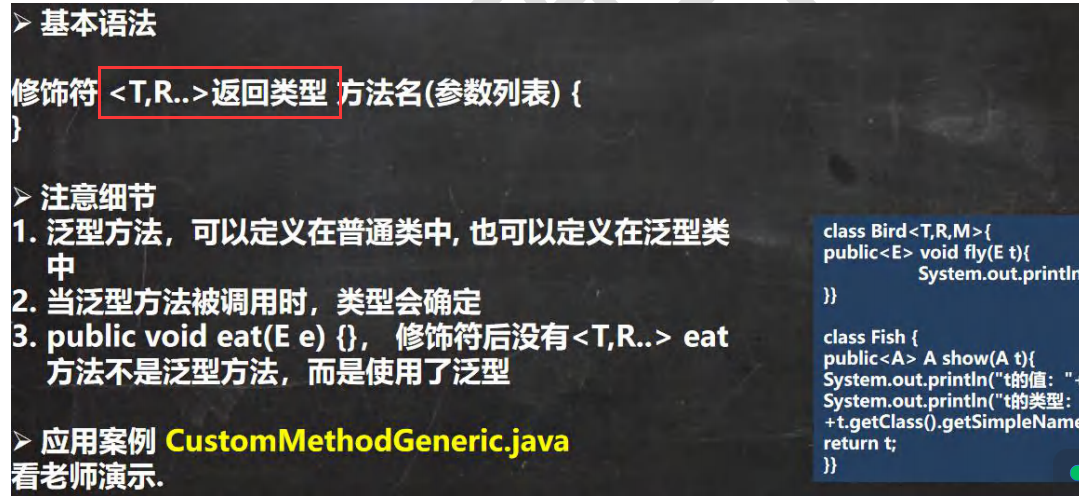
1 | public class CustomMethodGeneric { |
15.7 泛型的继承和通配符

15.8 JUnit单元测试类


第十六章 坦克大战【1】
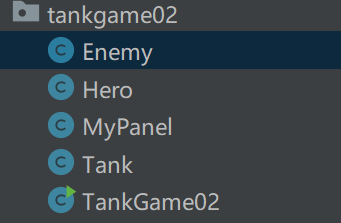
16.1 绘制坦克
16.1.1 坐标和像素
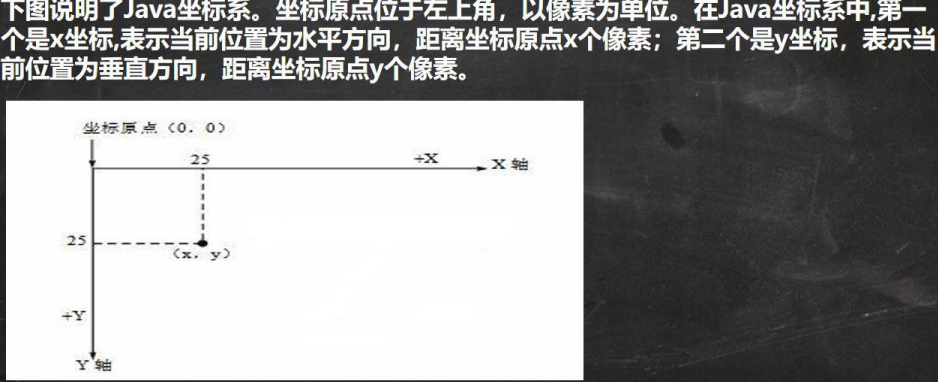

绘制一个圆形
1
2
3
4
5
6
7
8
9
10
11
12
13
14
15
16
17
18
19
20
21
22
23
24
25
26
27
28
29
30
31
32
33
34
35
36
37
38
39import javax.swing.*;
import java.awt.*;
public class DrawCircle extends JFrame { // DrawCircle继承JFrame,画框类(一个窗口)
private MyPanel mp = null;
public static void main(String[] args) {
new DrawCircle();
System.out.println("退出程序~");
}
public DrawCircle() { //构造器
// 初始化画板
mp = new MyPanel();
// 把画板加入到画框(窗口)
this.add(mp);
// 设置窗口大小
this.setSize(400, 300);
//当点击窗口的小×,程序完全退出.
this.setDefaultCloseOperation(JFrame.EXIT_ON_CLOSE);
// 设置可以显示
this.setVisible(true);
}
}
// 1.先定义一个MyPanel,继承JPanel类,画板类
class MyPanel extends JPanel {
//说明:
//1. MyPanel 对象就是一个画板
//2. Graphics g 把 g 理解成一支画笔
//3. Graphics 提供了很多绘图的方法
public void paint(Graphics g) { //绘图方法
super.paint(g);
System.out.println("paint方法被调用了");
// 画圆形
g.drawOval(10, 10, 100, 100);
}
}
16.1.2 绘图原理

16.1.3 Graphics类
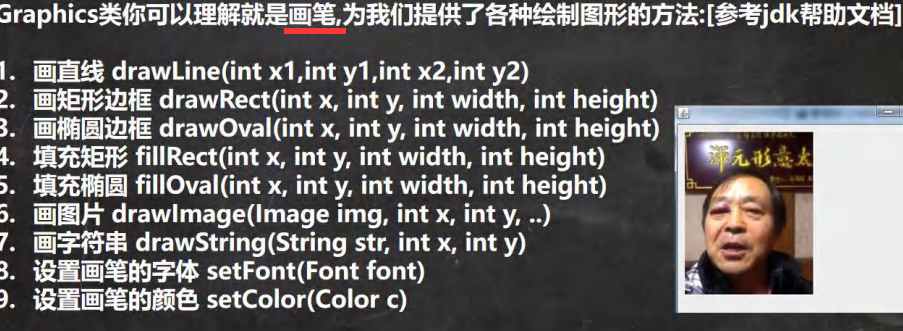
1 | // 画圆形 |
16.1.4 绘制坦克

1 | public class MyPanel extends JPanel { //自定义画板类 |
16.2 java事件处理机制
16.2.1 小球移动
- MyPanel要实现KeyListener键盘监听器,并实现对应监听方法(逻辑是 哪个键 ==> 哪个变量变化),注意要**repaint()**才能看到画面变化
- BallMove窗口要添加这个监听器
1 | public class BallMove extends JFrame { |
16.2.2 事件处理机制


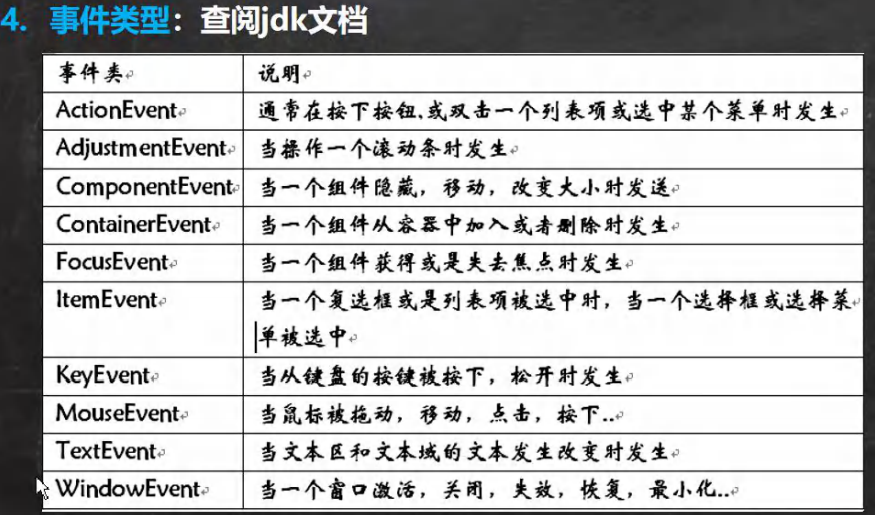
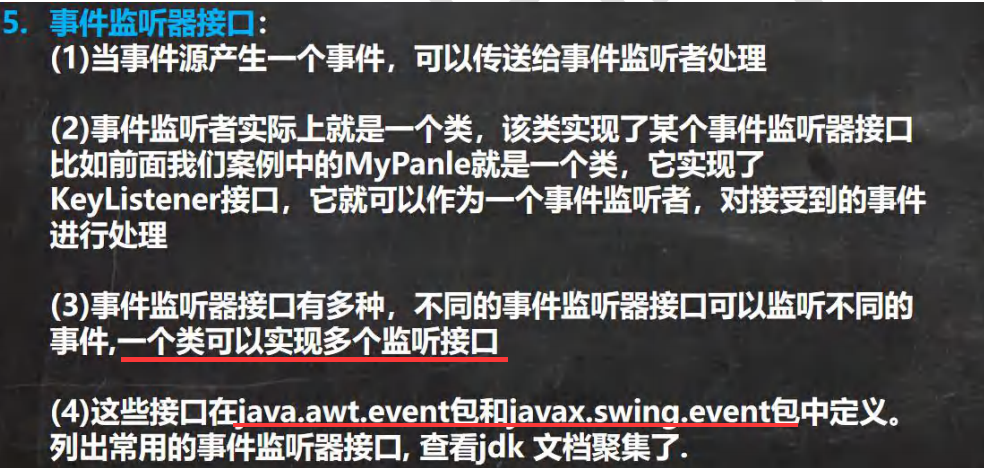
16.3 坦克移动
绘制不同方向的坦克
1
2
3
4
5
6
7
8
9
10
11
12
13
14
15
16
17
18
19
20
21
22
23
24
25
26
27
28
29
30
31
32
33
34
35
36
37public void drawTank(int x, int y, Graphics g, int direct, int type) {
// 根据不同坦克类型,设置不同颜色
// ...
// 根据不同方向,绘制坦克
switch (direct) {
case 0: //向上
g.fill3DRect(x, y, 10, 60, false); //左边轮子
g.fill3DRect(x + 30, y, 10, 60, false); //右边轮子
g.fill3DRect(x + 10, y + 10, 20, 40, false); //中间部分
g.fillOval(x + 10, y + 20, 20, 20); //中间的圆
g.drawLine(x + 20, y + 30, x + 20, y); //炮筒
break;
case 1: //向右
g.fill3DRect(x, y, 60, 10, false); //左边轮子
g.fill3DRect(x, y + 30, 60, 10, false); //右边轮子
g.fill3DRect(x + 10, y + 10, 40, 20, false); //中间部分
g.fillOval(x + 20, y + 10, 20, 20); //中间的圆
g.drawLine(x + 30, y + 20, x + 60, y + 20); //炮筒
break;
case 2: //向下
g.fill3DRect(x, y, 10, 60, false); //右边轮子
g.fill3DRect(x + 30, y, 10, 60, false); //左边轮子
g.fill3DRect(x + 10, y + 10, 20, 40, false); //中间部分
g.fillOval(x + 10, y + 20, 20, 20); //中间的圆
g.drawLine(x + 20, y + 30, x + 20, y + 60); //炮筒
break;
case 3: //向左
g.fill3DRect(x, y, 60, 10, false); //左边轮子
g.fill3DRect(x, y + 30, 60, 10, false); //右边轮子
g.fill3DRect(x + 10, y + 10, 40, 20, false); //中间部分
g.fillOval(x + 20, y + 10, 20, 20); //中间的圆
g.drawLine(x + 30, y + 20, x, y + 20); //炮筒
break;
default:
System.out.println("没有处理");
}
}监听键盘事件,让坦克移动。注意:repaint() 和 addListener()
1
2
3
4
5
6
7
8
9
10
11
12
13
14
15
16
17
18
19
20
public void keyPressed(KeyEvent e) {
if(e.getKeyCode() == KeyEvent.VK_W) { //W 上
// 修改方向
hero.setDirect(0);
// 修改坐标
hero.moveUp();
} else if (e.getKeyCode() == KeyEvent.VK_D) { // D 右
hero.setDirect(1);
hero.moveRight();
} else if (e.getKeyCode() == KeyEvent.VK_S) { // S 下
hero.setDirect(2);
hero.moveDown();
} else if (e.getKeyCode() == KeyEvent.VK_A) { // A 左
hero.setDirect(3);
hero.moveLeft();
}
// 重写绘制画板
this.repaint();
}
16.4 作业
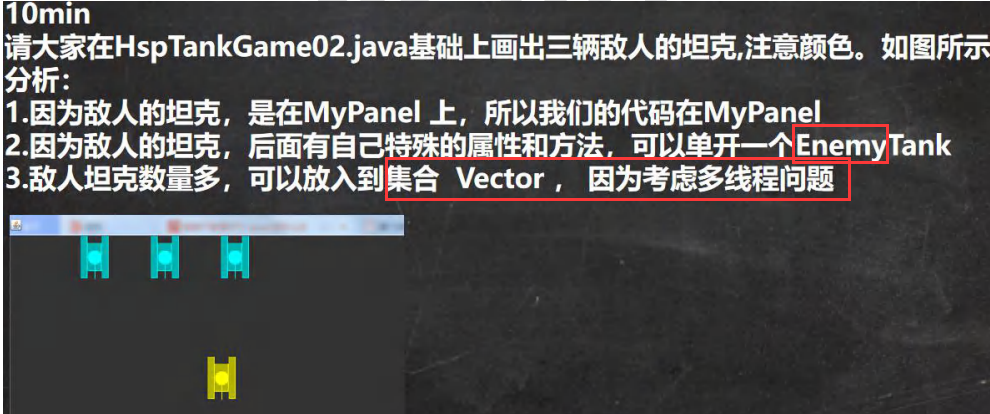
1 | public class MyPanel extends JPanel implements KeyListener { //自定义画板类 |
第十七章 多线程基础
17.1 线程相关概念
- 程序、
- 是为完成特定任务、用某种语言编写的一组指令的集合。简单的说:就是我们写的代码
- 进程
- 进程是指运行中的程序,比如我们使用QQ,就启动了一个进程,操作系统就会为该进程分配内存空间。当我们使用迅雷,又启动了一个进程,操作系统将为迅雷分配新的内存空间.
- 进程是程序的一次执行过程,或是正在运行的一个程序.是动态过程:有它自身的产生、存在和消亡过程
- 线程
- 线程由进程创建的,是进程的一个实体
- 一个进程可以拥有多个线程
- 其他概念
- 单线程: 同一个时刻,只允许执行一个线程
- 多线程: 同一个时刻,可以执行多个线程,比如:一个QQ进程,可以同时打开多个聊天窗口,一个迅雷进程,可以同时下载多个文件
- 并发: 同一个时刻,多个任务交替执行,造成一种“貌似同时”的错觉,简单的说, 单核cpu实现的多任务就是并发。
- 并行: 同一个时刻,多个任务同时执行。多核cpu可以实现并行。
17.2 线程基本使用
17.2.1 创建线程的两种方式
继承Thread 类, 重写run方法
实现Runnable接口, 重写run方法

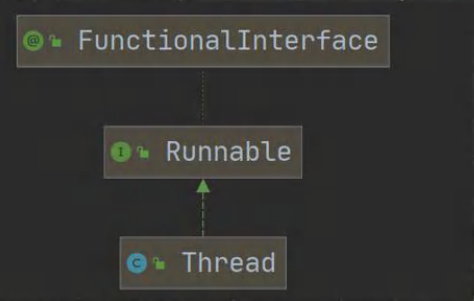
17.2.2 继承Thread类
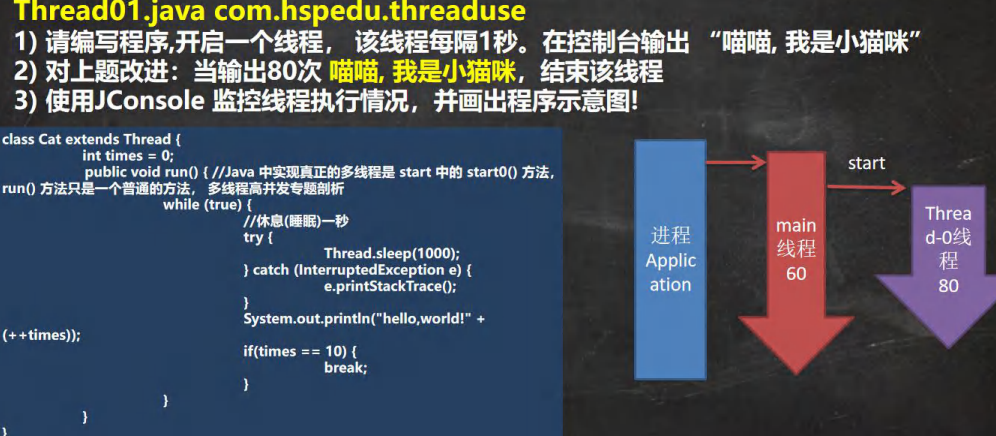
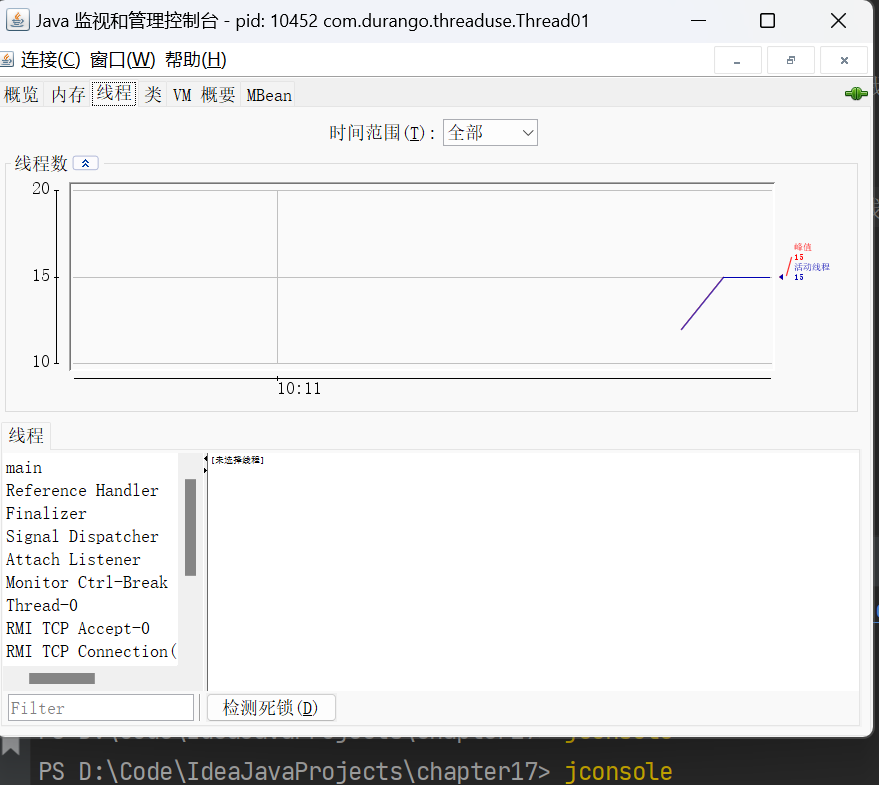
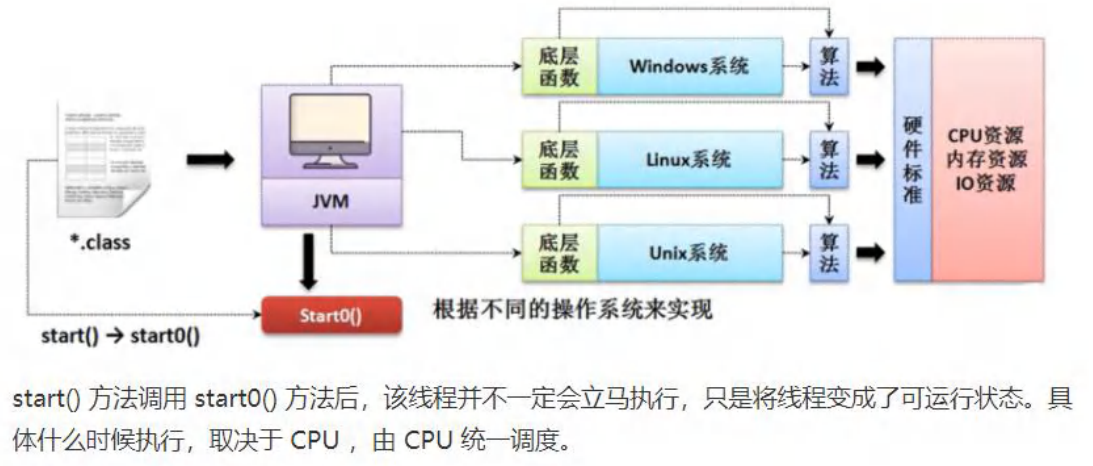
1 | public class Thread01 { |
17.2.3 实现Runnable接口

1 | public class Thread02 { |
模拟一个简单的Thread代理类
1
2
3
4
5
6
7
8
9
10
11
12
13
14
15
16
17
18
19
20
21
22
23
24
25
26
27
28
29
30
31
32
33
34
35
36
37
38public class Thread02 {
public static void main(String[] args) {
// Tiger tiger = new Tiger();//实现了 Runnable
// ThreadProxy threadProxy = new ThreadProxy(tiger);
// threadProxy.start();
}
}
class Tiger implements Runnable {
public void run() {
System.out.println("老虎嗷嗷叫....");
}
}
//线程代理类 , 模拟了一个极简的 Thread 类
class ThreadProxy implements Runnable {//你可以把 Proxy 类当做 ThreadProxy
private Runnable target = null;//属性,类型是 Runnable
public void run() {
if (target != null) {
target.run();//动态绑定(运行类型 Tiger)
}
}
public ThreadProxy(Runnable target) {
this.target = target;
}
public void start() {
start0();//这个方法时真正实现多线程方法
}
public void start0() {
run();
}
}
17.2.4 多线程案例

1 | public class Thread03 { |
17.3 模拟售票系统
1 | public class SellTicket { |
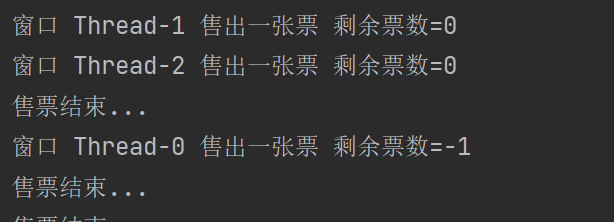
17.4 线程终止

1 | public class ThreadExit { |
17.5 线程常用方法
17.5.1 第一组方法


1 | public class ThreadMethod01 { |
17.5.2 第二组方法

1 | public class ThreadMethod02 { |
17.5.3 用户线程和守护线程

在main主线程中开启了一个无限执行的子线程T,即使主线程指向完毕了,T也还在继续执行。
将一个线程设置成守护线程。setDaemon(true)

17.6 线程的生命周期
17.6.1 线程的状态
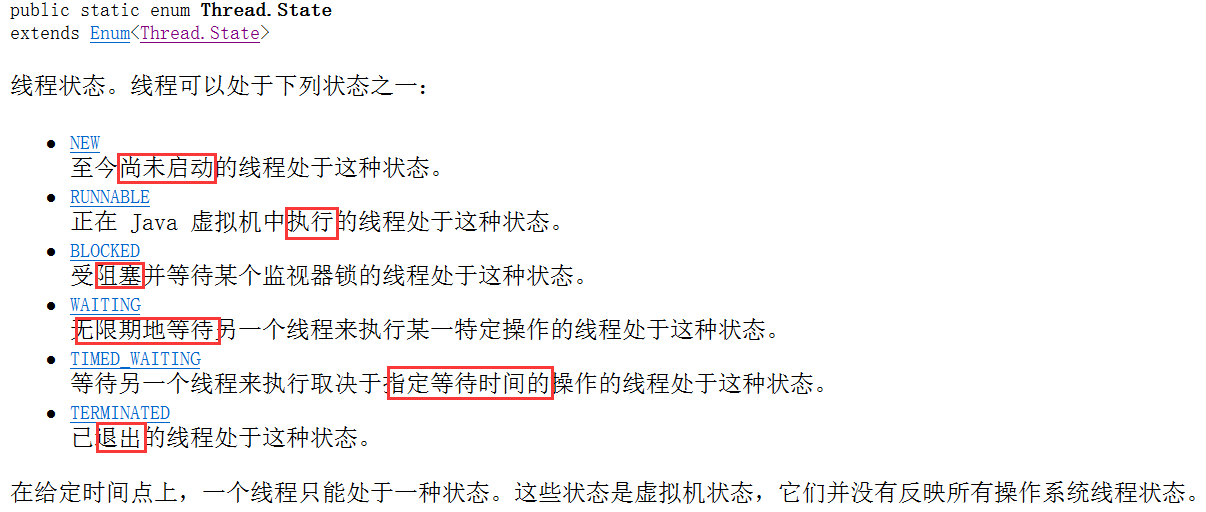
17.6.2 状态转化图(重要!)
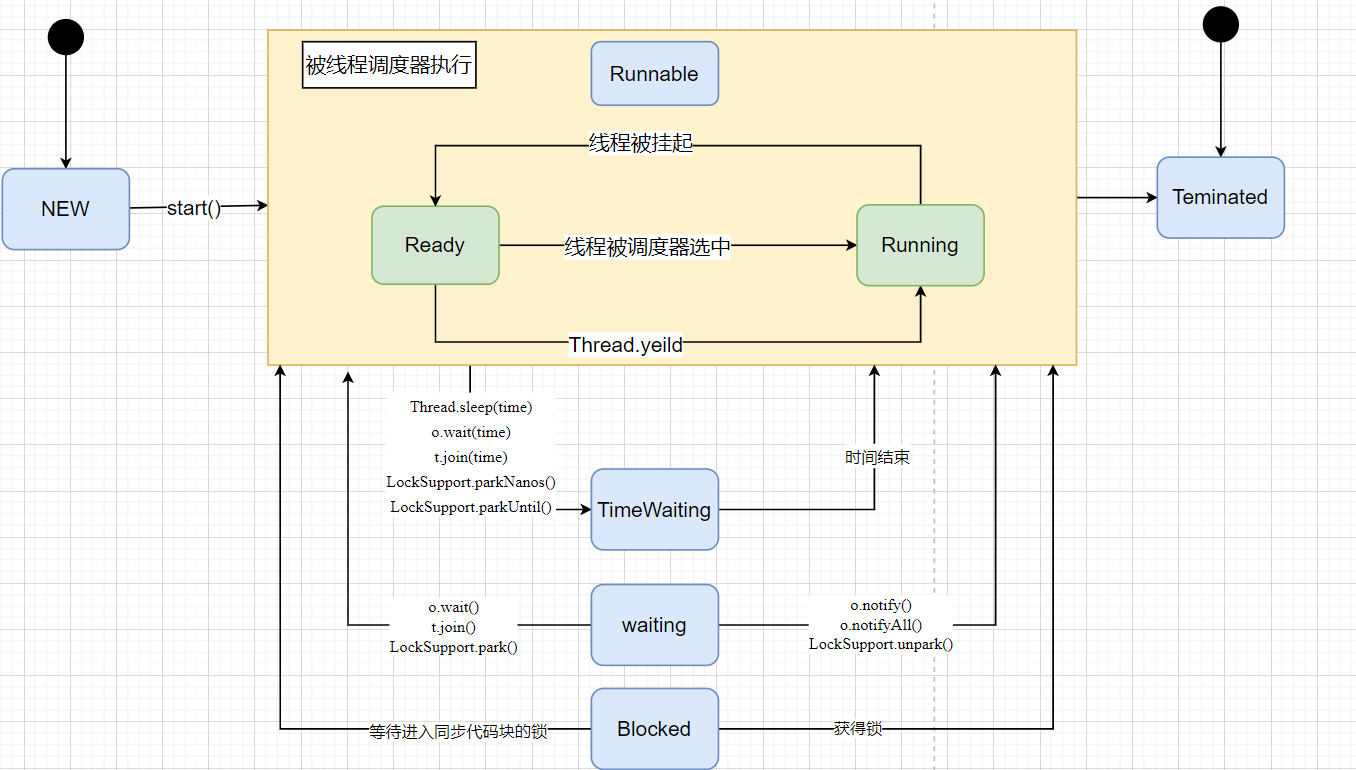
17.6.3 通过程序查看
1 | public class ThreadState { |
17.7 线程同步
17.7.1 线程同步机制

17.7.2 synchronized关键字
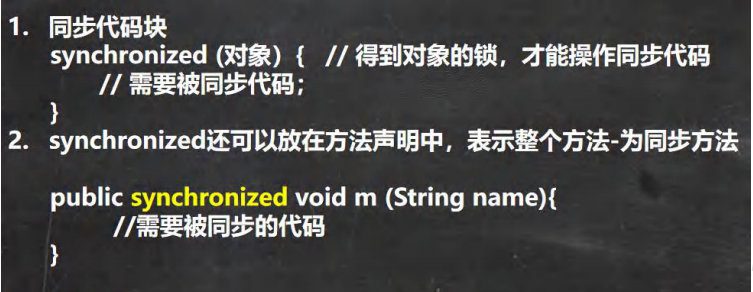
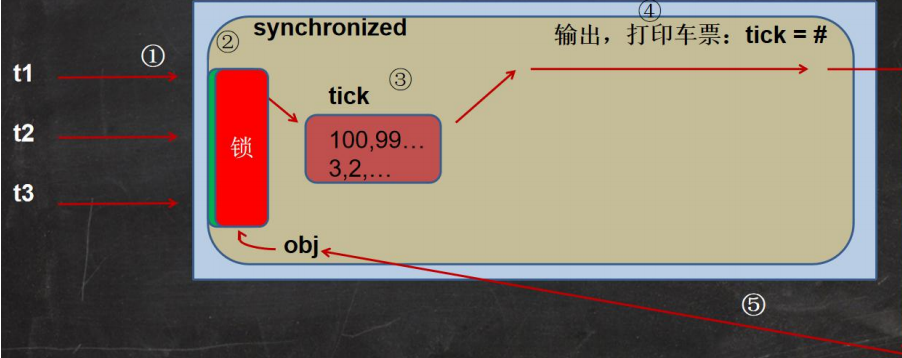
使用synchronized解决售票问题
1
2
3
4
5
6
7
8
9
10
11
12
13
14
15
16
17
18
19
20
21
22
23
24
25
26
27
28
29
30
31
32
33
34
35
36
37public class SellTicket {
public static void main(String[] args) {
SellTicket02 sellTicket02 = new SellTicket02();
new Thread(sellTicket02).start();
new Thread(sellTicket02).start();
new Thread(sellTicket02).start();
}
}
//实现接口方式,使用synchronized关键字实现同步
class SellTicket02 implements Runnable {
private int ticketNum = 100; //让多个线程共享 ticketNum
private boolean loop = true;
public synchronized void sell() { //同步方法,在同一个时刻,只能有一个线程来sell方法
if (ticketNum <= 0) {
System.out.println("售票结束...");
loop = false;
return;
}
System.out.println("窗口 " + Thread.currentThread().getName() + " 售出一张票" +
" 剩余票数=" + (--ticketNum));
}
public void run() {
while (loop) {
sell();
//休眠 50 毫秒, 模拟
try {
Thread.sleep(500);
} catch (InterruptedException e) {
e.printStackTrace();
}
}
}
}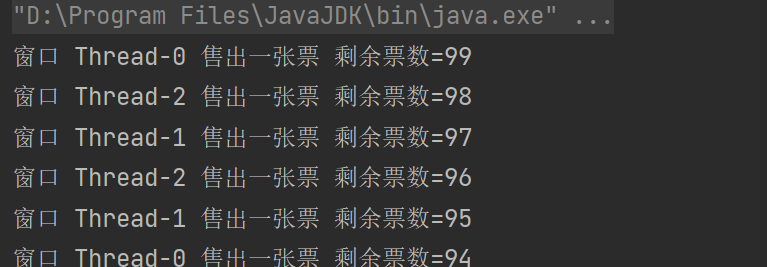
17.8 互斥锁
17.8.1 基本概念

17.8.2 注意事项
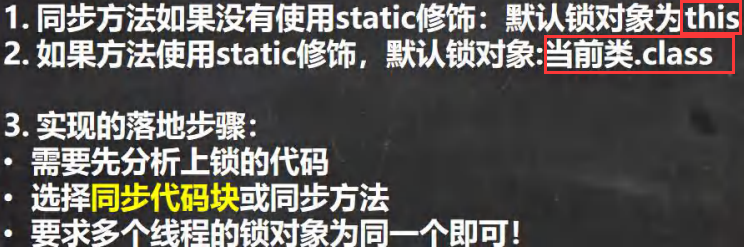
17.8.3 售票系统的同步问题
1 | public class SellTicket { |
17.9 线程的死锁

1 | public class DeadLock { |

17.10 锁的释放
17.10.1 下面操作会释放锁

17.10.2 下面操作不会释放锁

第十八章 坦克大战【2】
18.1 坦克大战0.3
18.1.1 发射子弹
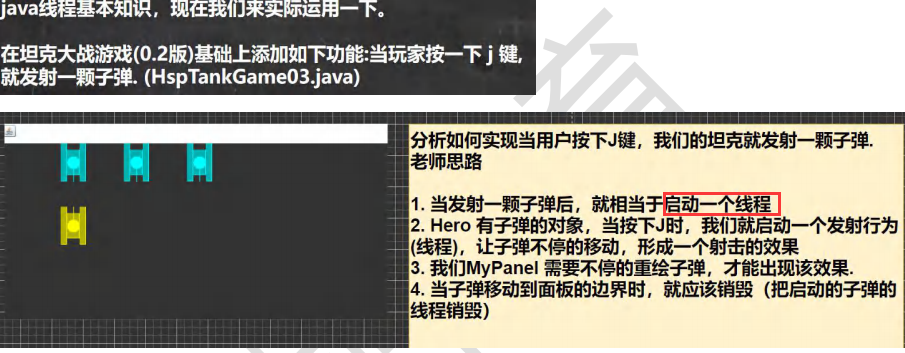
Shot.java
1
2
3
4
5
6
7
8
9
10
11
12
13
14
15
16
17
18
19
20
21
22
23
24
25
26
27
28
29
30
31
32
33
34
35
36
37
38
39
40
41
42
43
44
45
46
47public class Shot implements Runnable {
int x;
int y; //子弹坐标
int direct = 0; //子弹方向
int speed = 10; //子弹速度
boolean isLive = true; //子弹是否还存活
public Shot(int x, int y, int direct) {
this.x = x;
this.y = y;
this.direct = direct;
}
public void run() {
while (true) {
// 休眠50ms
try {
Thread.sleep(100);
} catch (InterruptedException e) {
throw new RuntimeException(e);
}
// 根据方向改变坐标
switch (direct) {
case 0: //上
y -= speed;
break;
case 1: //右
x += speed;
break;
case 2: //下
y += speed;
break;
case 3: //左
x -= speed;
break;
}
// 测试输出坐标
System.out.println("子弹线程" + Thread.currentThread().getName() + " x = " + x + ", y = " + y);
// 当子弹移动到面板的边界时,就应该销毁(把启动的子弹的线程销毁)
if (!(x >= 0 && x <= 1000 && y >= 0 && y <= 750)) {
isLive = false;
break;
}
}
}
}hero.java
1
2
3
4
5
6
7
8
9
10
11
12
13
14
15
16
17
18
19
20
21
22
23
24
25
26public class Hero extends Tank { // 自定义坦克类
// 定义一个Shot对象
Shot shot = null;
...
// 射击,开启一个线程
public void shotEnemyTank() {
// 创建Shot对象,根据当前Hero对象的位置和方向创建Shot
int direct = getDirect();
switch (direct) {
case 0: //向上
shot = new Shot(getX() + 20, getY(), getDirect());
break;
case 1: //向右
shot = new Shot(getX() + 60, getY() + 20, getDirect());
break;
case 2: //向下
shot = new Shot(getX() + 20, getY() + 60, getDirect());
break;
case 3: //向左
shot = new Shot(getX(), getY() + 20, getDirect());
break;
}
// 启动Shot线程
new Thread(shot).start();
}
}MyPanel.java
1
2
3
4
5
6
7
8
9
10
11
12
13
14
15
16
17
18
19
20
21
22
23
24
25
26
27
28
29
30
31
32
33
34
35public class MyPanel extends JPanel implements KeyListener, Runnable{ //自定义画板类
...
public void paint(Graphics g) {
...
// 画出hero射击的子弹
if(hero.shot != null && hero.shot.isLive) {
System.out.println("子弹被绘制!");
//g.fill3DRect(hero.shot.x, hero.shot.y, 1, 1, false);
g.draw3DRect(hero.shot.x, hero.shot.y, 1, 1, false);
}
}
...
public void keyPressed(KeyEvent e) {
...
// 如果按下的是J,就发射子弹
if (e.getKeyCode() == KeyEvent.VK_J) {
hero.shotEnemyTank();
}
}
...
public void run() { //每隔100ms,重绘面板,刷新绘图区域,子弹就会移动
while (true) {
try {
Thread.sleep(100);
} catch (InterruptedException e) {
throw new RuntimeException(e);
}
this.repaint();
}
}
...
}TankGame03.java
1
2
3
4
5
6
7
8
9
10public class TankGame03 extends JFrame {
...
public TankGame03() {
mp = new MyPanel();
// 将mp放入Thread并启动
Thread thread = new Thread(mp);
thread.start();
...
}
}
18.2 坦克大战0.4
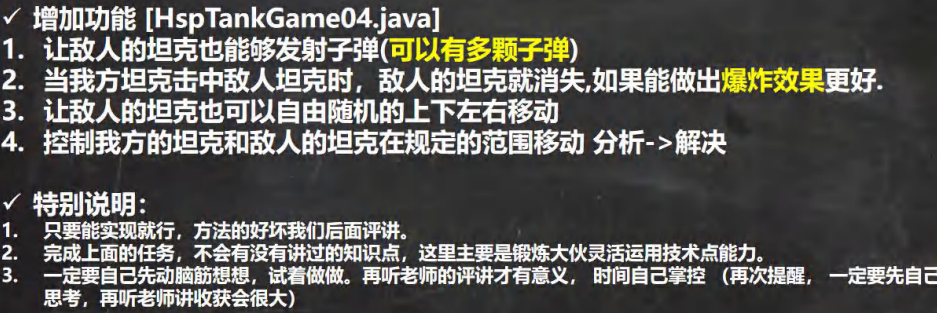
18.2.1 敌人发射子弹

Enemy.java
1
2
3
4
5
6
7public class Enemy extends Tank {
// 在敌人坦克类,使用Vector 保存多个Shot线程
Vector<Shot> shots = new Vector<>();
public Enemy(int x, int y) {
super(x, y);
}
}MyPanel.java
1
2
3
4
5
6
7
8
9
10
11
12
13
14
15
16
17
18
19
20
21
22
23
24
25
26
27
28
29
30
31
32
33
34
35
36
37
38
39
40
41public class MyPanel extends JPanel implements KeyListener, Runnable{ //自定义画板类
...
public MyPanel() {
...
//初始化敌人坦克
for (int i = 0; i < enemySize; i++) {
...
// 给该enemy对象初始化Shot对象
Shot shot = new Shot(enemy.getX() + 20, enemy.getY() + 60, enemy.getDirect());
enemy.shots.add(shot);
//启动Shot对象
new Thread(shot).start();
enemies.add(enemy);
}
}
public void paint(Graphics g) {
...
// 画出enemy坦克(遍历Vector)
for (int i = 0; i < enemies.size(); i++) {
// 取出坦克并绘制
Enemy enemy = enemies.get(i);
drawTank(enemy.getX(), enemy.getY(), g, enemy.getDirect(), 1);
// 绘制enemy的所有子弹
for (int j = 0; j < enemy.shots.size(); j++) {
// 取出子弹
Shot shot = enemy.shots.get(j);
// 绘制
if (shot.isLive) {
g.draw3DRect(shot.x, shot.y, 1, 1, false);
} else {
// 子弹消亡,从Vector移除
enemy.shots.remove(shot);
}
}
}
}
...
}
18.2.2 敌人坦克被击中
MyPanel.java:判断子弹是否击中敌人
1
2
3
4
5
6
7
8
9
10
11
12
13
14
15
16
17
18
19
20
21
22
23
24
25
26
27
28
29
30
31
32
33
34
35
36
37
38
39
40
41
42
43
44
45
46
47
48
49
50
51
52
53
54
55
56
57
58
59
60
61
62
63public class MyPanel extends JPanel implements KeyListener, Runnable { //自定义画板类
...
public void paint(Graphics g) {
...
// 画出enemy坦克(遍历Vector)
for (int i = 0; i < enemies.size(); i++) {
// 取出坦克并绘制
Enemy enemy = enemies.get(i);
// 当坦克存活时才绘制
if (enemy.isLive) {
drawTank(enemy.getX(), enemy.getY(), g, enemy.getDirect(), 1);
} else { //坦克死亡时从Vector中删除
enemies.remove(enemy);
}
...
}
}
...
// 判断我方子弹是否击中敌人的子弹
// 什么时候需要判断是否击中坦克?run方法中循环判断
public void hitTank(Shot s, Enemy enemy) {
// 判断s 击中坦克
switch (enemy.getDirect()) {
case 0: //坦克向上
case 2: //坦克向下
if (s.x > enemy.getX() && s.x < enemy.getX() + 40
&& s.y > enemy.getY() && s.y < enemy.getY() + 60) {
s.isLive = false; //子弹销毁
enemy.isLive = false; //敌人坦克销毁
}
break;
case 1: //坦克向右
case 3: //坦克向左
if (s.x > enemy.getX() && s.x < enemy.getX() + 60
&& s.y > enemy.getY() && s.y < enemy.getY() + 40) {
s.isLive = false; //子弹销毁
enemy.isLive = false; //敌人坦克销毁
}
break;
}
}
...
public void run() { //每隔100ms,重绘面板,刷新绘图区域,子弹就会移动
while (true) {
try {
Thread.sleep(100);
} catch (InterruptedException e) {
throw new RuntimeException(e);
}
// 判断是否击中了敌人坦克
if (hero.shot != null && hero.shot.isLive) {
// 遍历所有的敌人坦克
for (int i = 0; i < enemies.size(); i++) {
Enemy enemy = enemies.get(i);
hitTank(hero.shot, enemy);
}
}
this.repaint();
}
}
}
18.2.3 爆炸效果
Bomb.java
1
2
3
4
5
6
7
8
9
10
11
12
13
14
15
16
17
18
19public class Bomb {
int x, y; //炸弹坐标
int life = 9; //炸弹生命周期
boolean isLive = true;
public Bomb(int x, int y) {
this.x = x;
this.y = y;
}
// 减少生命值,配合图片出现爆炸效果
public void lifeDown() {
if (life > 0) {
life --;
} else {
isLive = false;
}
}
}MyPanel.java:
1
2
3
4
5
6
7
8
9
10
11
12
13
14
15
16
17
18
19
20
21
22
23
24
25
26
27
28
29
30
31
32
33
34
35
36
37
38
39
40
41
42
43
44
45
46
47
48
49
50
51
52
53
54
55
56
57
58
59
60
61
62
63
64
65
66
67
68
69
70
71public class MyPanel extends JPanel implements KeyListener, Runnable { //自定义画板类
...
// 定义一个Vector,用于存放炸弹(爆炸效果)
// 当子弹击中坦克时,就加入一个爆炸效果
Vector<Bomb> bombs = new Vector<>();
// 定义三张炸弹图片,用于显示爆炸效果
Image image1 = null;
Image image2 = null;
Image image3 = null;
public MyPanel() {
...
// 初始化Image对象
image1 = Toolkit.getDefaultToolkit().getImage(Panel.class.getResource("/bomb_1.gif"));
image2 = Toolkit.getDefaultToolkit().getImage(Panel.class.getResource("/bomb_2.gif"));
image3 = Toolkit.getDefaultToolkit().getImage(Panel.class.getResource("/bomb_3.gif"));
}
public void paint(Graphics g) {
...
// 画出所有炸弹(爆炸效果)
for (int i = 0; i < bombs.size(); i++) {
System.out.println("绘制爆炸效果");
Bomb bomb = bombs.get(i);
// 根据bomb的life值,画出对应的图片
if (bomb.life > 6) {
g.drawImage(image1, bomb.x, bomb.y, 60, 60, this);
} else if (bomb.life > 3) {
g.drawImage(image2, bomb.x, bomb.y, 60, 60, this);
} else {
g.drawImage(image3, bomb.x, bomb.y, 60, 60, this);
}
// 让炸弹生命值减少
bomb.lifeDown();
// 如果炸弹的life为0了(isLive为false),就从bombs中删除
if (!bomb.isLive) {
bombs.remove(bomb);
}
}
}
...
/ 判断我方子弹是否击中敌人的子弹
// 什么时候需要判断是否击中坦克?run方法中循环判断
public void hitTank(Shot s, Enemy enemy) {
// 判断s 击中坦克
switch (enemy.getDirect()) {
case 0: //坦克向上
case 2: //坦克向下
if (s.x > enemy.getX() && s.x < enemy.getX() + 40
&& s.y > enemy.getY() && s.y < enemy.getY() + 60) {
s.isLive = false; //子弹销毁
enemy.isLive = false; //敌人坦克销毁
// 创建Bomb对象,加入到bombs集合中
Bomb bomb = new Bomb(enemy.getX(), enemy.getY());
bombs.add(bomb);
}
break;
case 1: //坦克向右
case 3: //坦克向左
if (s.x > enemy.getX() && s.x < enemy.getX() + 60
&& s.y > enemy.getY() && s.y < enemy.getY() + 40) {
s.isLive = false; //子弹销毁
enemy.isLive = false; //敌人坦克销毁
// 创建Bomb对象,加入到bombs集合中
Bomb bomb = new Bomb(enemy.getX(), enemy.getY());
bombs.add(bomb);
}
break;
}
}
18.2.4 敌人坦克自由移动
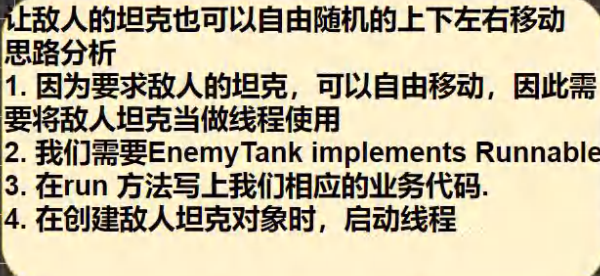
Enemy.java
1
2
3
4
5
6
7
8
9
10
11
12
13
14
15
16
17
18
19
20
21
22
23
24
25
26
27
28
29
30
31
32
33
34
35
36
37
38
39
40
41
42
43
44
45public class Enemy extends Tank implements Runnable{
// 在敌人坦克类,使用Vector 保存多个Shot线程
Vector<Shot> shots = new Vector<>();
boolean isLive = true;
public Enemy(int x, int y) {
super(x, y);
}
public void move(int direct, int step) {
for (int i = 0; i < step; i++) {
// 休眠50ms
try {
Thread.sleep(50);
} catch (InterruptedException e) {
throw new RuntimeException(e);
}
switch (direct) {
case 0: //上
moveUp();
break;
case 1: //右
moveRight();
break;
case 2: //下
moveDown();
break;
case 3: //左
moveLeft();
break;
}
}
}
public void run() {
while (isLive) {
// 根据坦克的方向来继续移动
move(getDirect(), 30);
// 然后随机地改变坦克方向 0-3
setDirect((int)(Math.random() * 4));
}
}
}MyPanel.java
1
2
3
4
5
6
7
8
9
10
11
12
13
14
15
16
17public class MyPanel extends JPanel implements KeyListener, Runnable { //自定义画板类
...
public MyPanel() {
hero = new Hero(100, 100); // 初始化自己的坦克
hero.setSpeed(5); // 初始化坦克速度
//初始化敌人坦克
for (int i = 0; i < enemySize; i++) {
Enemy enemy = new Enemy(100 * (i + 1), 0);
enemy.setDirect(2); // 设置初始炮筒方向
new Thread(enemy).start(); //启动Enemy线程,让坦克自由移动
...
}
...
}
....
}
18.2.4 控制坦克移动范围
Enemy.java
1
2
3
4
5
6
7
8
9
10
11
12
13
14
15
16
17
18
19
20
21
22
23
24
25
26
27
28
29
30
31
32
33public void move(int direct, int step) {
for (int i = 0; i < step; i++) {
// 休眠50ms
try {
Thread.sleep(50);
} catch (InterruptedException e) {
throw new RuntimeException(e);
}
switch (direct) {
case 0: //上
if (getY() > 0){
moveUp();
}
break;
case 1: //右
if (getX() + 60 < 1000) {
moveRight();
}
break;
case 2: //下
if (getY() + 60 < 750) {
moveDown();
}
break;
case 3: //左
if (getX() > 0) {
moveLeft();
}
break;
}
}
}MyPanel.java
1
2
3
4
5
6
7
8
9
10
11
12
13
14
15
16
17
18
19
20
21
22
23
24
25
26
27
28
29
public void keyPressed(KeyEvent e) {
//jSystem.out.println((char) e.getKeyCode() + "被按下..");
if (e.getKeyCode() == KeyEvent.VK_W) { //W 上
// 修改方向
hero.setDirect(0);
// 修改坐标
if (hero.getY() > 0){
hero.moveUp();
}
} else if (e.getKeyCode() == KeyEvent.VK_D) { // D 右
hero.setDirect(1);
if (hero.getX() + 60 < 1000) {
hero.moveRight();
}
} else if (e.getKeyCode() == KeyEvent.VK_S) { // S 下
hero.setDirect(2);
if (hero.getY() + 60 < 750) {
hero.moveDown();
}
} else if (e.getKeyCode() == KeyEvent.VK_A) { // A 左
hero.setDirect(3);
if (hero.getX() > 0) {
hero.moveLeft();
}
}
...
}
18.3 坦克大战0.5

18.3.1 发射多颗子弹
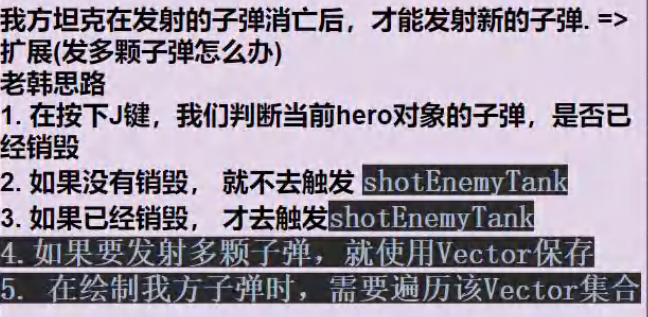
Hero.java
1
2
3
4
5
6
7
8
9
10
11
12
13
14
15
16
17
18
19
20public class Hero extends Tank { // 自定义坦克类
// 定义一个Shot对象
Shot shot = null;
// 可以发射多颗子弹
Vector<Shot> shots = new Vector<>();
...
// 射击,开启一个线程
public void shotEnemyTank() {
// 控制一次最多发射几颗子弹
if (shots.size() == 5) {
return;
}
...
// 新创建的shot放入shots集合中
shots.add(shot);
// 启动Shot线程
new Thread(shot).start();
}
}MyPanel.java
1
2
3
4
5
6
7
8
9
10
11
12
13
14
15
16
17
18
19
20
21
22
23
24
25
26
27
28
29
30
31
32
33
34
35
36
37
38
39
40
41
42
43
44
45
46
47
48
49
50
51
52
53
54
55
56
57
58
59
60
61
62
63
64
65
66
67
68
69
70
71
72
73
74
75
76
77
78
79
80
81
82
83
84
85
86
87
88
89
90
91
92
93public class MyPanel extends JPanel implements KeyListener, Runnable { //自定义画板类
...
public void paint(Graphics g) {
...
// 画出hero射击的子弹
for (int i = 0; i < hero.shots.size(); i++) {
Shot shot = hero.shots.get(i);
if (shot != null && shot.isLive) {
g.draw3DRect(shot.x, shot.y, 1, 1, false);
} else { // shot对象已经销毁,从shots集合中移除
hero.shots.remove(shot);
}
}
...
}
...
//判断我方所有子弹是否击中任意敌人
public void hitEnemyTank() {
for (int i = 0; i < hero.shots.size(); i++) {
Shot shot = hero.shots.get(i);
// 判断该颗子弹是否击中任意敌人
if (hero.shot != null && hero.shot.isLive){
for (int j = 0; j < enemies.size(); j++) {
Enemy enemy = enemies.get(j);
hitTank(shot, enemy);
}
}
}
}
// 判断我方子弹是否击中敌人的子弹
// 什么时候需要判断是否击中坦克?run方法中循环判断
public void hitTank(Shot s, Enemy enemy) {
// 判断s 击中坦克
switch (enemy.getDirect()) {
case 0: //坦克向上
case 2: //坦克向下
if (s.x > enemy.getX() && s.x < enemy.getX() + 40
&& s.y > enemy.getY() && s.y < enemy.getY() + 60) {
s.isLive = false; //子弹销毁
enemy.isLive = false; //敌人坦克销毁
enemies.remove(enemy); //将敌人坦克从Vector中删除
// 创建Bomb对象,加入到bombs集合中
Bomb bomb = new Bomb(enemy.getX(), enemy.getY());
bombs.add(bomb);
}
break;
case 1: //坦克向右
case 3: //坦克向左
if (s.x > enemy.getX() && s.x < enemy.getX() + 60
&& s.y > enemy.getY() && s.y < enemy.getY() + 40) {
s.isLive = false; //子弹销毁
enemy.isLive = false; //敌人坦克销毁
enemies.remove(enemy);
// 创建Bomb对象,加入到bombs集合中
Bomb bomb = new Bomb(enemy.getX(), enemy.getY());
bombs.add(bomb);
}
break;
}
}
public void keyPressed(KeyEvent e) {
...
// 如果按下的是J,就发射子弹
if (e.getKeyCode() == KeyEvent.VK_J) {
//只能发射一颗子弹,且子弹消亡了才能发射新的子弹
/*if (hero.shot == null || !hero.shot.isLive) {
hero.shotEnemyTank();
}*/
// 发射多颗子弹
hero.shotEnemyTank();
}
}
public void run() { //每隔100ms,重绘面板,刷新绘图区域,子弹就会移动
while (true) {
try {
Thread.sleep(50);
} catch (InterruptedException e) {
throw new RuntimeException(e);
}
// 判断我方所有子弹是否击中了任意敌人坦克
hitEnemyTank();
this.repaint();
}
}
}
18.3.2 敌人发射多颗子弹

Enemy.java
1
2
3
4
5
6
7
8
9
10
11
12
13
14
15
16
17
18
19
20
21
22
23
24
25
26
27
28
29
30
public void run() {
while (isLive) {
// 敌人发射多颗子弹,如果shots.size() < 3,创建新子弹
if (shots.size() < 3) {
Shot shot = null;
switch (getDirect()) {
case 0:
shot = new Shot(getX() + 20, getY(), 0);
break;
case 1:
shot = new Shot(getX() + 60, getY() + 20, 1);
break;
case 2:
shot = new Shot(getX() + 20, getY() + 60, 2);
break;
case 3:
shot = new Shot(getX(), getY(), 3);
break;
}
shots.add(shot);
new Thread(shot).start();
}
// 根据坦克的方向来继续移动
move(getDirect(), 30);
// 然后随机地改变坦克方向 0-3
setDirect((int) (Math.random() * 4));
}
}
18.3.3 敌人坦克击中我方
Tank.java
1
boolean isLive = true;
MyPanel.java
1
2
3
4
5
6
7
8
9
10
11
12
13
14
15
16
17
18
19
20
21
22
23
24
25
26
27
28
29
30
31
32
33
34
35
36
37
38
39
40
41
42
43
44
45
46
47
48
49
50
51
52
53
54
55
56
57
58
59
60
61
62
63
64
65
66
67
68
69
70
71
72
73
74
75
76
77
78
79
80
81
82
83
84
85
86public class MyPanel extends JPanel implements KeyListener, Runnable {
...
public void paint(Graphics g) {
super.paint(g);
g.fillRect(0, 0, 1000, 750); //填充背景,默认是黑色
// 画出hero坦克-封装成方法
if (hero != null && hero.isLive){
drawTank(hero.getX(), hero.getY(), g, hero.getDirect(), 0);
}
...
}
/ 判断敌人子弹是否击中我方坦克
public void hitHero() {
// 遍历所有敌人坦克
for (int i = 0; i < enemies.size(); i++) {
Enemy enemy = enemies.get(i);
// 遍历敌人坦克所有子弹
for (int j = 0; j < enemy.shots.size(); j++) {
Shot shot = enemy.shots.get(j);
if (hero.isLive && shot.isLive) {
hitTank(shot, hero);
}
}
}
}
//判断我方所有子弹是否击中任意敌人
public void hitEnemyTank() {
// 取出我方所有子弹
for (int i = 0; i < hero.shots.size(); i++) {
Shot shot = hero.shots.get(i);
// 判断该颗子弹是否击中任意敌人
if (hero.shot != null && hero.shot.isLive) {
for (int j = 0; j < enemies.size(); j++) {
Enemy enemy = enemies.get(j);
hitTank(shot, enemy);
}
}
}
}
// 判断子弹是否击中坦克
// 什么时候需要判断是否击中坦克?run方法中循环判断
public void hitTank(Shot s, Tank tank) {
// 判断s 击中坦克
switch (tank.getDirect()) {
case 0: //坦克向上
case 2: //坦克向下
if (s.x > tank.getX() && s.x < tank.getX() + 40
&& s.y > tank.getY() && s.y < tank.getY() + 60) {
s.isLive = false; //子弹销毁
tank.isLive = false; //敌人坦克销毁
enemies.remove(tank); //将敌人坦克从Vector中删除
// 创建Bomb对象,加入到bombs集合中
Bomb bomb = new Bomb(tank.getX(), tank.getY());
bombs.add(bomb);
}
break;
case 1: //坦克向右
case 3: //坦克向左
if (s.x > tank.getX() && s.x < tank.getX() + 60
&& s.y > tank.getY() && s.y < tank.getY() + 40) {
s.isLive = false; //子弹销毁
tank.isLive = false; //敌人坦克销毁
enemies.remove(tank);
// 创建Bomb对象,加入到bombs集合中
Bomb bomb = new Bomb(tank.getX(), tank.getY());
bombs.add(bomb);
}
break;
}
}
...
public void run() { //每隔100ms,重绘面板,刷新绘图区域,子弹就会移动
while (true) {
...
// 判断敌人子弹是否击中我方坦克
hitHero();
this.repaint();
}
}
}
第十九章 IO流
19.1 文件流
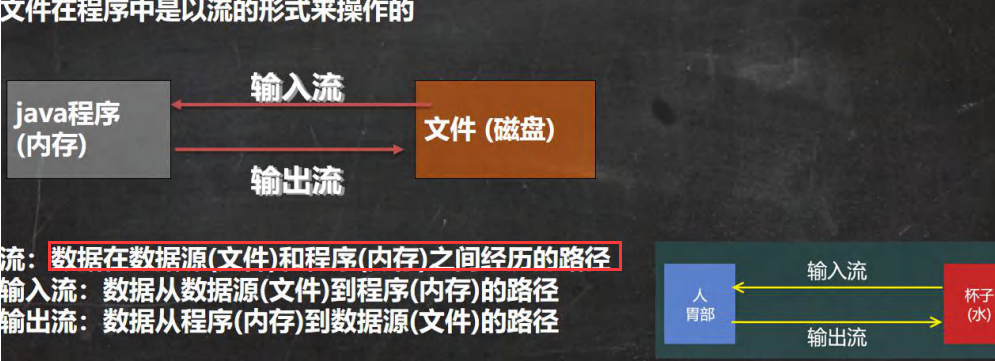
19.2 常用的文件操作
19.2.1 创建文件
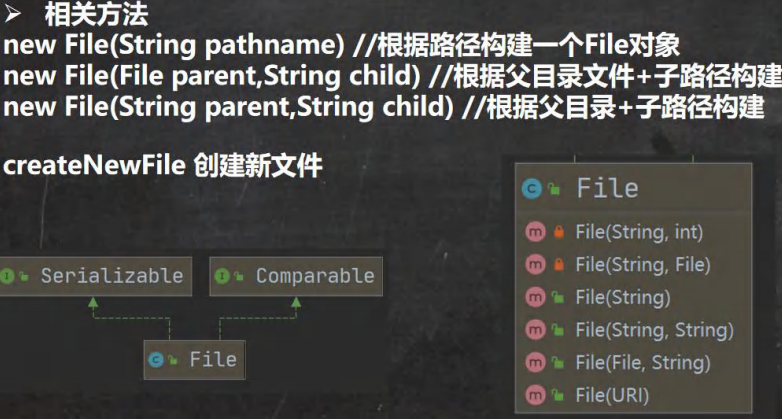
1 | // 方式 1 new File(String pathname) 根据路径构建 |
19.2.2 获取文件相关信息
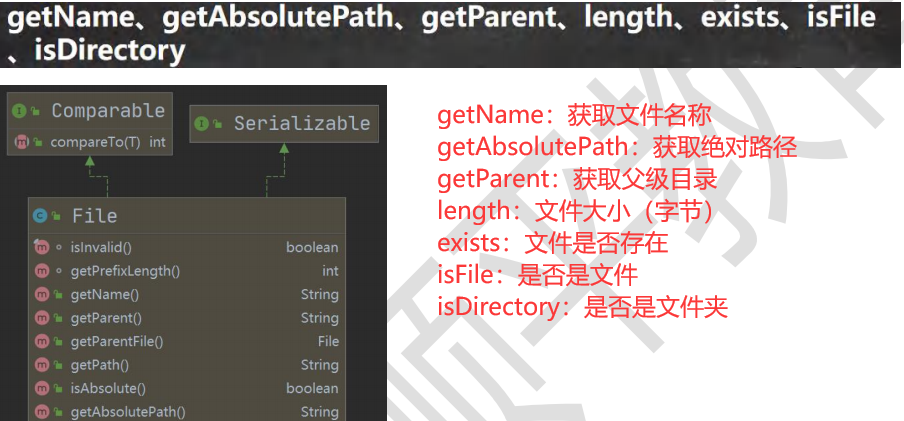
1 |
|
19.2.3 目录的操作和文件删除

1 | // 判断文件是否存在,存在则删除 |
19.3 IO流原理和分类
19.3.1 IO流原理
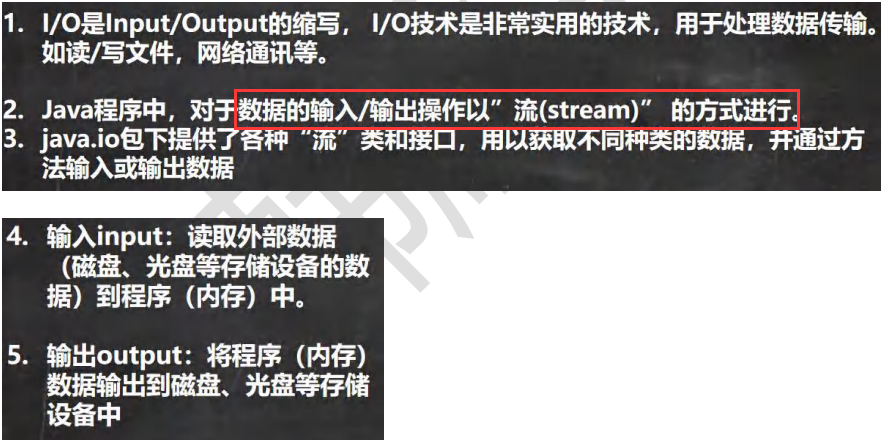
19.3.2 流的分类
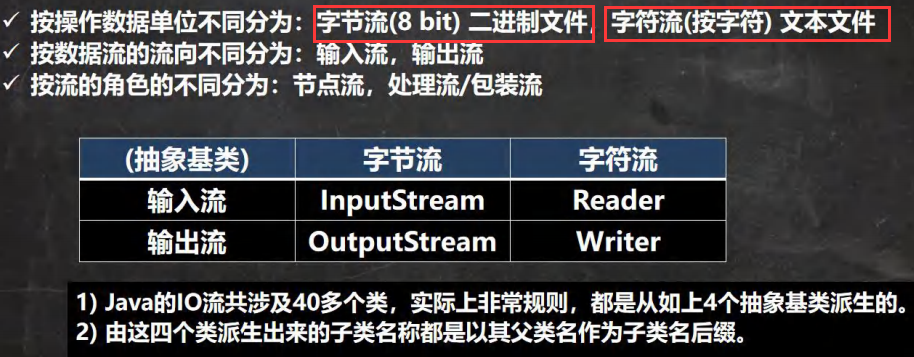
19.3.3 IO流体系图
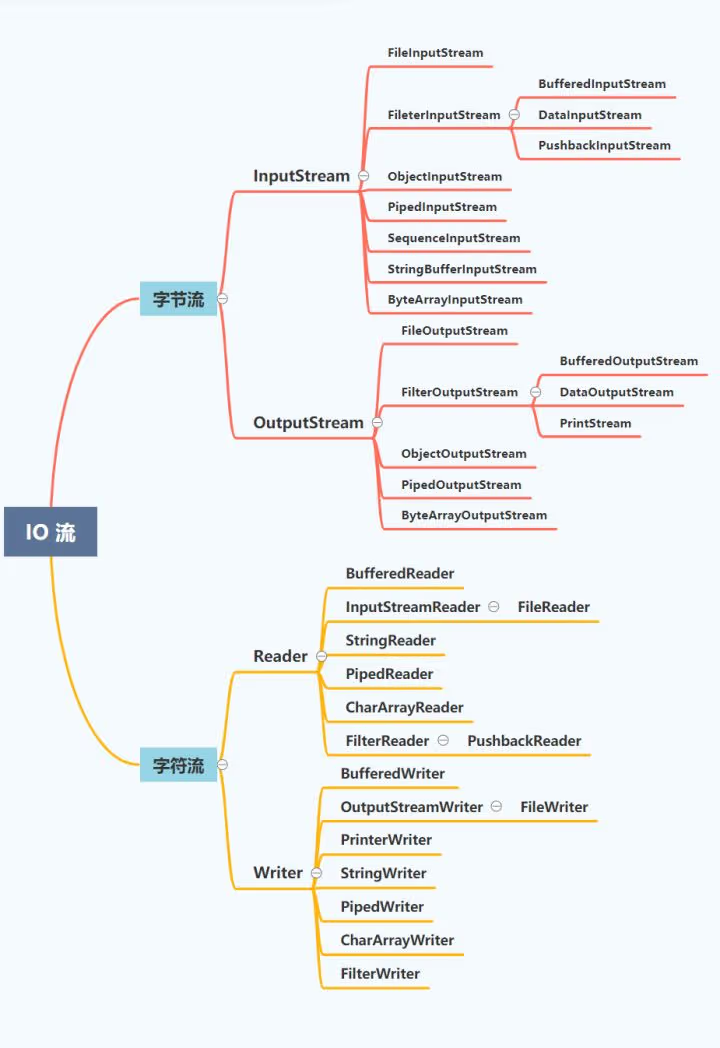
19.4 IO流常用的类
19.4.1 FileInputStream
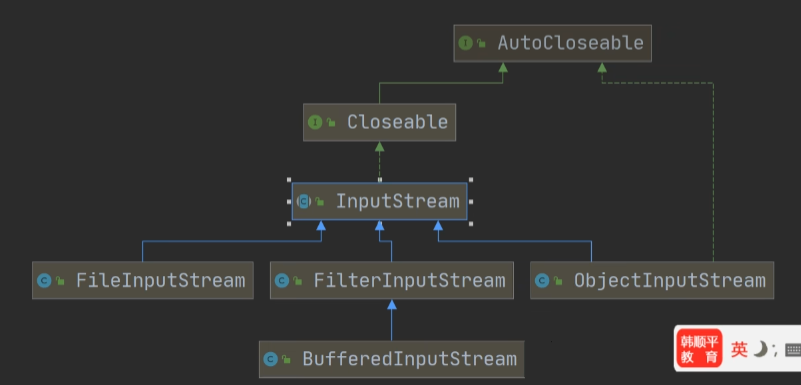
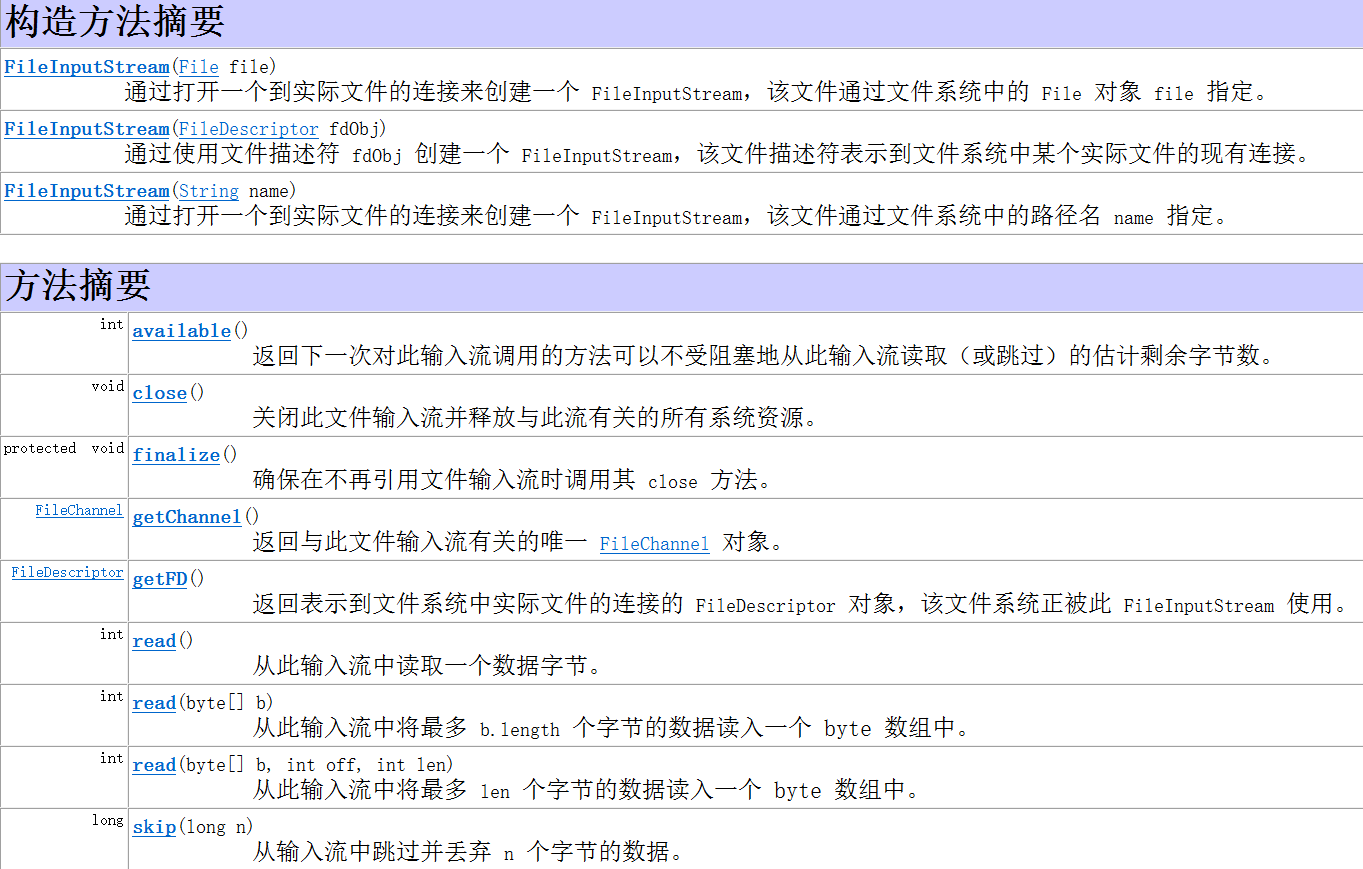
1 | /** |
1 | /** |
19.4.2 FileOutputStream
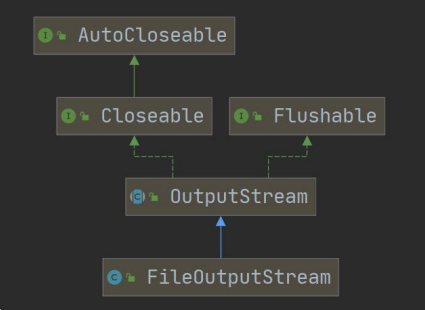
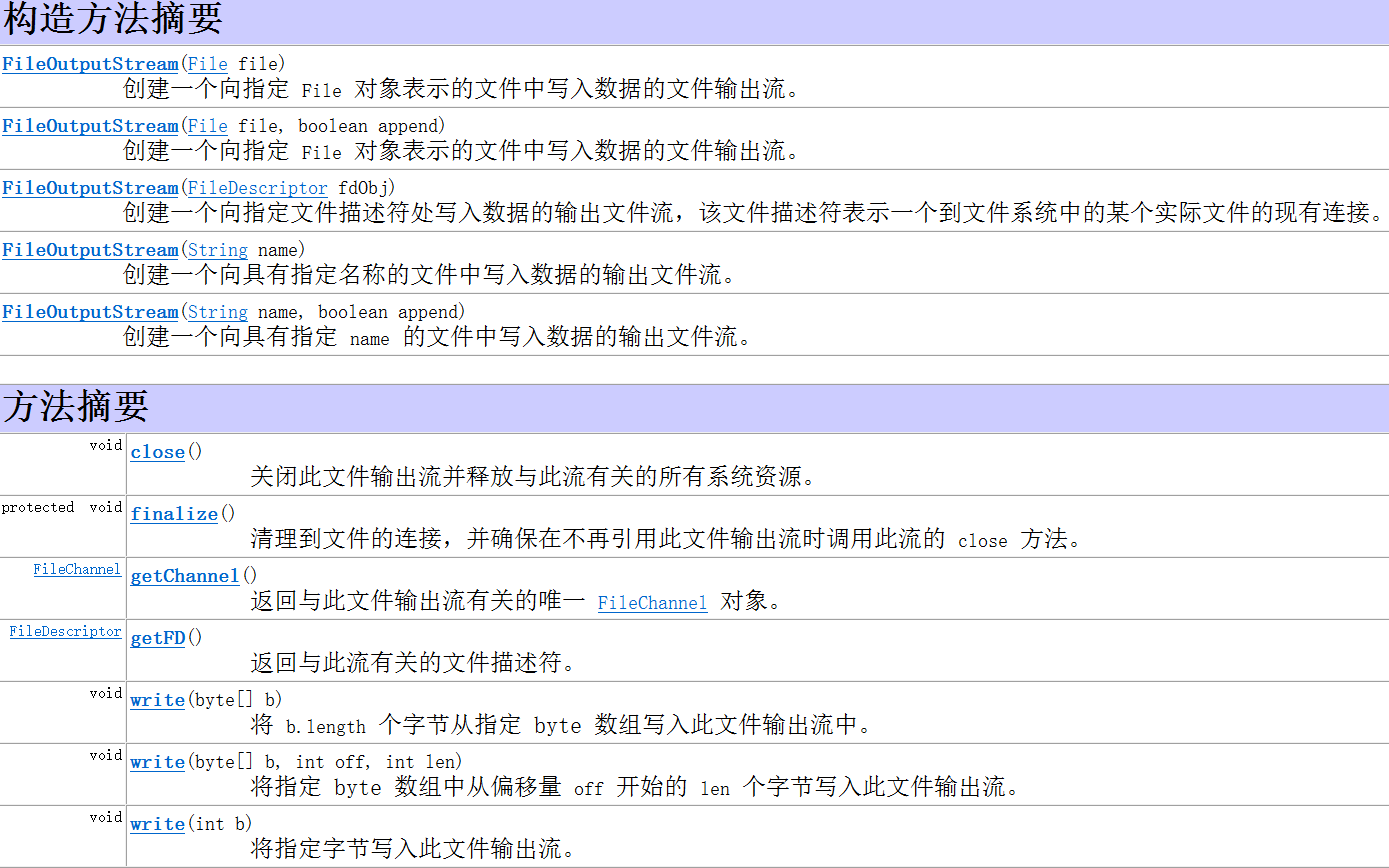
1 | /** |
1 | /** |
19.4.3 FileReader
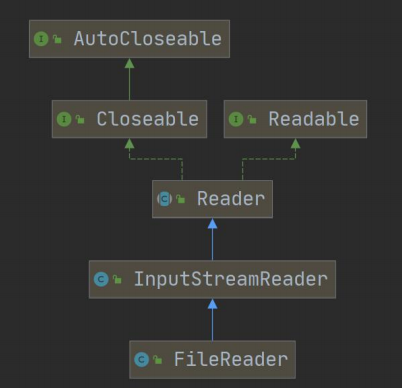

1 | /** |
1 | /** |
19.4.4 FileWriter
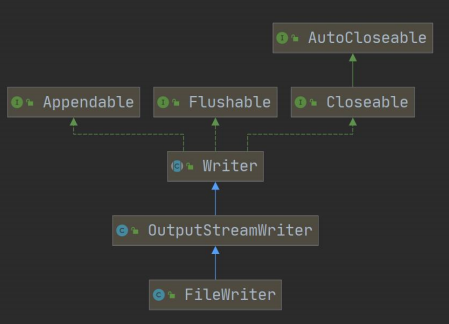

1 |
|
19.5 节点流和处理流
19.5.1 基本介绍
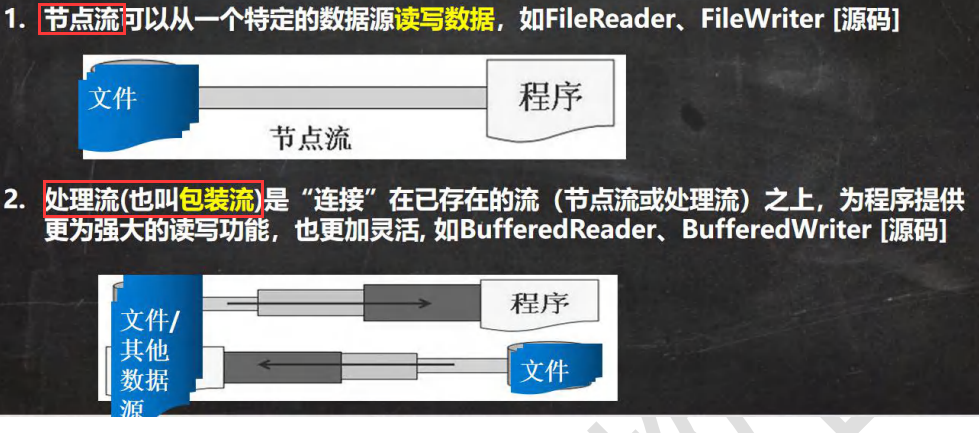
一览图

节点流和处理流的区别和联系


处理流的功能主要体现在以下两个方面:
- 性能的提高: 主要以增加缓冲的方式来提高输入输出的效率.
- 操作的便捷: 处理流可能提供了一系列便捷的方法来一次输入输出大批量的数据,使用更加灵活方便
19.5.2 缓冲流-BufferedReader 和 BufferedWriter
使用BufferedReader读取文本文件
1
2
3
4
5
6
7
8
9
10
11
12
13
14
15public static void main(String[] args) throws IOException {
String filePath = "e:\\a.java";
//创建 bufferedReader
BufferedReader bufferedReader = new BufferedReader(new FileReader(filePath));
//读取
String line; //按行读取, 效率高
//说明
//1. bufferedReader.readLine() 是按行读取文件
//2. 当返回 null 时,表示文件读取完毕
while ((line = bufferedReader.readLine()) != null) {
System.out.println(line);
}
//关闭流, 这里注意,只需要关闭 BufferedReader ,因为底层会自动地去关闭 节点流
bufferedReader.close();
}使用BufferedWriter写入文本文件
1
2
3
4
5
6
7
8
9
10
11
12
13
14
15
16public static void main(String[] args) throws IOException {
String filePath = "e:\\ok.txt";
//创建 BufferedWriter
//说明:
//1. new FileWriter(filePath, true) 表示以追加的方式写入
//2. new FileWriter(filePath) , 表示以覆盖的方式写入
BufferedWriter bufferedWriter = new BufferedWriter(new FileWriter(filePath));
bufferedWriter.write("hello, 韩顺平教育!");
bufferedWriter.newLine();//插入一个和系统相关的换行
bufferedWriter.write("hello2, 韩顺平教育!");
bufferedWriter.newLine();
bufferedWriter.write("hello3, 韩顺平教育!");
bufferedWriter.newLine();
//说明:关闭外层流即可 , 传入的 new FileWriter(filePath) ,会在底层关闭
bufferedWriter.close();
}拷贝文本文件
1
2
3
4
5
6
7
8
9
10
11
12
13
14
15
16
17
18public static void main(String[] args) throws IOException {
// 不要去操作 二进制文件[声音,视频,doc, pdf ], 可能造成文件损坏
String srcPath = "D:\\Code\\IdeaJavaProjects\\chapter19\\src\\story.txt";
String desPath = "D:\\Code\\IdeaJavaProjects\\chapter19\\src\\story2.txt";
BufferedReader bufferedReader = null;
BufferedWriter bufferedWriter = null;
bufferedReader = new BufferedReader(new FileReader(srcPath));
bufferedWriter = new BufferedWriter(new FileWriter(desPath));
String line = null;
while((line = bufferedReader.readLine()) != null) {
bufferedWriter.write(line);
}
bufferedReader.close();
bufferedWriter.close();
}
}
19.5.3 缓冲流-BufferedInputStream 和 BufferedOutputStream
字节流可以操作二进制文件,也可以操作文本文件
拷贝图片、音频文件
1
2
3
4
5
6
7
8
9
10
11
12
13
14
15
16
17
18
19public static void main(String[] args) throws IOException {
String srcPath = "D:\\Code\\IdeaJavaProjects\\chapter19\\src\\img.png";
String desPath = "D:\\Code\\IdeaJavaProjects\\chapter19\\src\\img2.png";
BufferedInputStream bufferedInputStream = null;
BufferedOutputStream bufferedOutputStream = null;
bufferedInputStream = new BufferedInputStream(new FileInputStream(srcPath));
bufferedOutputStream = new BufferedOutputStream(new FileOutputStream(desPath));
byte[] buff = new byte[1024];
int readLen = 0;
while ((readLen = bufferedInputStream.read(buff)) != -1) {
bufferedOutputStream.write(buff, 0, readLen);
}
bufferedInputStream.close();
bufferedOutputStream.close();
}
19.5.4 序列化和反序列化
看一个需求

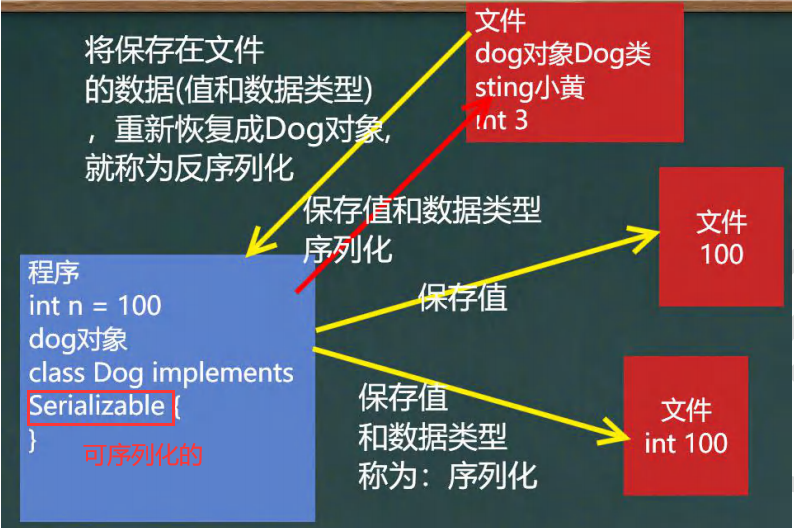
序列化和反序列化

19.5.5 对象流-ObjectInputStream 和 ObjectOutputStream
提供了对基本类型或对象类型的序列化和反序列化的方法
- ObjectOutputStream 提供 序列化功能
- ObjectInputStream 提供 反序列化功能

演示 ObjectOutputStream 的使用, 完成数据的序列化
1
2
3
4
5
6
7
8
9
10
11
12
13
14
15
16
17
18
19
20
21
22
23
24
25
26
27
28
29
30
31
32
33
34
35public class ObjectOutputStream_ {
public static void main(String[] args) throws IOException {
//序列化后,保存的文件格式,不是存文本,而是按照他的格式来保存
String filePath = "D:\\Code\\IdeaJavaProjects\\chapter19\\src\\data.dat";
ObjectOutputStream oos = new ObjectOutputStream(new FileOutputStream(filePath));
//序列化数据
oos.writeInt(100);// int -> Integer (实现了 Serializable)
oos.writeBoolean(true);// boolean -> Boolean (实现了 Serializable)
oos.writeChar('a');// char -> Character (实现了 Serializable)
oos.writeDouble(9.5);// double -> Double (实现了 Serializable)
oos.writeUTF("韩顺平教育");//String
//保存一个 dog 对象
oos.writeObject(new Dog("旺财", 10));
oos.close();
}
}
class Dog implements Serializable {
private String name;
private int age;
public Dog(String name, int age) {
this.name = name;
this.age = age;
}
public String toString() {
return "Dog{" +
"name='" + name + '\'' +
", age=" + age +
'}';
}
}
演示 ObjectInputStream的使用,完成数据的反序列化
1
2
3
4
5
6
7
8
9
10
11
12
13
14
15
16
17
18public class ObjectInputStream_ {
public static void main(String[] args) throws IOException, ClassNotFoundException {
// 1.创建流对象
ObjectInputStream ois = new ObjectInputStream(new FileInputStream("src\\data.dat"));
// 2.读取, 注意顺序和保存数据一致
System.out.println(ois.readInt());
System.out.println(ois.readBoolean());
System.out.println(ois.readChar());
System.out.println(ois.readDouble());
System.out.println(ois.readUTF());
Object o = ois.readObject();
System.out.println("运行类型=" + o.getClass()); //class com.durango.outputstream.Dog
System.out.println("Dog信息" + o); //Dog信息Dog{name='旺财', age=10}
// 3.关闭
ois.close();
System.out.println("以反序列化的方式读取(恢复)ok~");
}
}
- 注意事项
- 读写顺序要一致
- 要求序列化或反序列化对象,需要实现可序列化
- 序列化的类中建议添加SerialVersionUID,为了提高版本的兼容性
- 序列化对象时,默认将里面所有属性都进行序列化,但除了static或transient修饰的成员
- 序列化对象时,要求里面属性的数据类型也需要实现序列化接口
- 序列化具备可继承性,也就是如果某类已经实现了序列化,则它的所有子类也已经默认实现了序列化
19.5.6 标准输入输出流

1 | // System.in 标准输入 - 键盘 |
19.5.7 转换流-InputStreamReader 和 OutputStreamWriter
- 一个编码问题
- 默认情况下,字符流读取文件是按照 utf-8 编码,无法指定编码
- 字节流可以指定编码

演示:将字节流 FileInputStream 转成字符流 InputStreamReader, 指定编码 gbk/utf-8
1
2
3
4
5
6
7
8
9
10
11
12
13
14
15
16
17
18
19public static void main(String[] args) throws IOException {
String filePath = "D:\\Code\\IdeaJavaProjects\\chapter19\\src\\note.txt";
//1. 把 FileInputStream 转成 InputStreamReader
//2. 指定编码 gbk
//3. 把 InputStreamReader 传入 BufferedReader
//InputStreamReader isr = new InputStreamReader(new FileInputStream(filePath), "gbk");
//BufferedReader br = new BufferedReader(isr);
//将 2 和 3 合在一起
BufferedReader br = new BufferedReader(new InputStreamReader(
new FileInputStream(filePath), "gbk"));
//4. 读取
String s;
while ((s = br.readLine()) != null) {
System.out.println("读取内容=" + s);
}
//5. 关闭外层流
br.close();
}演示:编程将字节流FileOutputStream包装成(转换成)字符流OutputStreamWriter,对文件进行写入(按照GBK格式,可以指定其他,比如utf-8)
1
2
3
4
5
6
7
8
9
10
11public static void main(String[] args) throws IOException {
// 1.创建流对象
String filePath = "D:\\Code\\IdeaJavaProjects\\chapter19\\src\\note2.txt";
OutputStreamWriter osw =
new OutputStreamWriter(new FileOutputStream(filePath), "gbk");
// 2.写入
osw.write("hello,韩顺平教育~");
// 3.关闭
osw.close();
System.out.println("保存成功~");
}
19.5.8 打印流-PrintStream 和 PrintWriter
继承关系图
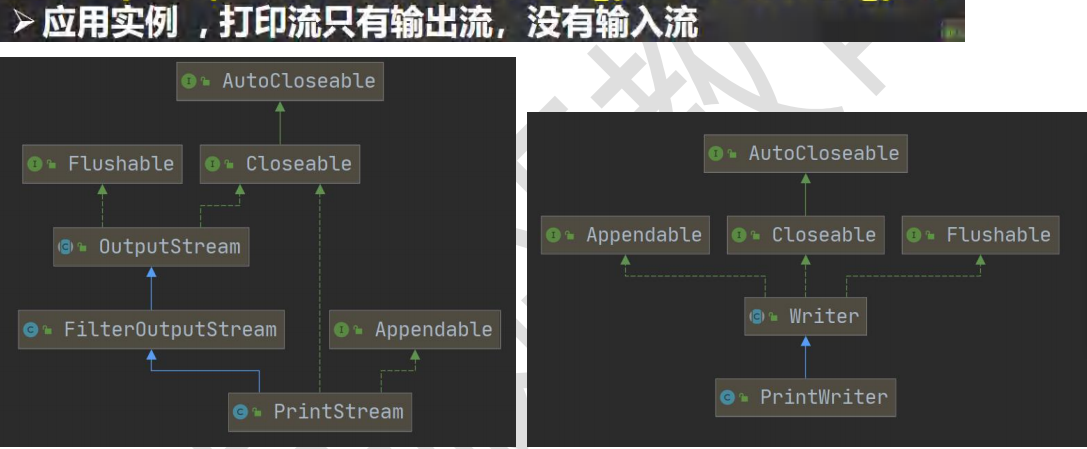
案例
1
2
3
4
5
6
7
8
9
10
11
12
13
14
15
16
17
18public static void main(String[] args) throws IOException {
PrintStream out = System.out;
//在默认情况下,PrintStream 输出数据的位置是 标准输出,即显示器
out.print("john, hello");
//因为 print 底层使用的是 write , 所以我们可以直接调用 write 进行打印/输出
out.write("韩顺平,你好".getBytes());
out.close();
//我们可以去修改打印流输出的位置/设备
//1. 输出修改成 "e:\\f1.txt"
// public static void setOut(PrintStream out) {
// checkIO();
// setOut0(out); // native 方法,修改了 out
// }
System.setOut(new PrintStream("e:\\f1.txt"));
System.out.println("hello, 韩顺平教育~");
}1
2
3
4
5
6
7
8public static void main(String[] args) throws IOException {
PrintWriter printWriter = new PrintWriter(System.out);
PrintWriter printWriter1 = new PrintWriter(new FileWriter("e:\\f1.txt"));
printWriter.println("hi,你好");
printWriter1.println("hello,world!");
printWriter.close();
printWriter1.close();
}
19.6 Properties 类
19.6.1 基本介绍

19.6.2 常用方法

19.6.3 案例

1 | //使用 Properties 类来读取 mysql.properties 文件 |
1 | //使用 Properties 类来创建 配置文件, 修改配置文件内容 |
第二十章 坦克大战【3】
20.1 坦克大战0.6

20.1.1 防止坦克重叠
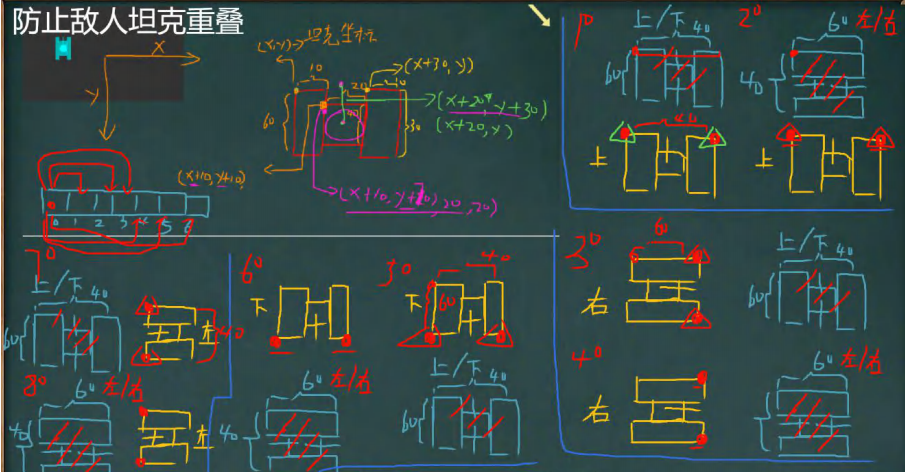
Enemy.java
1
2
3
4
5
6
7
8
9
10
11
12
13
14
15
16
17
18
19
20
21
22
23
24
25
26
27
28
29
30
31
32
33
34
35
36
37
38
39
40
41
42
43
44
45
46
47
48
49
50
51
52
53
54
55
56
57
58
59
60
61
62
63
64
65
66
67
68
69
70
71
72
73
74
75
76public class Enemy extends Tank implements Runnable {
...
// 增加成员enemies,可以得到敌人坦克的Vector(在MyPanel中创建的)
Vector<Enemy> enemies = new Vector<>();
// 编写方法,判断当前坦克是否和其他Enemy坦克发生碰撞
public boolean isTouchEnemy() {
// 判断当前坦克方向
switch (this.getDirect()) {
case 0: //上
for (int i = 0; i < enemies.size(); i++) {
//遍历Vector中所有敌人坦克
Enemy enemy = enemies.get(i);
if (enemy != this) {
int direct = enemy.getDirect();
//1. 敌人坦克上下,x范围[x,x+40],y范围[y,y+60]
if (direct == 0 || direct == 2) {
//当前坦克左上角[x,y],右上角[x+40,y]
if (this.getX() >= enemy.getX()
&& this.getX() <= enemy.getX() + 40
&& this.getY() >= enemy.getY()
&& this.getY() <= enemy.getY() + 60) {
return true;
}
if (this.getX() + 40 >= enemy.getX()
&& this.getX() + 40 <= enemy.getX() + 40
&& this.getY() >= enemy.getY()
&& this.getY() <= enemy.getY() + 60) {
return true;
}
}
//2. 敌人坦克左右,x范围[x,x+60],y范围[y,y+40]
if (direct == 1 || direct == 3) {
//当前坦克左上角[x,y],右上角[x+40,y]
if (this.getX() >= enemy.getX()
&& this.getX() <= enemy.getX() + 60
&& this.getY() >= enemy.getY()
&& this.getY() <= enemy.getY() + 40) {
return true;
}
if (this.getX() + 40 >= enemy.getX()
&& this.getX() + 40 <= enemy.getX() + 60
&& this.getY() >= enemy.getY()
&& this.getY() <= enemy.getY() + 40) {
return true;
}
}
}
}
break;
case 1: //右
...
break;
case 2: //下
...
break;
case 3: //左
...
break;
}
return false;
}
public void move(int direct, int step) {
for (int i = 0; i < step; i++) {
...
switch (direct) {
case 0: //上
if (getY() > 0 && !isTouchEnemy()) {
moveUp();
}
...
}
}
}MyPanel.java
1
2
3
4
5
6//初始化敌人坦克
for (int i = 0; i < enemySize; i++) {
...
// 设置Enemy的成员Vector<Enemy> enemies
enemy.setEnemies(enemies);
}
20.1.2 记录总成绩
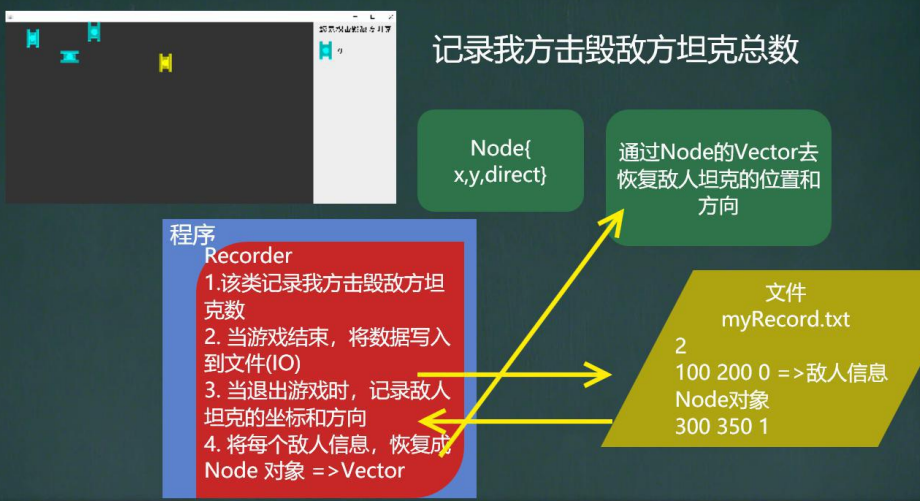
Recorder.java
1
2
3
4
5
6
7
8
9
10
11
12
13
14
15
16
17
18
19
20
21
22
23
24
25
26
27
28
29
30
31
32
33
34
35
36
37
38
39
40public class Recorder {
// 击毁坦克数
private static int allEnemyNum = 0;
// 定义IO对象,写数据到文件
private static FileWriter fw = null;
private static BufferedWriter bw = null;
private static String recordFile = "src\\myRecord.txt";
// 当我方坦克击毁一辆敌方坦克,allEnemyNum++
public static void addAllEnemyNum() {
Recorder.allEnemyNum++;
}
// 游戏退出时,保存信息
public static void keepRecord() {
try {
bw = new BufferedWriter(new FileWriter(recordFile));
bw.write(allEnemyNum + "\r\n");
} catch (IOException e) {
throw new RuntimeException(e);
} finally {
try {
if (bw != null) {
bw.close();
}
} catch (IOException e) {
throw new RuntimeException(e);
}
}
}
public static int getAllEnemyNum() {
return allEnemyNum;
}
public static void setAllEnemyNum(int allEnemyNum) {
Recorder.allEnemyNum = allEnemyNum;
}
}MyPanel.java
1
2
3
4
5
6
7
8
9
10
11
12
13
14
15
16
17
18public void hitTank(Shot s, Tank tank) {
// 判断s 击中坦克
switch (tank.getDirect()) {
case 0: //坦克向上
case 2: //坦克向下
if (s.x > tank.getX() && s.x < tank.getX() + 40
&& s.y > tank.getY() && s.y < tank.getY() + 60) {
...
if (tank instanceof Enemy) {
enemies.remove(tank); //将敌人坦克从Vector中删除
Recorder.addAllEnemyNum();
}
...
}
break;
...
}
}TankGame06.java
1
2
3
4
5
6
7
8
9
10
11
12public TankGame06() {
...
// 在JFame中增加窗口监听
this.addWindowListener(new WindowAdapter() {
public void windowClosing(WindowEvent e) {
System.out.println("关闭窗口");
Recorder.keepRecord();
System.exit(0);
}
});
}
20.1.3 记录敌人信息
Recorder.java
1
2
3
4
5
6
7
8
9
10
11
12
13
14
15
16
17
18
19
20
21
22
23
24
25
26
27public class Recorder {
...
// 定义Vector指向MyPane对象的 enemies
private static Vector<Enemy> enemies = null;
// 游戏退出时,保存信息
public static void keepRecord() {
try {
bw = new BufferedWriter(new FileWriter(recordFile));
// 保存成绩
bw.write(allEnemyNum + "\r\n");
// 遍历敌人坦克Vector,保存敌人信息
for (int i = 0; i < enemies.size(); i++) {
Enemy enemy = enemies.get(i);
if (enemy.isLive) {
String record = enemy.getX() + " " + enemy.getY() + " " + enemy.getDirect();
bw.write(record+ "\r\n");
}
}
}
...
}
...
public static void setEnemies(Vector<Enemy> enemies) {
Recorder.enemies = enemies;
}
}MyPanel.java
1
2
3
4
5public MyPanel() {
// Recorder获取到enemies,用于保存信息
Recorder.setEnemies(enemies);
...
}
20.1.4 恢复敌人信息
Node.java
1
2
3
4
5
6public class Node {
private int x;
private int y;
private int direct;
...
}Recorder.java
1
2
3
4
5
6
7
8
9
10
11
12
13
14
15
16
17
18
19
20
21
22
23
24
25
26
27
28
29
30
31
32
33
34public class Recorder {
...
// 定义Vector保存敌人的信息node
private static Vector<Node> nodes = new Vector<>();
// 增加一个方法,用于读取recordFile,恢复相关信息
// 继续上局游戏时调用
public static Vector<Node> getNodesAndEnemyRec() {
try {
br = new BufferedReader(new FileReader(recordFile));
allEnemyNum = Integer.parseInt(br.readLine());
// 循环读取,生成nodes集合
String line = "";
while ((line = br.readLine()) != null) {
String[] xyd = line.split(" ");
Node node = new Node(Integer.parseInt(xyd[0]), Integer.parseInt(xyd[1]),
Integer.parseInt(xyd[2]));
nodes.add(node);
}
} catch (IOException e) {
throw new RuntimeException(e);
} finally {
try {
if (br != null) {
br.close();
}
} catch (IOException e) {
throw new RuntimeException(e);
}
}
return nodes;
}
...
}TankGame06.java
1
2
3
4
5
6public TankGame06() {
System.out.println("请输入选择:1:新游戏;2:继续游戏");
String key = scanner.next();
mp = new MyPanel(key);
...
}MyPanel.java
1
2
3
4
5
6
7
8
9
10
11
12
13
14
15
16
17
18
19
20
21
22
23
24
25
26
27
28
29
30
31
32
33
34
35
36
37
38
39
40
41
42
43
44
45
46
47
48
49
50
51public class MyPanel extends JPanel implements KeyListener, Runnable { //自定义画板类
// 定义一个存放Node对象的Vector,用于恢复坦克信息
Vector<Node> nodes = new Vector<>();
...
public MyPanel(String key) {
nodes = Recorder.getNodesAndEnemyRec();
...
switch (key) {
case "1": // 新游戏
Recorder.setAllEnemyNum(0);
//初始化敌人坦克
for (int i = 0; i < enemySize; i++) {
Enemy enemy = new Enemy(100 * (i + 1), 0);
enemy.setDirect(2); // 设置初始炮筒方向
new Thread(enemy).start(); //启动Enemy线程,让坦克自由移动
// 给该enemy对象初始化Shot对象
Shot shot = new Shot(enemy.getX() + 20, enemy.getY() + 60, enemy.getDirect());
enemy.shots.add(shot);
//启动Shot线程
new Thread(shot).start();
enemies.add(enemy);
// 设置Enemy的成员Vector<Enemy> enemies
enemy.setEnemies(enemies);
}
break;
case "2": // 继续游戏
for (int i = 0; i < nodes.size(); i++) {
Node node = nodes.get(i);
Enemy enemy = new Enemy(node.getX(), node.getY());
enemy.setDirect(node.getDirect()); // 设置初始炮筒方向
new Thread(enemy).start(); //启动Enemy线程,让坦克自由移动
// 给该enemy对象初始化Shot对象
Shot shot = new Shot(enemy.getX() + 20, enemy.getY() + 60, enemy.getDirect());
enemy.shots.add(shot);
//启动Shot线程
new Thread(shot).start();
enemies.add(enemy);
// 设置Enemy的成员Vector<Enemy> enemies
enemy.setEnemies(enemies);
}
break;
default:
System.out.println("输入有误!");
}
...
}
...
}
20.2 坦克大战0.7

20.2.1 播放音乐
AePlayWave.java
1
2
3
4
5
6
7
8
9
10
11
12
13
14
15
16
17
18
19
20
21
22
23
24
25
26
27
28
29
30
31
32public class TankGame07 extends JFrame {
private MyPanel mp = null;
static Scanner scanner = new Scanner(System.in);
public static void main(String[] args) {
new TankGame07();
}
public TankGame07() {
System.out.println("请输入选择:1:新游戏;2:继续游戏");
String key = scanner.next();
mp = new MyPanel(key);
// 将mp放入Thread并启动
Thread thread = new Thread(mp);
thread.start();
this.add(mp);
this.addKeyListener(mp);
this.setSize(1300, 750);
this.setDefaultCloseOperation(JFrame.EXIT_ON_CLOSE);
this.setVisible(true);
// 在JFame中增加窗口监听
this.addWindowListener(new WindowAdapter() {
public void windowClosing(WindowEvent e) {
System.out.println("关闭窗口");
Recorder.keepRecord();
System.exit(0);
}
});
}
}MyPanel.java
1
2
3
4
5public MyPanel(String key) {
...
// 游戏初始化后,播放音乐
new AePlayWave("src\\111.wav").start();
}
20.2.2 处理文件相关异常
MyPanel.java
1
2
3
4
5
6
7
8
9
10
11
12public MyPanel(String key) {
// 判断记录文件是否存在
// 不存在则只能开启"新游戏" key = "1"
File file = new File(Recorder.getRecordFile());
if (file.exists()) {
nodes = Recorder.getNodesAndEnemyRec();
} else {
System.out.println("没有存档,只能开启新游戏");
key = "1";
}
...
}
— 第三阶段 —
第二十一章 网络编程
21.1 网络的相关概念
21.1.1 网络通讯

21.1.2 网络
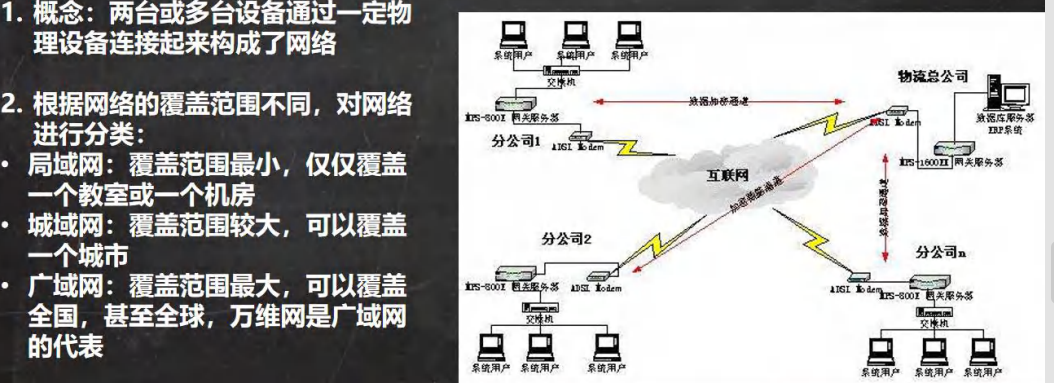
21.1.3 IP地址
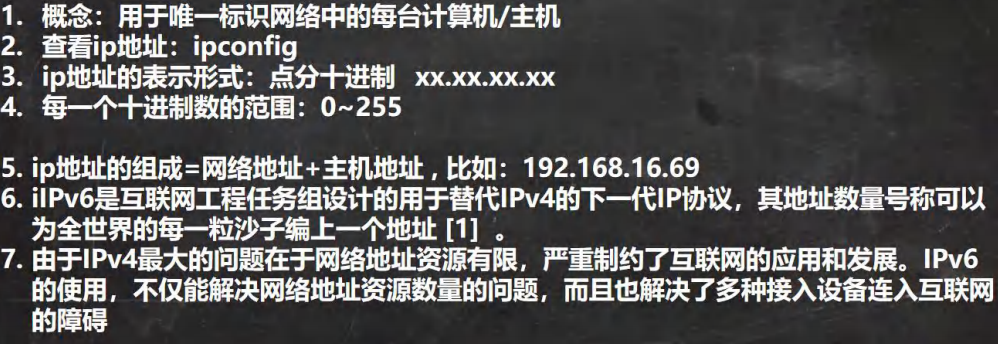
21.1.4 ipv4 地址分类
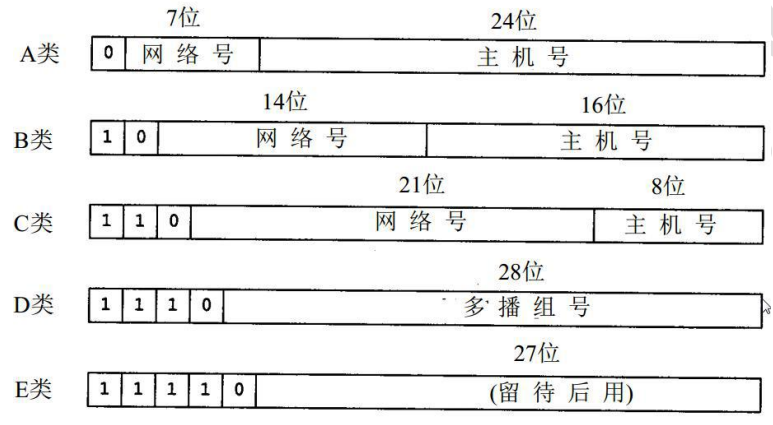
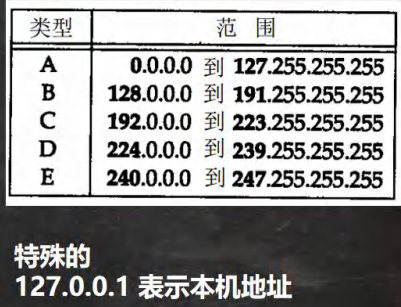
21.1.5 域名和端口
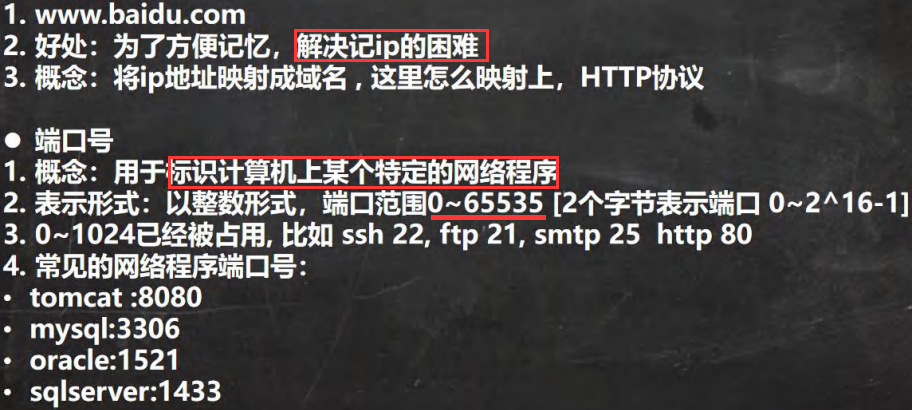
21.1.6 TCP/IP协议
- TCP/IP(Transmission Control Protocol/Internet Protocol)的简写中文译名为 传输控制协议/因特网互联协议,又叫网络通讯协议,这个协议是 Internet 最基本的协议、国际互联网络的基础,简单地说,就是由网络层的IP协议和传输层的TCP协议组成的。
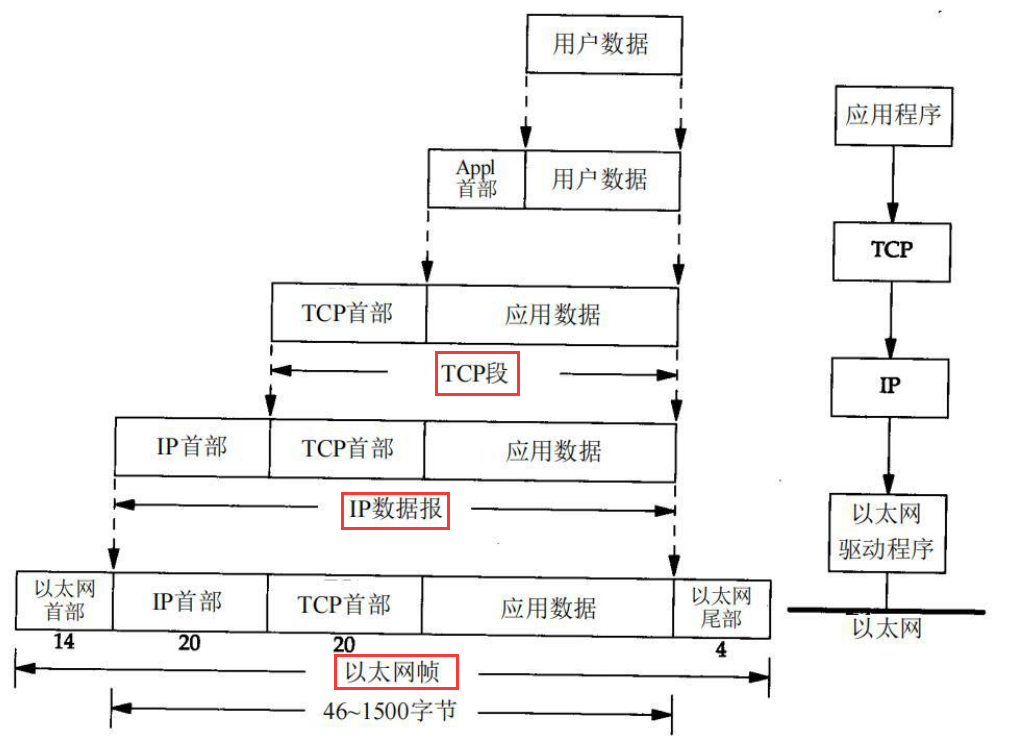
21.1.7 网络通信协议
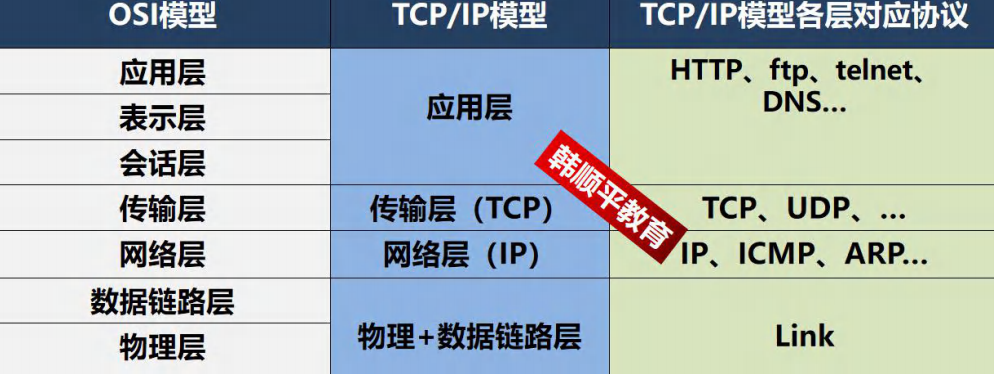
21.1.8 TCP 和 UDP
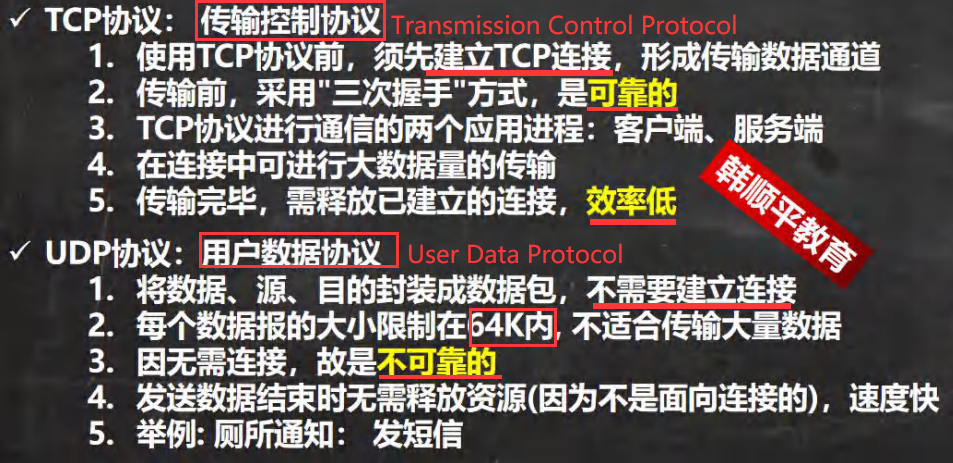
21.2 InetAddress 类
21.2.1 相关方法
- getLocalhost:获取本机InetAddress对象
- getByName:根据指定主机名/域名获取InetAddress对象
- getHostName:获取InetAddress对象的主机名
- getHostAddress:获取InetAddress对象的地址
1 | //获取本机 InetAddress 对象 getLocalHost |
21.3 Socket套接字
21.3.1 基本介绍


21.4 TCP网络通信编程
21.4.1 基本介绍和流程
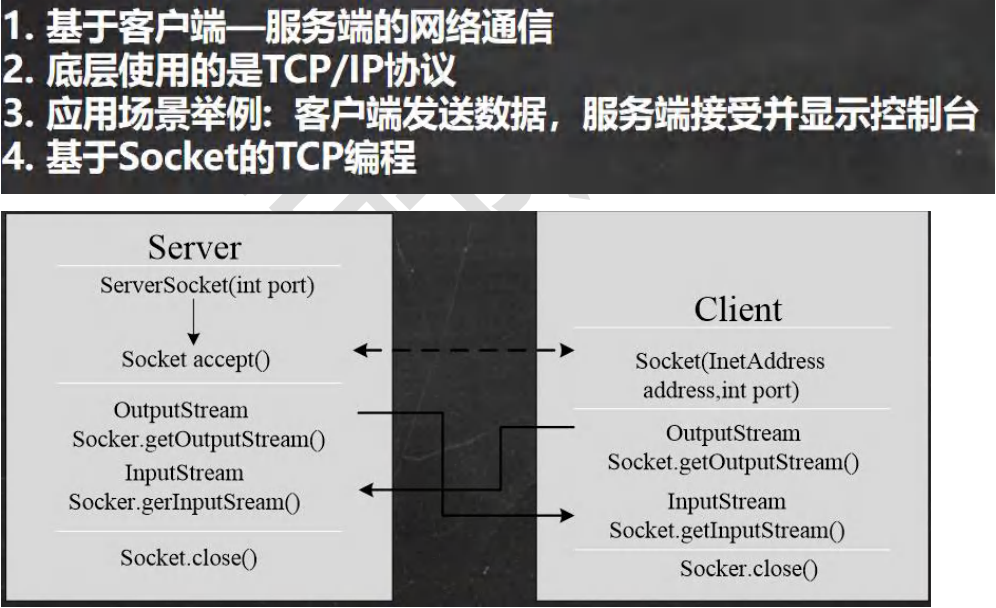
注意事项:
- 思路流程图很重要!
- 数据发送完毕后记得设置结束标记
- 最后要关闭相关的流
21.4.2 应用案例 1(使用字节流)

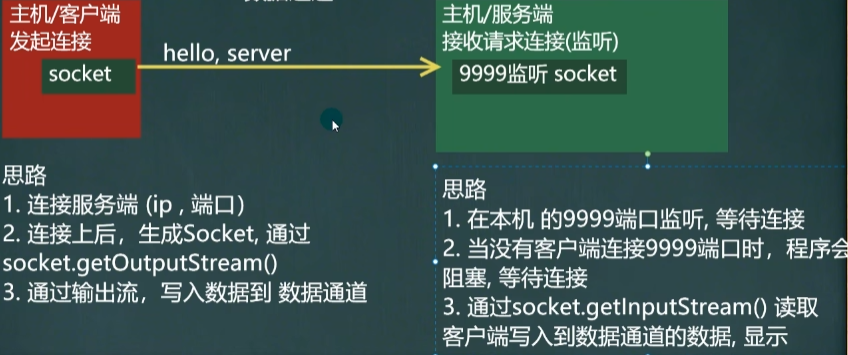
注意!设置结束标记 socket.shutdownOutput();
SocketTCP01Server.java
1
2
3
4
5
6
7
8
9
10
11
12
13
14
15
16
17
18
19
20
21
22
23
24
25
26
27public class SocketTCP01Server {
public static void main(String[] args) throws IOException {
//1. 在本机 的 9999 端口监听, 等待连接
ServerSocket serverSocket = new ServerSocket(9999);
System.out.println("服务端,在 9999 端口监听,等待连接..");
//2. 当没有客户端连接 9999 端口时,程序会阻塞, 等待连接
// 如果有客户端连接,则会返回 Socket 对象,程序继续
Socket socket = serverSocket.accept();
System.out.println("客户端 socket =" + socket.getClass() +"已连接!");
//3. 通过 socket.getInputStream() 读取客户端写入到数据通道的数据, 显示
InputStream inputStream = socket.getInputStream();
//4. IO 读取
byte[] buf = new byte[1024];
int readLen = 0;
while ((readLen = inputStream.read(buf)) != -1) {
System.out.println(new String(buf, 0, readLen));
}
//5.关闭流和 socket
inputStream.close();
socket.close();
serverSocket.close();//关闭
System.out.println("服务端退出.....");
}
}SocketTCP01Client.java
1
2
3
4
5
6
7
8
9
10
11
12
13
14
15
16
17
18
19
20public class SocketTCP01Client {
public static void main(String[] args) throws IOException {
//1. 连接服务端 (ip , 端口)
//解读: 连接本机的 9999 端口, 如果连接成功,返回 Socket 对象
Socket socket = new Socket(InetAddress.getLocalHost(), 9999);
System.out.println("客户端 socket 返回=" + socket.getClass());
//2. 连接上后,生成 Socket, 通过 socket.getOutputStream()
// 得到 和 socket 对象关联的输出流对象
OutputStream outputStream = socket.getOutputStream();
//3. 通过输出流,写入数据到 数据通道
outputStream.write("hello, server".getBytes());
//4. 关闭流对象和 socket, 必须关闭
outputStream.close();
socket.close();
System.out.println("客户端退出.....");
}
}
21.4.3 应用案例 2(使用字节流)

SocketTCP02Server.java
1
2
3
4
5
6
7
8
9
10
11
12
13
14
15
16
17
18
19
20
21
22
23
24
25
26
27
28
29
30
31
32
33
34public class SocketTCP02Server {
public static void main(String[] args) throws IOException {
//1. 在本机 的 9999 端口监听, 等待连接
ServerSocket serverSocket = new ServerSocket(9999);
System.out.println("服务端,在 9999 端口监听,等待连接..");
//2. 当没有客户端连接 9999 端口时,程序会阻塞, 等待连接
// 如果有客户端连接,则会返回 Socket 对象,程序继续
Socket socket = serverSocket.accept();
System.out.println("服务端 socket 返回=" + socket.getClass());
//3. 通过 socket.getInputStream() 读取客户端写入到数据通道的数据, 显示
InputStream inputStream = socket.getInputStream();
//4. IO 读取
byte[] buf = new byte[1024];
int readLen = 0;
while ((readLen = inputStream.read(buf)) != -1) {
System.out.println(new String(buf, 0, readLen));
}
//5. 获取 socket 相关联的输出流
OutputStream outputStream = socket.getOutputStream();
outputStream.write("hello, client".getBytes());
// 设置结束标记
socket.shutdownOutput();
//6.关闭流和 socket
inputStream.close();
outputStream.close();
socket.close();
serverSocket.close();//关闭
System.out.println("服务端退出.....");
}
}SocketTCP02Client.java
1
2
3
4
5
6
7
8
9
10
11
12
13
14
15
16
17
18
19
20
21
22
23
24
25
26
27
28
29
30
31
32public class SocketTCP02Client {
public static void main(String[] args) throws IOException {
//1. 连接服务端 (ip , 端口)
//解读: 连接本机的 9999 端口, 如果连接成功,返回 Socket 对象
Socket socket = new Socket(InetAddress.getLocalHost(), 9999);
System.out.println("客户端 socket 返回=" + socket.getClass());
//2. 连接上后,生成 Socket, 通过 socket.getOutputStream()
// 得到 和 socket 对象关联的输出流对象
OutputStream outputStream = socket.getOutputStream();
//3. 通过输出流,写入数据到 数据通道
outputStream.write("hello, server".getBytes());
// 设置结束标记
socket.shutdownOutput();
//4. 获取和 socket 关联的输入流. 读取数据(字节),并显示
InputStream inputStream = socket.getInputStream();
byte[] buf = new byte[1024];
int readLen = 0;
while ((readLen = inputStream.read(buf)) != -1) {
System.out.println(new String(buf, 0, readLen));
}
//5. 关闭流对象和 socket, 必须关闭
inputStream.close();
outputStream.close();
socket.close();
System.out.println("客户端退出.....");
}
}
21.4.4 应用案例 3(使用字符流)

注意!bufferedWriter.newLine();和bufferedWriter.flush();
SocketTCP03Server.java
1
2
3
4
5
6
7
8
9
10
11
12
13
14
15
16
17
18
19
20
21
22
23
24
25
26
27
28
29
30
31//1. 在本机 的 9999 端口监听, 等待连接
ServerSocket serverSocket = new ServerSocket(9999);
System.out.println("服务端,在 9999 端口监听,等待连接..");
//2. 当没有客户端连接 9999 端口时,程序会阻塞, 等待连接
// 如果有客户端连接,则会返回 Socket 对象,程序继续
Socket socket = serverSocket.accept();
System.out.println("服务端 socket 返回=" + socket.getClass());
//3. 通过 socket.getInputStream() 读取客户端写入到数据通道的数据, 显示
InputStream inputStream = socket.getInputStream();
//4. IO 读取, 使用字符流, 使用 InputStreamReader 将 inputStream 转成字符流
BufferedReader bufferedReader = new BufferedReader(new InputStreamReader(inputStream));
String s = bufferedReader.readLine();
System.out.println(s);//输出
//5. 获取 socket 相关联的输出流
OutputStream outputStream = socket.getOutputStream();
// 使用字符输出流的方式回复信息 使用 OutputStreamWriter 将 outputStream 转换成字符流
BufferedWriter bufferedWriter = new BufferedWriter(new OutputStreamWriter(outputStream));
bufferedWriter.write("hello client 字符流");
bufferedWriter.newLine();// 插入一个换行符,表示回复内容的结束!!! 相当于socket.shutdownOutput()
bufferedWriter.flush(); //注意需要手动的 flush!!!
//6.关闭流和 socket
bufferedReader.close();
bufferedWriter.close();
socket.close();
serverSocket.close();//关闭
System.out.println("服务端退出.....");SocketTCP03Client.java
1
2
3
4
5
6
7
8
9
10
11
12
13
14
15
16
17
18
19
20
21
22
23
24
25
26//1. 连接服务端 (ip , 端口)
//解读: 连接本机的 9999 端口, 如果连接成功,返回 Socket 对象
Socket socket = new Socket(InetAddress.getLocalHost(), 9999);
System.out.println("客户端 socket 返回=" + socket.getClass());
//2. 连接上后,生成 Socket, 通过 socket.getOutputStream()
// 得到 和 socket 对象关联的输出流对象
OutputStream outputStream = socket.getOutputStream();
//3. 通过输出流,写入数据到 数据通道, 使用字符流
BufferedWriter bufferedWriter = new BufferedWriter(new OutputStreamWriter(outputStream));
bufferedWriter.write("hello, server 字符流");
bufferedWriter.newLine();//插入一个换行符,表示写入的内容结束, 注意,要求对方使用 readLine()!!!!
bufferedWriter.flush();// 如果使用的字符流,需要手动刷新,否则数据不会写入数据通道
//4. 获取和 socket 关联的输入流. 读取数据(字符),并显示
InputStream inputStream = socket.getInputStream();
BufferedReader bufferedReader = new BufferedReader(new InputStreamReader(inputStream));
String s = bufferedReader.readLine();
System.out.println(s);
//5. 关闭流对象和 socket, 必须关闭
bufferedReader.close();//关闭外层流
bufferedWriter.close();
socket.close();
System.out.println("客户端退出.....");
21.4.5 应用案例 4(上传图片)

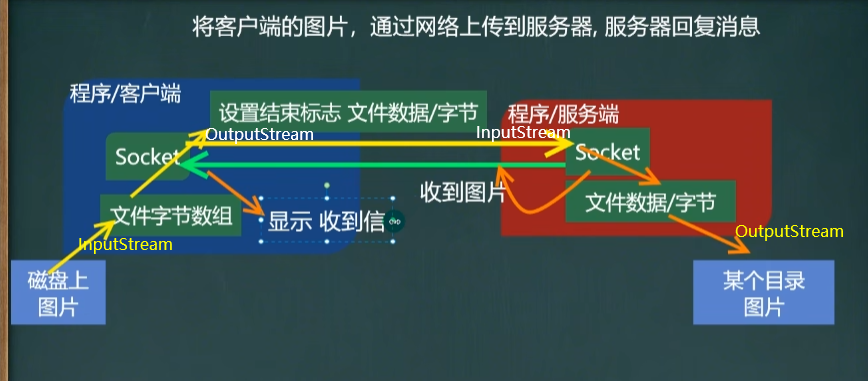
StreamUtils.java
1
2
3
4
5
6
7
8
9
10
11
12
13
14
15
16
17
18
19
20
21
22
23
24
25public class StreamUtils {
//功能:将输入流转换成字节数组 byte[]
public static byte[] streamToByteArray(InputStream is) throws Exception {
ByteArrayOutputStream bos = new ByteArrayOutputStream();//创建输出流对象
byte[] b = new byte[1024]; //字节数组
int len;
while ((len = is.read(b)) != -1) {
bos.write(b, 0, len);
}
byte[] array = bos.toByteArray();
bos.close();
return array;
}
//功能:将 InputStream 转换成 String
public static String streamToString(InputStream is) throws Exception {
BufferedReader reader = new BufferedReader(new InputStreamReader(is));
StringBuilder builder = new StringBuilder();
String line;
while ((line = reader.readLine()) != null) { //当读取到 null 时,就表示结束
builder.append(line + "\r\n");
}
return builder.toString();
}
}TCPFileUploadServer.java
1
2
3
4
5
6
7
8
9
10
11
12
13
14
15
16
17
18
19
20
21
22
23
24
25
26
27
28
29
30
31
32public class TCPFileUploadServer {
public static void main(String[] args) throws Exception {
// 1. 服务端在本机监听8888端口
ServerSocket serverSocket = new ServerSocket(8888);
System.out.println("服务端在8888端口监听,等待连接...");
// 2. 等待连接
Socket socket = serverSocket.accept();
// 3.通过socket获取输入流,读取客户端发送的数据
BufferedInputStream bis = new BufferedInputStream(socket.getInputStream());
byte[] bytes = StreamUtils.streamToByteArray(bis);
// 4.将bytes写入到指定路径的文件
String filePath = "src\\copy.jpg";
BufferedOutputStream bos = new BufferedOutputStream(new FileOutputStream(filePath));
bos.write(bytes);
// 5.通过socket获取输出流,发送“收到图片”(通过字符流)
BufferedWriter bw = new BufferedWriter(new OutputStreamWriter(socket.getOutputStream()));
bw.write("收到图片");
bw.flush(); //把内容刷新到数据通道
socket.shutdownOutput();//设置结束标记
// 6.关闭相关流
bis.close();
bos.close();
bw.close();
socket.close();
serverSocket.close();
}
}TCPFileUploadClient.java
1
2
3
4
5
6
7
8
9
10
11
12
13
14
15
16
17
18
19
20
21
22
23
24
25
26
27
28
29public class TCPFileUploadClient {
public static void main(String[] args) throws Exception {
// 1. 客户端连接服务端,得到socket对象
Socket socket = new Socket(InetAddress.getLocalHost(), 8888);
System.out.println("连接到服务器...");
// 2. 创建读取磁盘文件的输入流
String filePath = "D:\\zlx18\\Pictures\\Camera Roll\\绘图1.jpg";
BufferedInputStream bis = new BufferedInputStream(new FileInputStream(filePath));
// 3. 把文件保存到字节数组中
byte[] bytes = StreamUtils.streamToByteArray(bis);
// 4.通过socket获取输出流,将bytes发送到服务端
BufferedOutputStream bos = new BufferedOutputStream(socket.getOutputStream());
bos.write(bytes); //将文件对应的字节内容写入到数据通道
socket.shutdownOutput(); //设置结束标记
// 5.通过socket获取输入流,接收服务端回复的消息
// 使用StreamUtils工具类将输入流转换为String
String s = StreamUtils.streamToString(socket.getInputStream());
System.out.println(s);
// 6.关闭相关流
bis.close();
bos.close();
socket.close();
}
}
21.4.6 netstat 指令
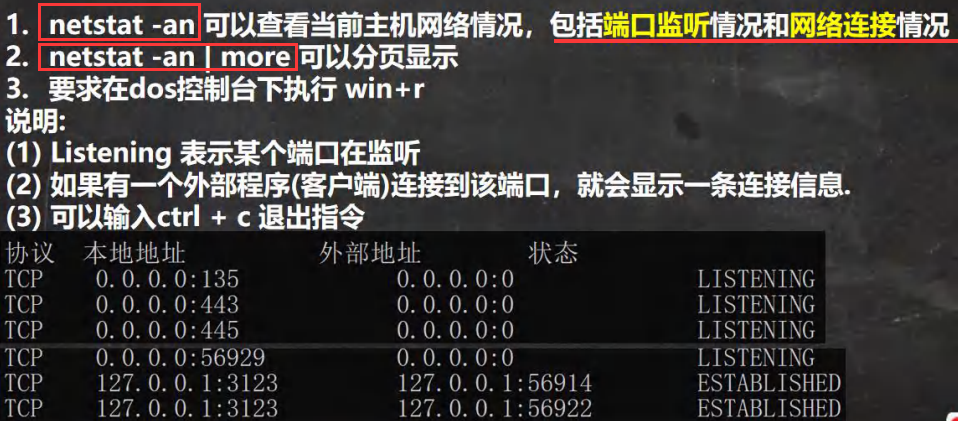

21.5 UDP网络通信编程
21.5.1 基本介绍和流程

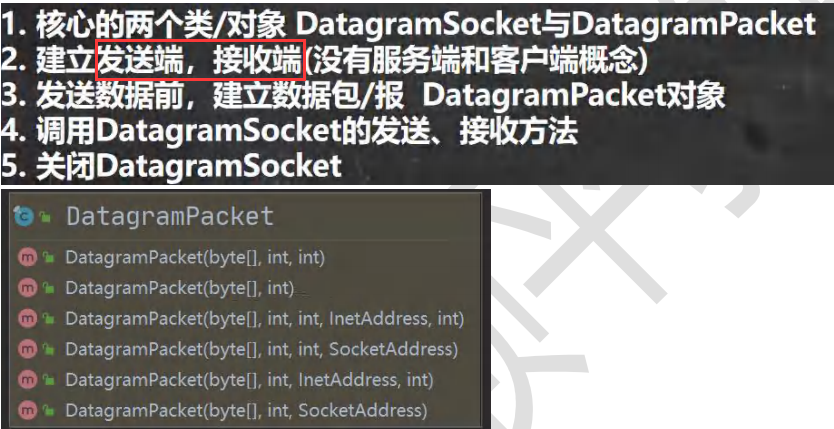
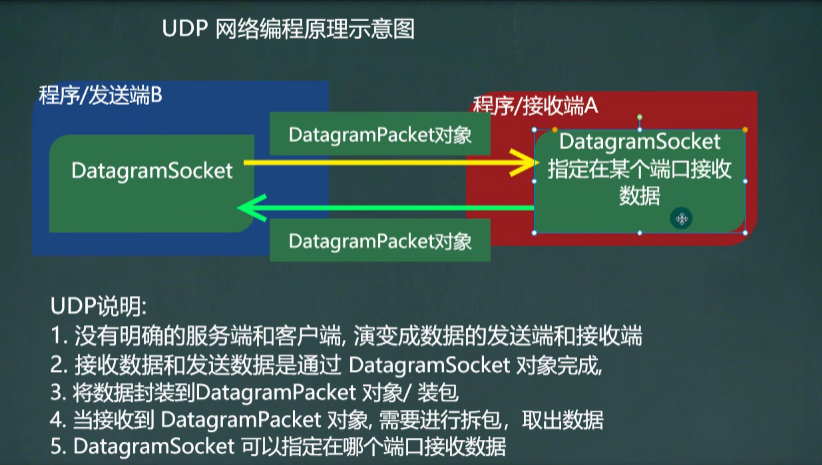
21.5.2 案例1

UDPReceiverA.java
1
2
3
4
5
6
7
8
9
10
11
12
13
14
15
16
17
18
19
20
21
22
23
24
25
26
27
28
29
30
31
32
33
34public class UDPReceiverA {
public static void main(String[] args) throws IOException {
//1. 创建一个 DatagramSocket 对象,准备在 9999 接收数据
DatagramSocket socket = new DatagramSocket(9999);
//2. 构建一个 (空的)DatagramPacket 对象,准备接收数据
// 一个数据包最大 64k
byte[] buf = new byte[1024];
DatagramPacket packet = new DatagramPacket(buf, buf.length);
//3. 调用接收方法, 将通过网络传输的 DatagramPacket 对象 填充到 packet 对象
// 当有数据报发送到 本机的 9999 端口时,就会接收到数据
// 如果没有数据包发送到 本机的 9999 端口, 就会阻塞等待.
System.out.println("接收端 A 等待接收数据..");
socket.receive(packet);
//4. 把 packet 进行拆包,取出数据,并显示.
int length = packet.getLength();//实际接收到的数据字节长度
byte[] data = packet.getData();//接收到数据
String s = new String(data, 0, length);
System.out.println(s);
//===回复信息给 B 端
//将需要发送的数据,封装到 DatagramPacket 对象
data = "好的, 明天见".getBytes();
packet =
new DatagramPacket(data, data.length, InetAddress.getByName("127.0.0.1"), 9998);
socket.send(packet);//发送
//5. 关闭资源
socket.close();
System.out.println("A 端退出...");
}
}UDPSenderB.java
1
2
3
4
5
6
7
8
9
10
11
12
13
14
15
16
17
18
19
20
21
22
23
24
25
26public static void main(String[] args) throws IOException {
//1.创建 DatagramSocket 对象,准备在 9998 端口 接收数据
DatagramSocket socket = new DatagramSocket(9998);
//2. 将需要发送的数据,封装到 DatagramPacket 对象
byte[] data = "hello 明天吃火锅~".getBytes(); //
DatagramPacket packet =
new DatagramPacket(data, data.length, InetAddress.getByName("127.0.0.1"), 9999);
socket.send(packet);
//3.=== 接收从 A 端回复的信息
//(1) 构建一个 DatagramPacket 对象,准备接收数据
byte[] buf = new byte[1024];
packet = new DatagramPacket(buf, buf.length);
//(2) 调用 接收方法, 将通过网络传输的 DatagramPacket 对象填充到 packet 对象
socket.receive(packet);
//(3) 可以把 packet 进行拆包,取出数据,并显示.
int length = packet.getLength();//实际接收到的数据字节长度
data = packet.getData();//接收到数据
String s = new String(data, 0, length);
System.out.println(s);
//4.关闭资源
socket.close();
System.out.println("B 端退出");
}
}
21.6 Homeworks
21.6.1 多次对话

Homework01Server.java
1
2
3
4
5
6
7
8
9
10
11
12
13
14
15
16
17
18
19
20
21
22
23
24
25
26
27
28
29
30
31
32
33
34
35
36public class Homework01Server {
public static void main(String[] args) throws IOException {
ServerSocket serverSocket = new ServerSocket(8080);
System.out.println("等待客户端连接...");
Socket socket = serverSocket.accept();
System.out.println("客户端连接成功!");
BufferedReader bufferedReader = new BufferedReader(new InputStreamReader(socket.getInputStream()));
BufferedWriter bufferedWriter = new BufferedWriter(new OutputStreamWriter(socket.getOutputStream()));
boolean key = true;
while (key) {
// 采用字符流
String s = bufferedReader.readLine();
System.out.println("客户端:" + s);
if (s.equals("name")) {
bufferedWriter.write("我是nova");
} else if (s.equals("hobby")) {
bufferedWriter.write("编写java程序");
} else if (s.equals("bye")) {
bufferedWriter.write("bye");
key = false;
} else {
bufferedWriter.write("你说什么");
}
bufferedWriter.newLine();
bufferedWriter.flush();
}
System.out.println("与客户端对话结束");
bufferedReader.close();
bufferedWriter.close();
socket.close();
serverSocket.close();
}
}Homework01Client.java
1
2
3
4
5
6
7
8
9
10
11
12
13
14
15
16
17
18
19
20
21
22
23
24
25
26
27
28
29public class Homework01Client {
public static void main(String[] args) throws IOException {
Socket socket = new Socket(InetAddress.getLocalHost(), 8080);
System.out.println("连接到服务端!");
BufferedReader bufferedReader = new BufferedReader(new InputStreamReader(socket.getInputStream()));
BufferedWriter bufferedWriter = new BufferedWriter(new OutputStreamWriter(socket.getOutputStream()));
boolean key = true;
while (key) {
Scanner scanner = new Scanner(System.in);
String message = scanner.next();
bufferedWriter.write(message);
bufferedWriter.newLine(); // 插入换行符表示结束标志
bufferedWriter.flush(); // 注意需要手动的 flush!!!
String s = bufferedReader.readLine();
System.out.println("服务端:" + s);
if (s.equals("bye")) {
key = false;
}
}
System.out.println("与服务端对话结束");
bufferedReader.close();
bufferedWriter.close();
socket.close();
}
}
21.6.2 音乐下载

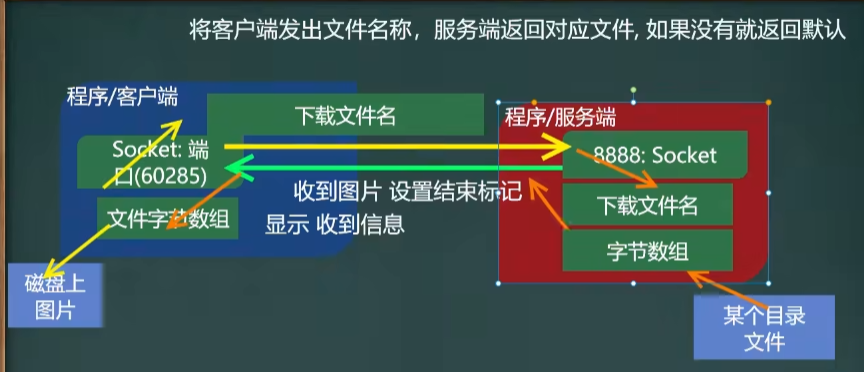
Homework03Server.java
1
2
3
4
5
6
7
8
9
10
11
12
13
14
15
16
17
18
19
20
21
22
23
24
25
26
27
28
29
30
31
32
33
34
35
36
37
38
39
40
41
42
43
44
45
46
47
48public class Homework03Server {
public static void main(String[] args) throws Exception {
// 1. 监听端口,等待客户端连接
ServerSocket serverSocket = new ServerSocket(8888);
System.out.println("服务端等待连接...");
Socket socket = serverSocket.accept();
System.out.println("客户端已连接!");
// 2. 得到socket关联的输入流,读取客户端要下载的文件名
InputStream is = socket.getInputStream();
byte[] b = new byte[1024];
int len = 0;
String musicName = "";
while ((len = is.read(b)) != -1) {
musicName += new String(b, 0, len);
}
System.out.println("客户端想要下载音乐《" + musicName + "》");
// 3. 判断用户下载的文件是否存在
String filePath = "src\\music\\" + musicName + ".mp3";
File file = new File(filePath);
FileInputStream fileInputStream = null;
if (file.exists()) {
fileInputStream = new FileInputStream(file);
} else {
fileInputStream = new FileInputStream("src\\music\\无名.mp3");
}
// 4.从磁盘读取文件到字节数组
BufferedInputStream bis2 = new BufferedInputStream(fileInputStream);
byte[] bytes = StreamUtils.streamToByteArray(bis2);
// 5. 得到socket关联的输出流,写入数据通道
BufferedOutputStream bos = new BufferedOutputStream(socket.getOutputStream());
System.out.println("音乐传输中...");
bos.write(bytes);
bos.flush();
System.out.println("音乐传输完毕!");
socket.shutdownOutput();
// 6. 关闭相关流
is.close();
bis2.close();
bos.close();
socket.close();
serverSocket.close();
}
}Homework03Client.java
1
2
3
4
5
6
7
8
9
10
11
12
13
14
15
16
17
18
19
20
21
22
23
24
25
26
27
28
29
30
31
32public class Homework03Client {
public static void main(String[] args) throws Exception {
// 1. 连接服务端
Socket socket = new Socket(InetAddress.getLocalHost(), 8888);
System.out.println("连接到服务器");
// 2. 得到socket关联的输出流,发送要下载的文件名给客户端
Scanner scanner = new Scanner(System.in);
System.out.println("请输入你想下载的音乐名称:");
String musicName = scanner.next();
OutputStream os = socket.getOutputStream();
os.write(musicName.getBytes());
socket.shutdownOutput();
// 3. 得到socket关联的输入流,从数据通道读取数据到字节数组
String filePath = "src\\music.mp3";
BufferedInputStream bis = new BufferedInputStream(socket.getInputStream());
byte[] bytes = StreamUtils.streamToByteArray(bis);
// 4. 将字节数组数据写入文件
BufferedOutputStream bos2 = new BufferedOutputStream(new FileOutputStream(filePath));
bos2.write(bytes);
System.out.println("音乐已经保存");
// 5. 关闭相关流
os.close();
bos2.close();
bis.close();
socket.close();
}
}
第二十二章 多用户及时通信系统
22.1 相关技术
- 项目框架设计
- java面向对象编程
- 网络编程
- 多线程
- IO流
- mysql/使用集合充当内存数据库
22.2 项目开发流程
- 需求分析(30%) ==》设计阶段(20%) ==》实现阶段(20%) ==》测试阶段(20%) ==》实施阶段(10%) ==》维护阶段
- 开发 –> 架构师、项目经理 or 产品经理
- 项目越大,需求和设计阶段占用时间越多
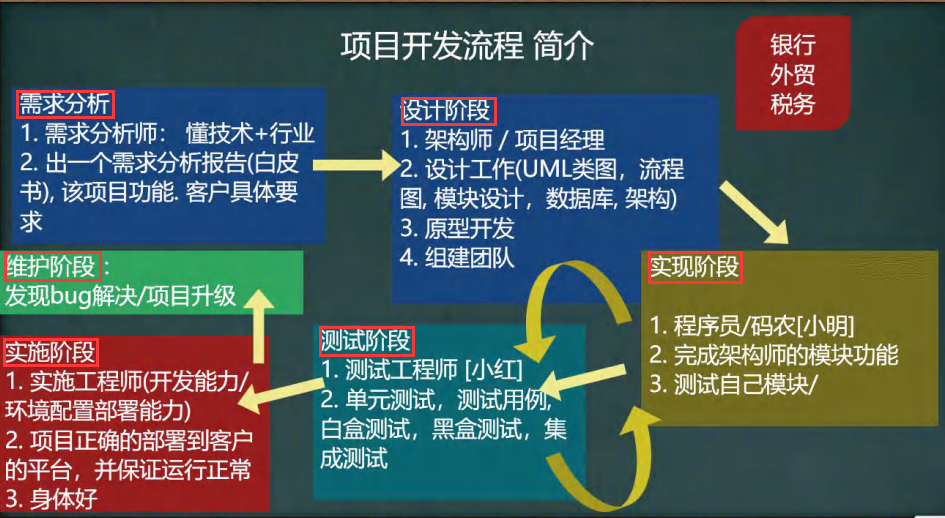
22.3 需求分析
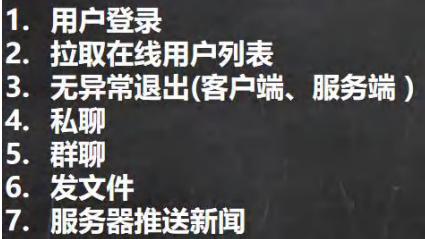
22.4 界面设计
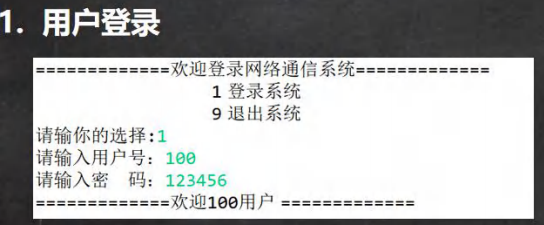
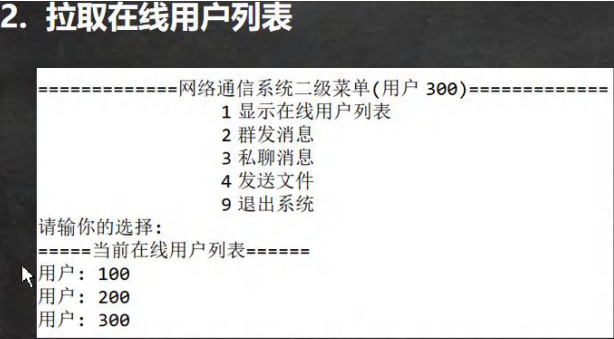
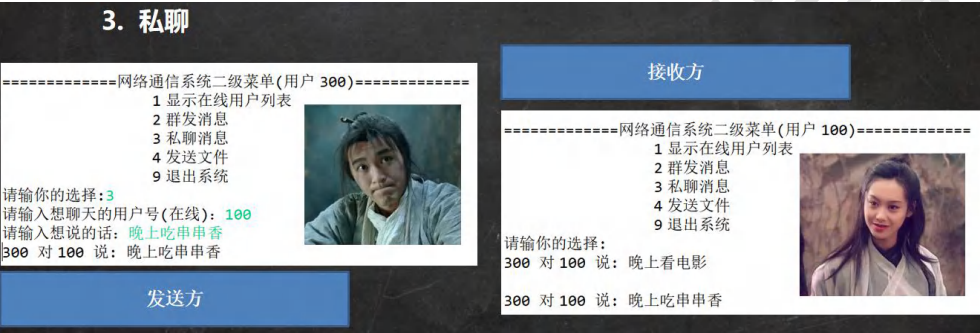
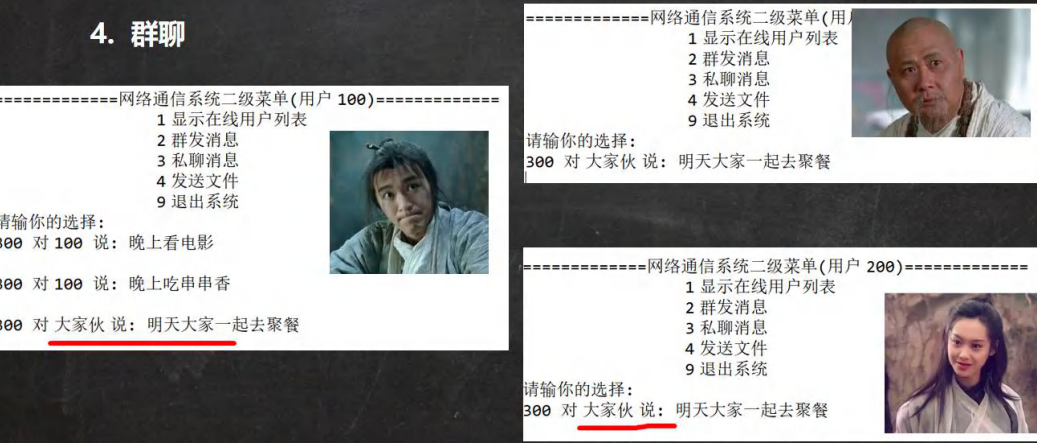
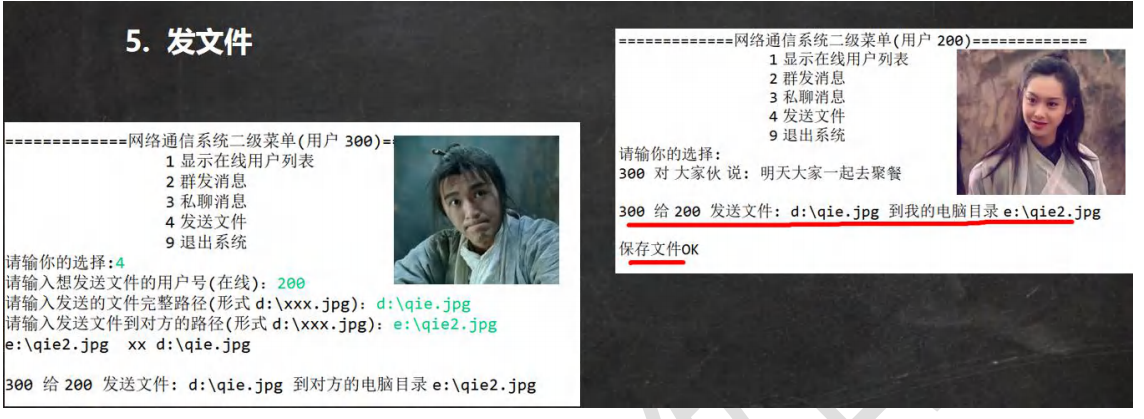
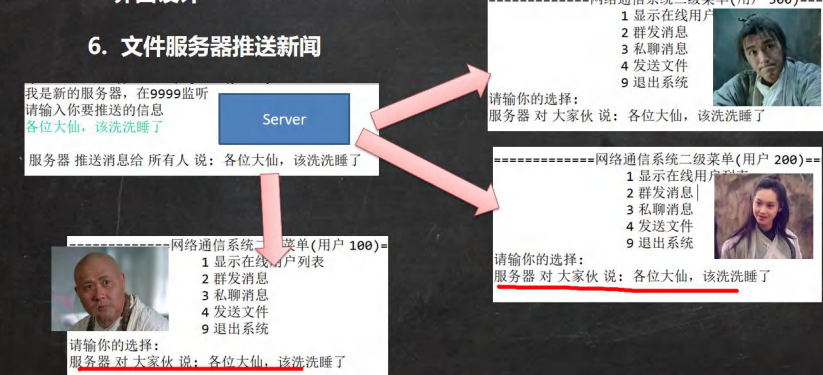
22.5 功能 - 用户登录
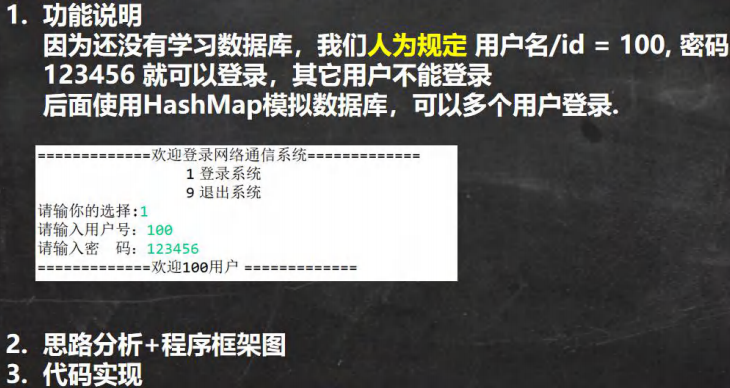
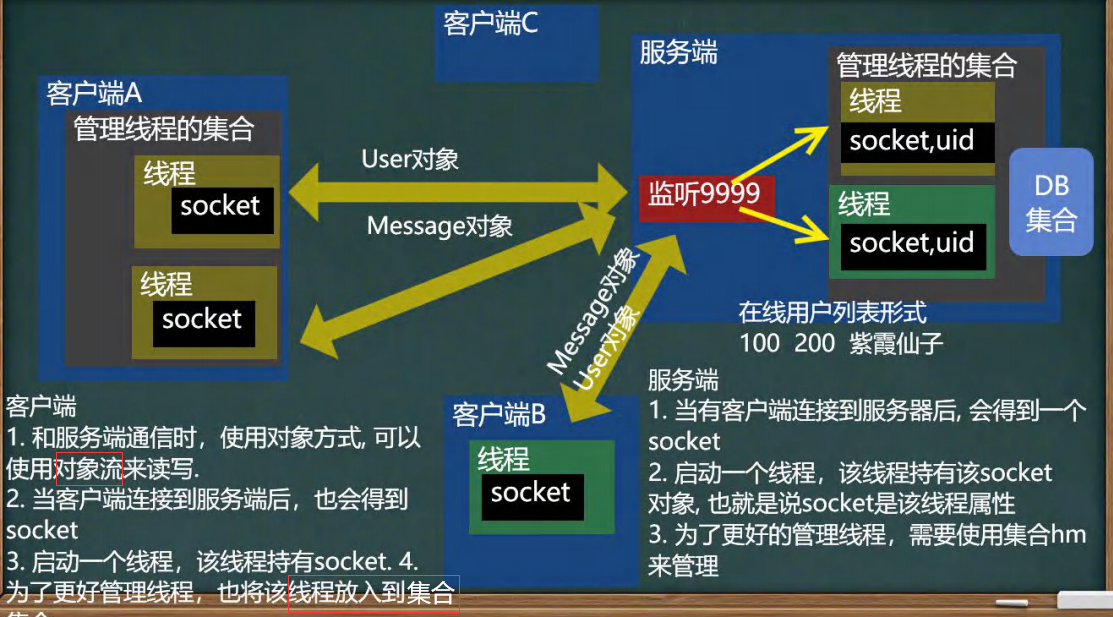
22.6 功能 - 拉取在线用户列表
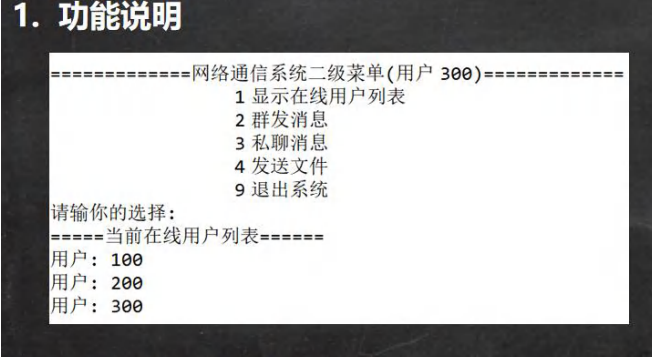
22.7 功能 - 无异常退出
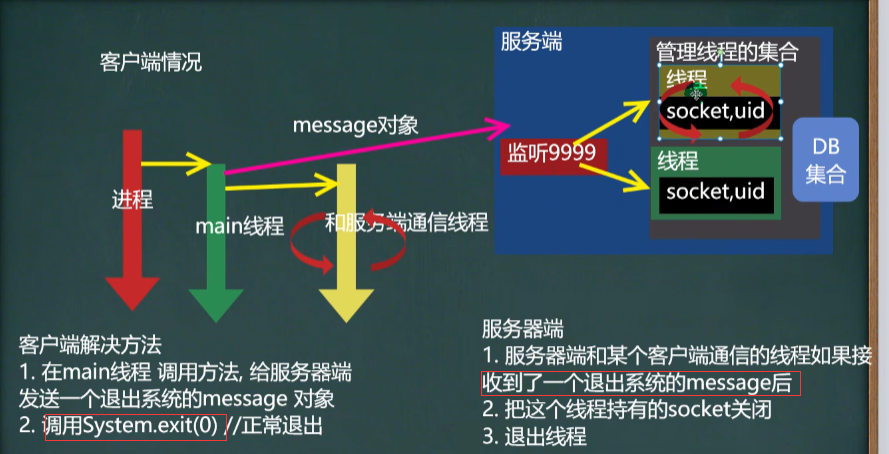
22.8 功能 - 私聊
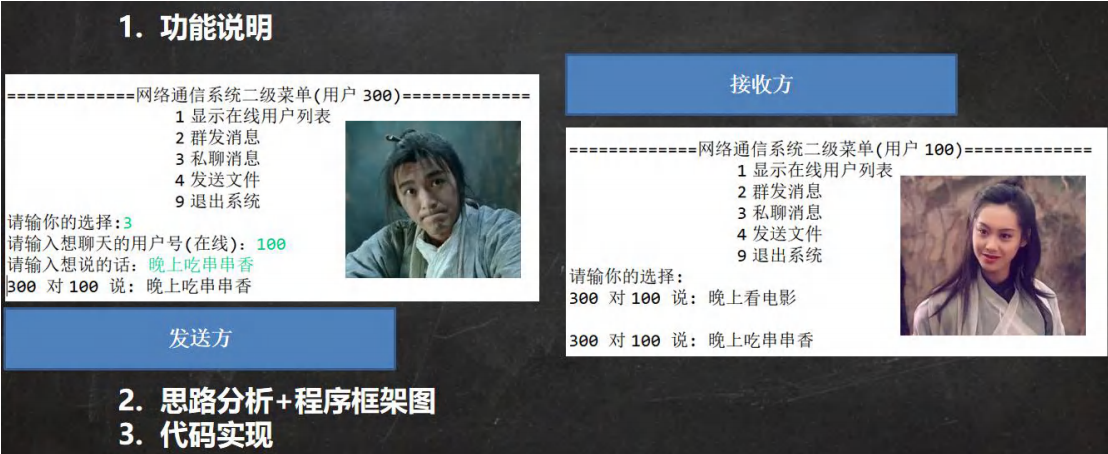
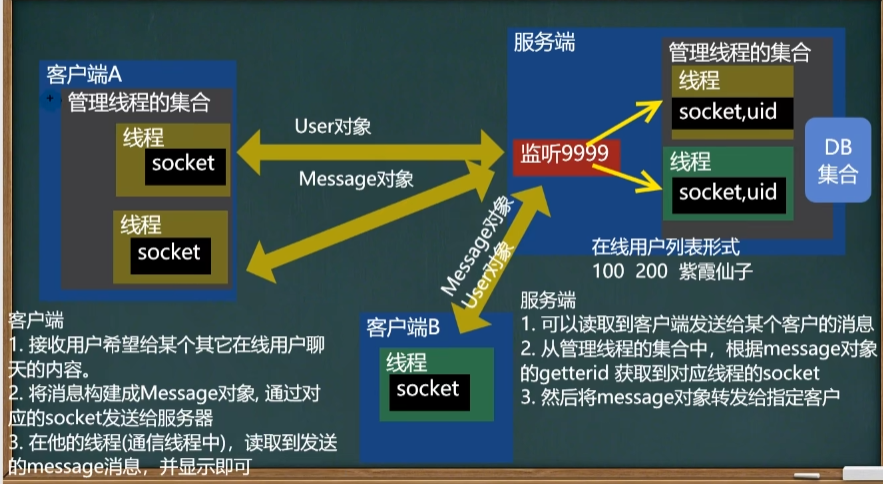
22.9 功能 - 群发
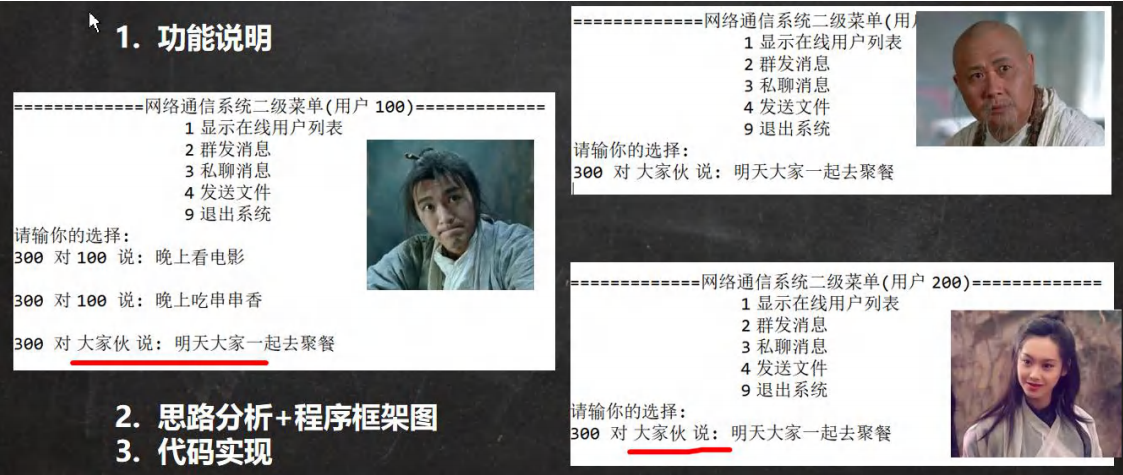
22.10 功能 - 发文件
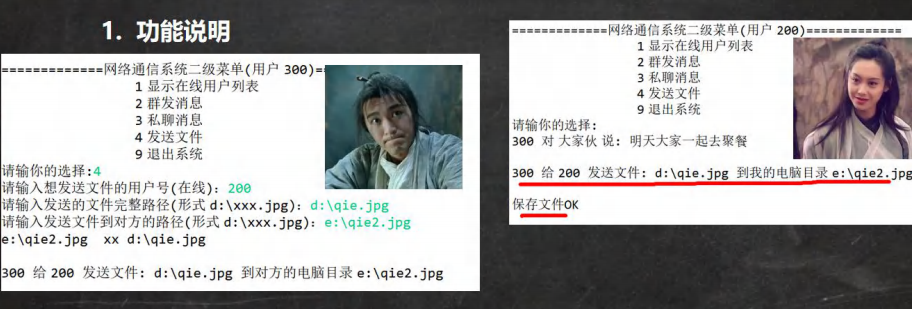
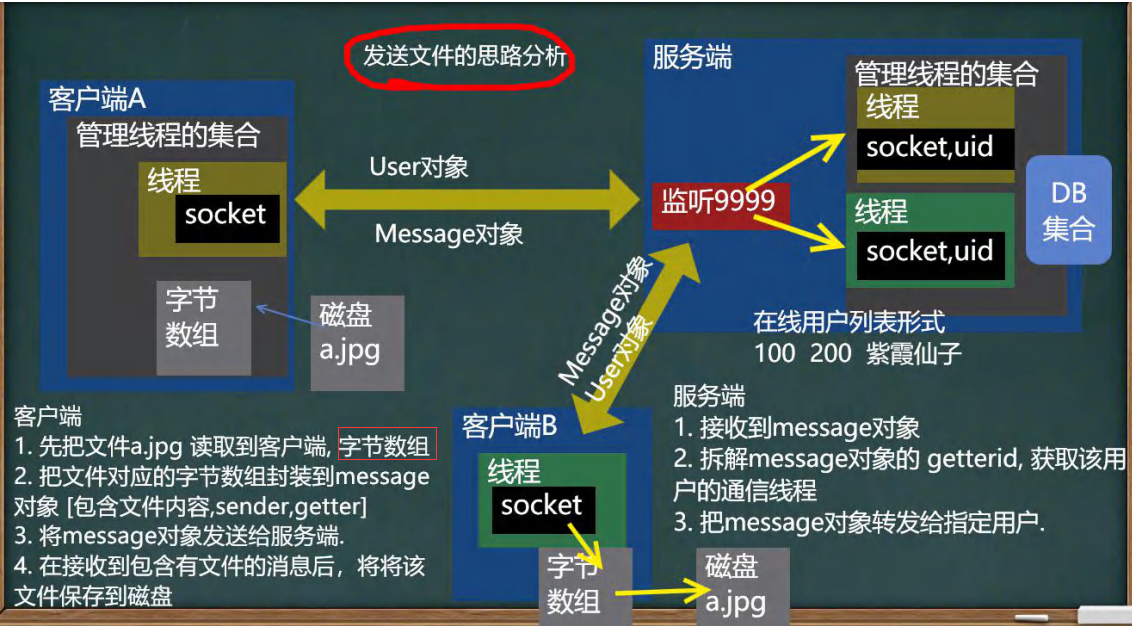
22.11 功能 - 服务器推送新闻
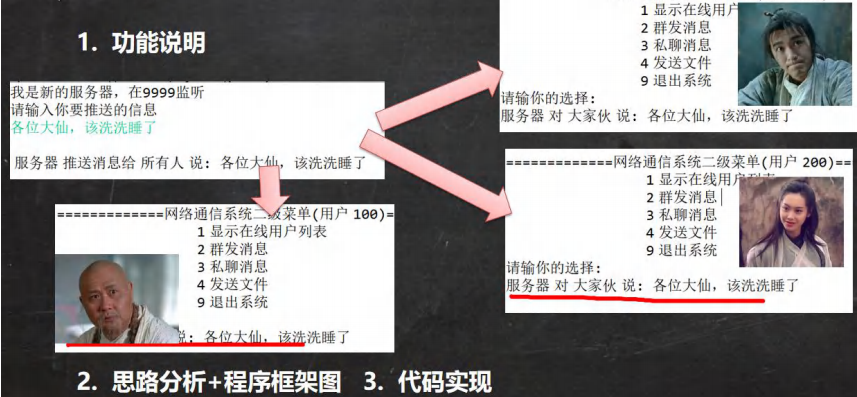
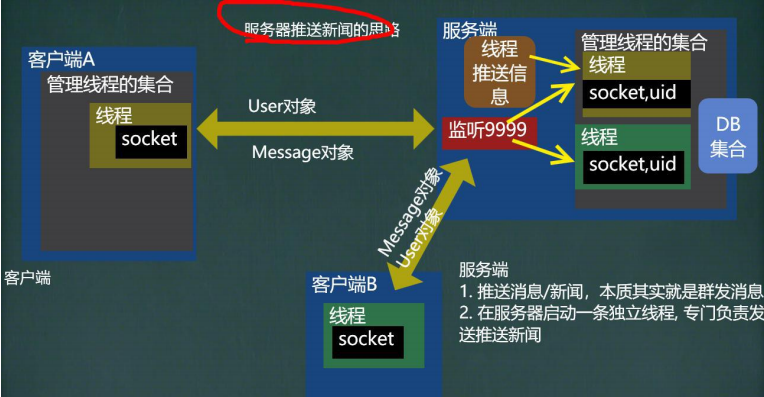
22.12 功能扩展 - 离线发送

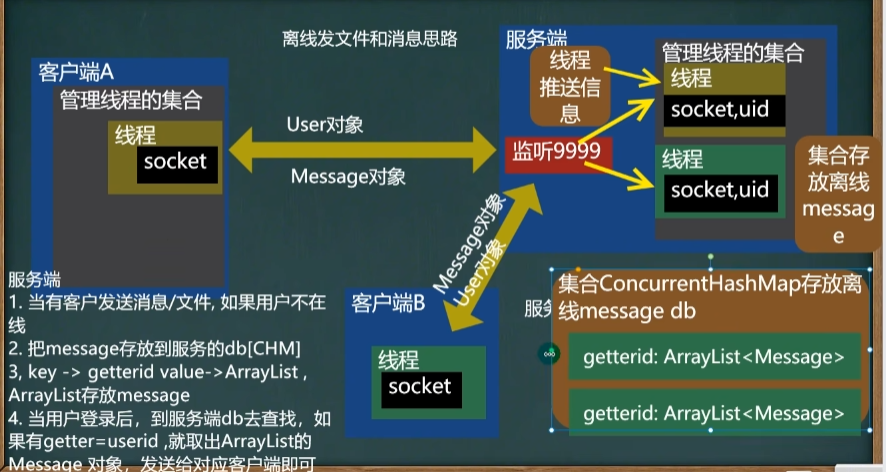
22.13 项目框架分析
22.13.1 文件目录
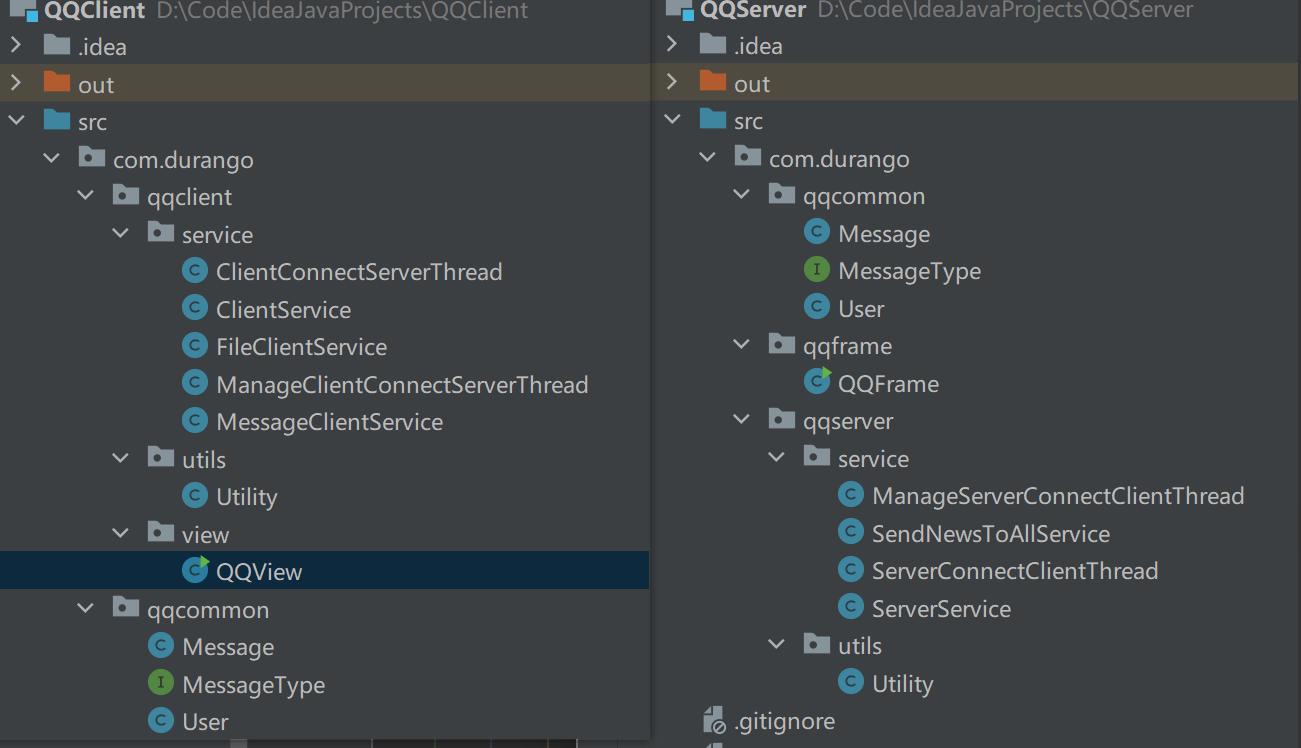
22.13.2 客户端框架
视图类:QQView
服务类:
- ClientService:完成用户登录验证、用户注册、退出客户端等功能
- MessageClientService:提供和消息相关的服务功能
- FileClientService:提供文件传输服务
线程类:ClientConnectServerThread,用于保持和服务器端的socket连接
管理类:ManageClientConnectServerThread,管理客户端连接到服务器端线程
视图类根据用户选择调用各个服务类的功能,ClientService建立起和服务器的socket连接,并创建线程类ClientConnectServerThread,保持和服务器端的socket连接。该线程类通过ManageClientConnectServerThread管理类进行管理,以便于其他服务能获得该线程及socket连接。MessageClientService和FileClientService都是通过管理类获得维持连接的线程类socket后,完成相应功能。
22.13.3 服务端框架
- 服务类:
- ServerService:建立来自各个客户端的socket连接,验证登录是否合法
- 线程类:
- ServerConnectClientThread:用于保持和用户端的socket连接,实现各种业务逻辑,如获取在线用户列表、退出系统、转发、群发、发文件等。
- SendNewsToAllService:服务器推送消息的线程
- 管理类:ManageServerConnectClientThread,管理ServerConnectClientThread线程类
- 服务类监听端口并建立各个客户端的socket连接,验证登录是否合法后开启ServerConnectClientThread线程类维持socket连接,线程类通过接收到的客户端请求,做出相应业务处理。管理类ManageServerConnectClientThread便于获取线程socket连接以及断开连接等操作。
第二十三章 反射
23.1 一个需求引出反射
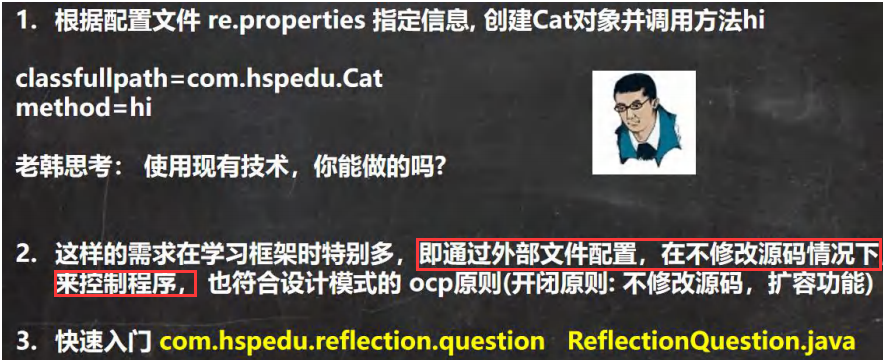
1 | //根据配置文件 re.properties 指定信息, 创建 Cat 对象并调用方法 hi |
23.2 反射机制
23.2.1 Java Reflection
- 反射机制允许程序在执行期借助于Reflection API取得任何类的内部信息(比如成员变量,构造器,成员方法等等),并能操作对象的属性及方法。反射在设计模式和框架底层都会用到。
- 加载完类之后,在堆中就产生了一个Class类型的对象 (一个类只对应一个Class对象) ,这个对象包含了类的完整结构信息。通过这个对象得到类的结构。这个Class对象就像一面镜子,透过这个镜子看到类的结构,以,形象的称之为: 反射
23.2.2 原理示意图
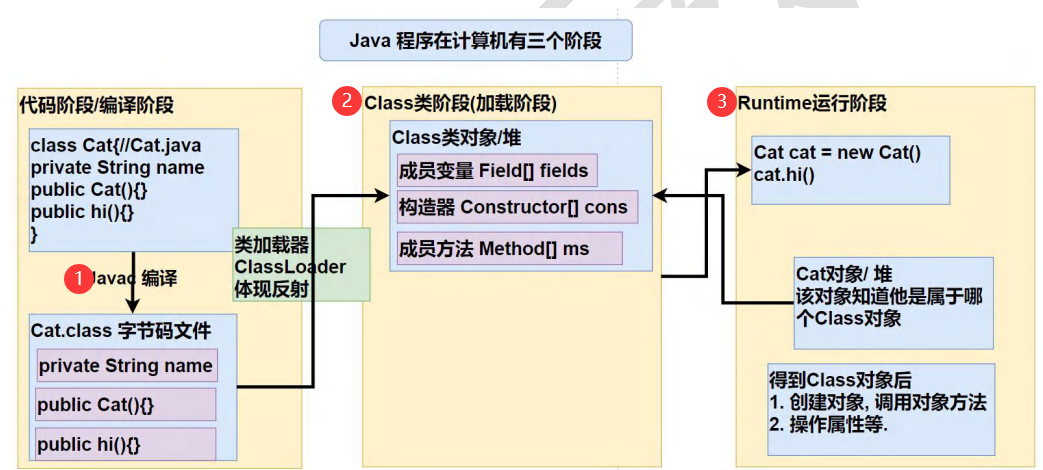
23.2.3 反射的作用
- 在运行时判断任意一个对象所属的类
- 在运行时构造任意一个类的对象
- 在运行时得到任意一个类所具有的成员变量和方法
- 在运行时调用任意一个对象的成员变量和方法
- 生成动态代理(动态加载类,降低依赖性)
23.2.4 反射相关的主要类
- java.lang.Class:代表一个类, Class对象表示某个类加载后在堆中的对象
- 构造器java.lang.reflect.Method: 代表类的方法,Method对象表示某个类的方法
- java.lang.reflect.Field: 代表类的成员变量,Field对象表示某个类的成员变量
- java.lang.reflect.Constructor: 代表类的构造方法, Constructor对象表示
1 | //1. 使用 Properties 类, 可以读写配置文件 |
23.2.5 反射优点和缺点
- 优点: 可以动态的创建和使用对象(也是框架底层核心),使用灵活,没有反射机制,框架技术就失去底层支撑。
- 缺点: 使用反射基本是解释执行,对执行速度有影响
23.2.6 反射调用优化

1 | public class Reflection02 { |
23.3 Class类
23.3.1 基本介绍

- Class也是类,因此也继承Obiect类[类图]
- Class类对象不是new出来的,而是系统创建的。ClassLoader类的loadClass方法
- 对于某个类的Class类对象,在内存中只有一份,因为类只加载一次
- 每个类的实例都会记得自己是由哪个Class实例所生成
- 通过Class对象可以完整地得到一个类的完整结构,通过一系列API
- Class对象是存放在堆的
- 类的字节码二进制数据,是放在方法区的,有的地方称为类的元数据(包括方法代码(https://www.zhihu.com/question/38496907)变量名,方法名,访问权限等等)
23.3.2 常用方法
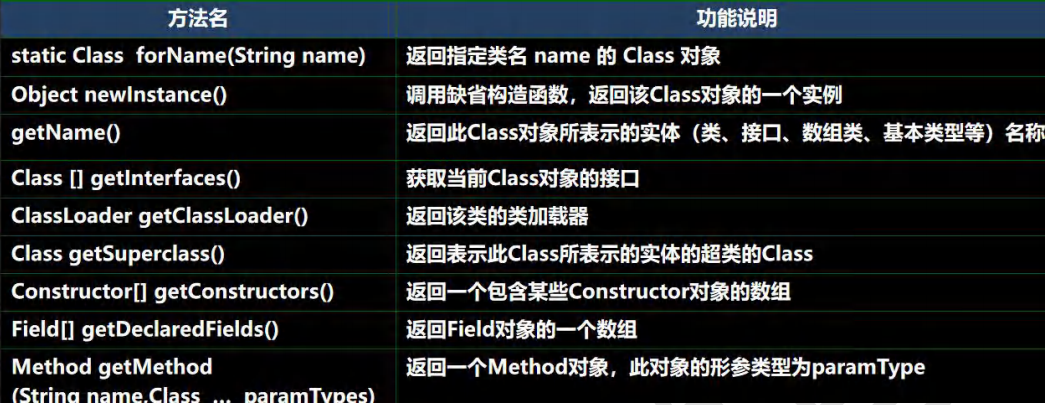
1 | public class Class02 { |
23.4 获取Class类对象
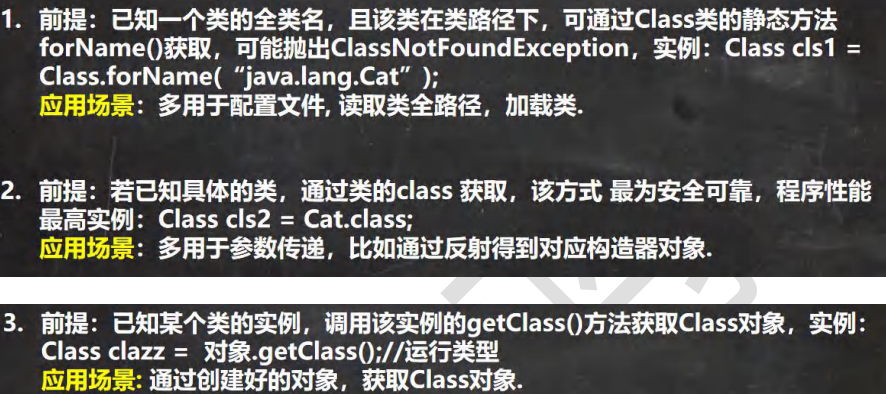
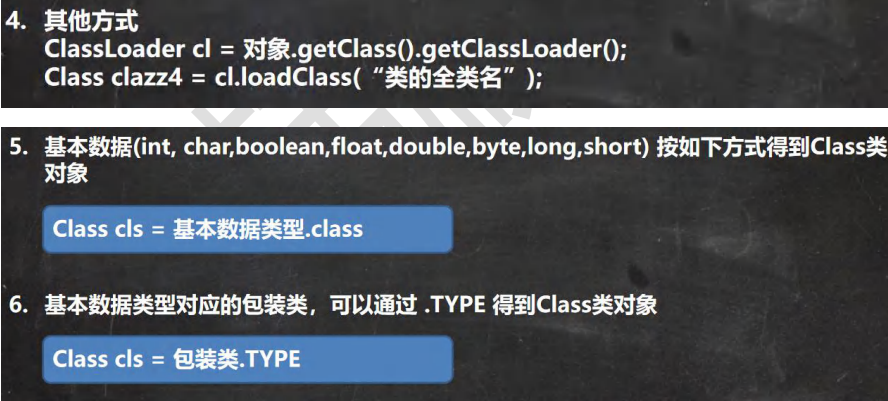
1 | //1. Class.forName |
23.5 哪些类型有 Class 对象

1 | Class<String> cls1 = String.class;//外部类 |
23.6 类加载
23.6.1 基本说明

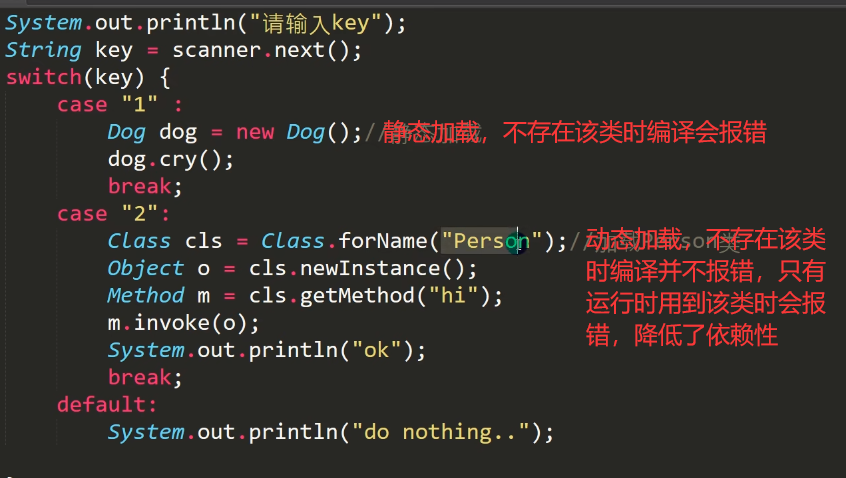
23.6.2 类加载时机

23.6.3 类加载过程图
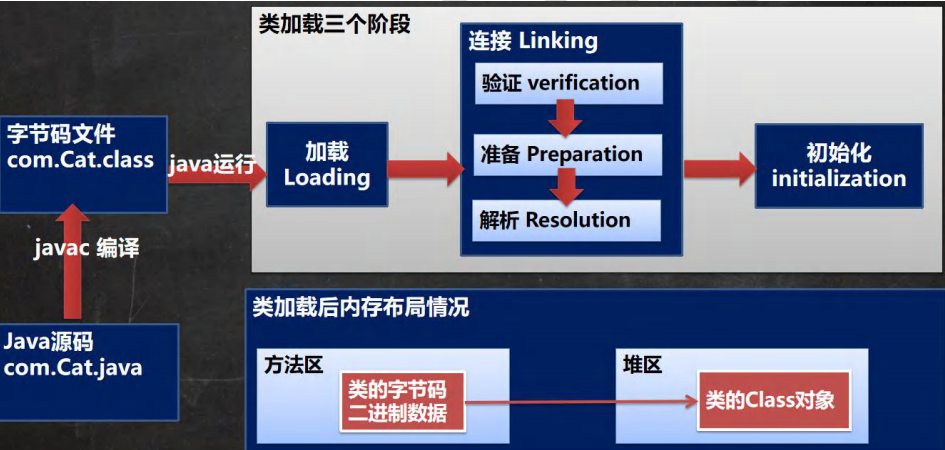
23.6.4 类加载各阶段完成任务
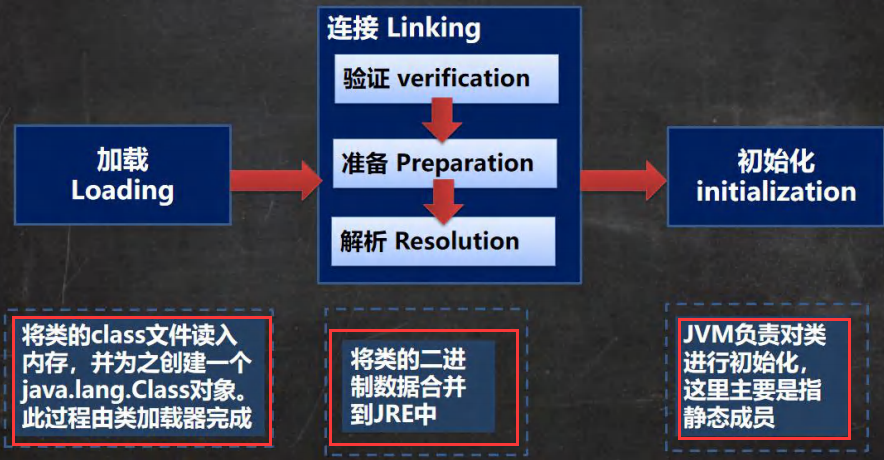
23.6.5 加载阶段
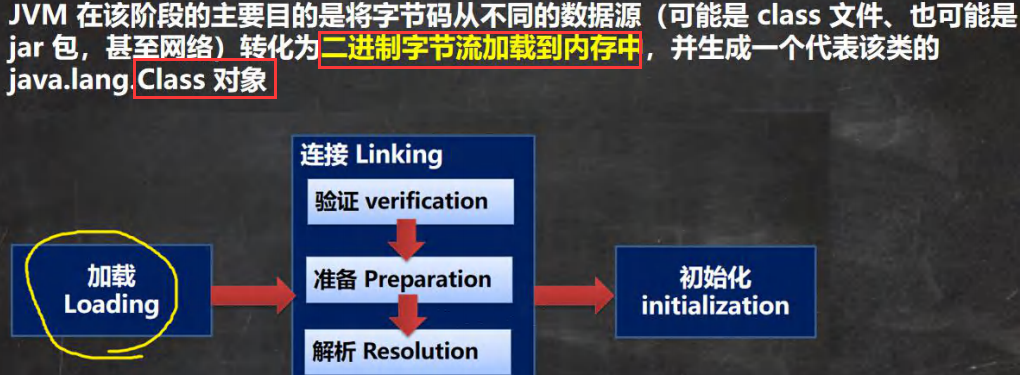
23.6.6 连接阶段 - 验证

23.6.7 连接阶段 - 准备

23.6.8 连接阶段 - 解析
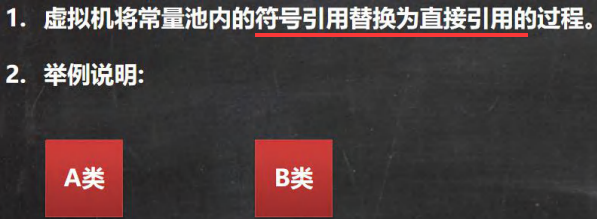
23.6.9 初始化 Initialization

23.7 通过反射获取类的结构信息
23.7.1 第一组: java.lang.Class 类
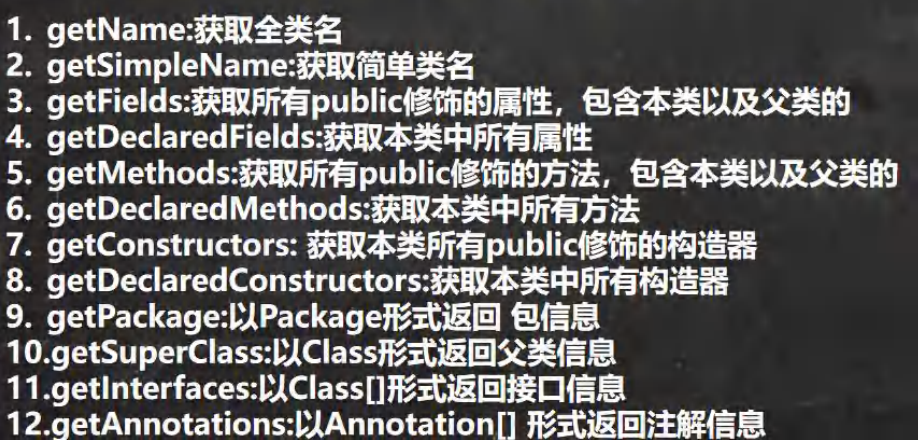
1 | // 第一组 |
23.7.2 第二组: java.lang.reflect.Field 类

1 | //得到 Class 对象 |
23.7.3 第三组: java.lang.reflect.Method 类

1 | //getDeclaredMethods:获取本类中所有方法 |
23.7.4 第四组: java.lang.reflect.Constructor 类

1 | //getDeclaredConstructors:获取本类中所有构造器 |
23.8 通过反射创建对象
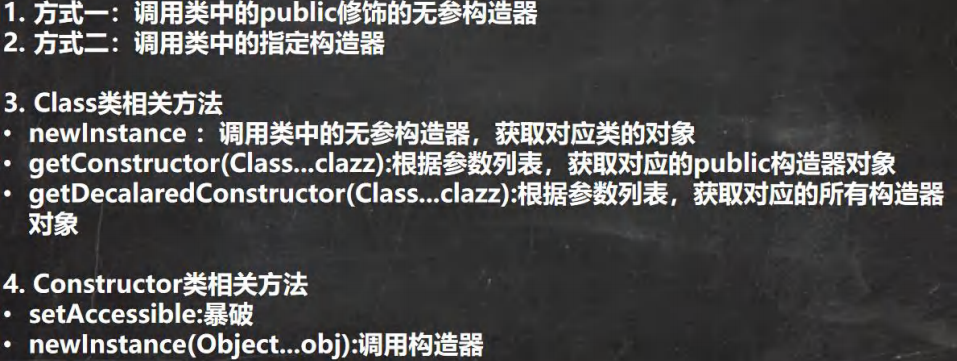
1 | public static void main(String[] args) throws ClassNotFoundException, InstantiationException, IllegalAccessException, NoSuchMethodException, InvocationTargetException { |
23.9 通过反射访问类中的成员
23.9.1 访问属性
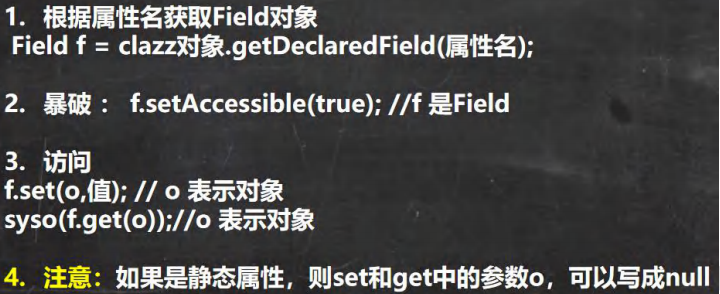
1 | public static void main(String[] args) throws ClassNotFoundException, InstantiationException, IllegalAccessException, NoSuchFieldException { |
23.9.2 访问方法

1 | public static void main(String[] args) throws ClassNotFoundException, InstantiationException, IllegalAccessException, InvocationTargetException, NoSuchMethodException { |
第二十四章 MySQL
(略)MySQL基础篇
第二十五章 JDBC和连接池
25.1 JDBC概述
25.1.1 基本介绍

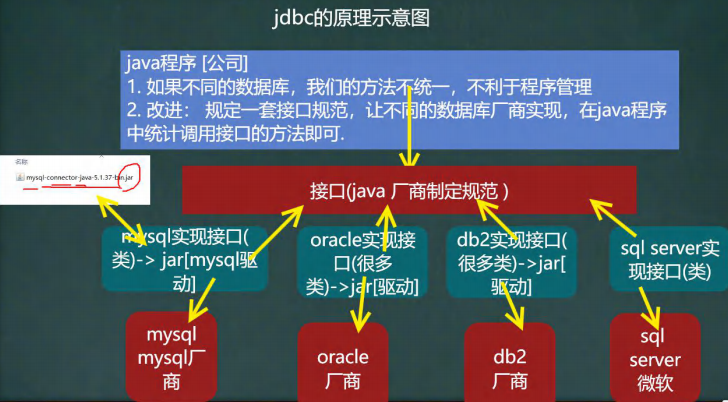
25.1.2 JDBC 带来的好处
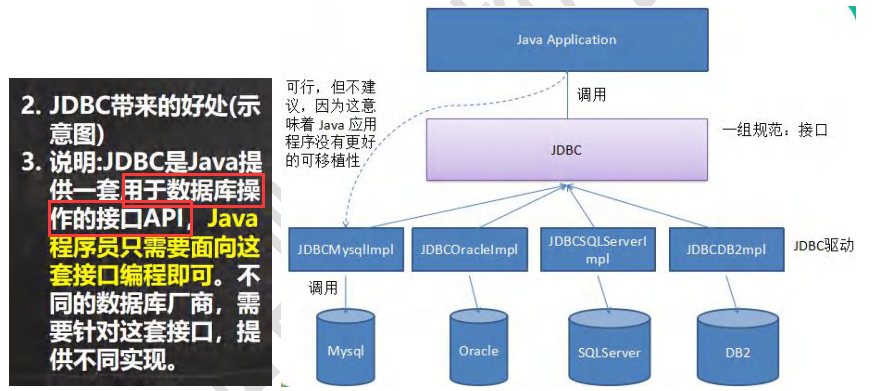
25.1.3 JDBC API
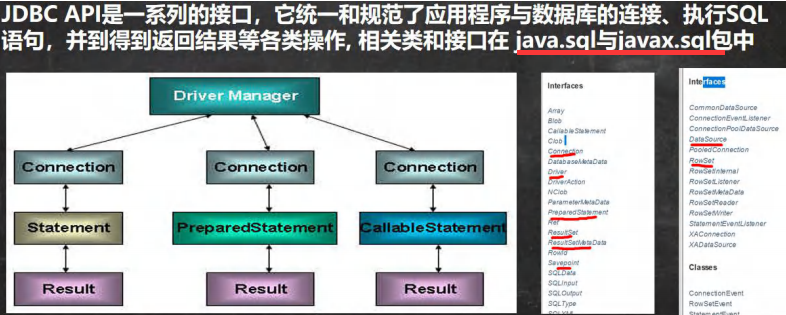
25.2 JDBC快速入门
25.2.1 JDBC程序编写步骤
- 注册驱动 - 加载Driver类
- 获取连接 - 得到Connection
- 执行增删改查 - 通过Statement
- 释放资源 - 关闭Statement和Connection
25.2.2 JDBC第一个程序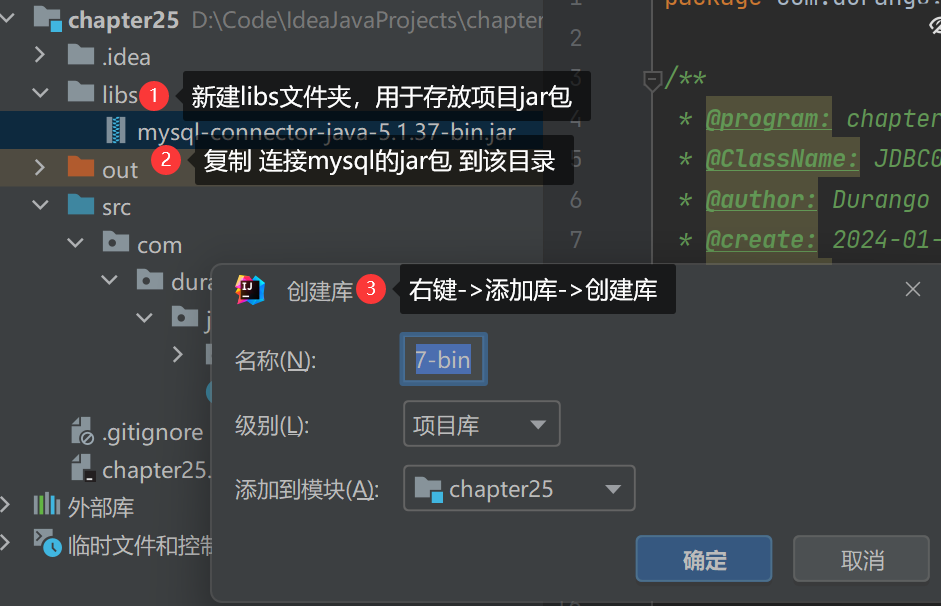
1 | package com.durango.jdbc; |
25.3 获取数据库连接 5 种方式
25.3.1 方式一
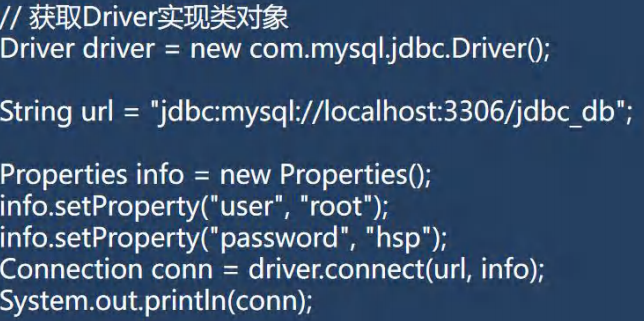
1 | // 方式一 |
25.3.2 方式二
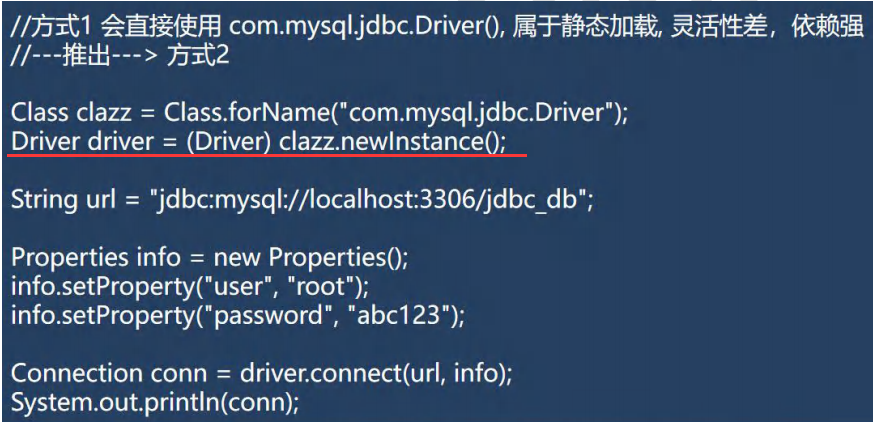
1 | // 方式二 |
25.3.3 方式三
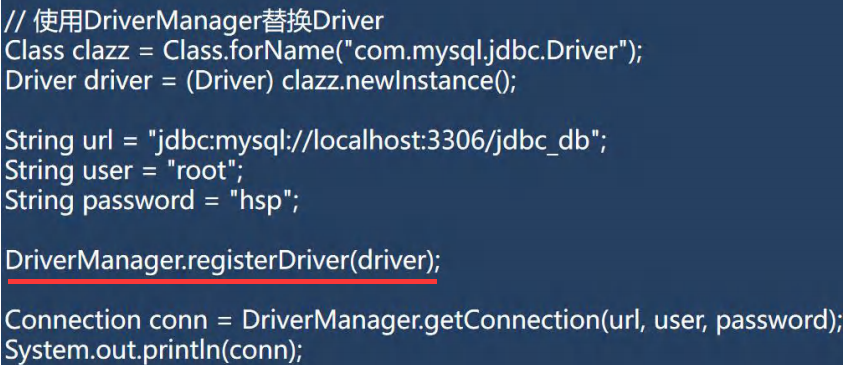
1 | //方式 3 使用 DriverManager 替代 driver 进行统一管理 |
25.3.4 方式四
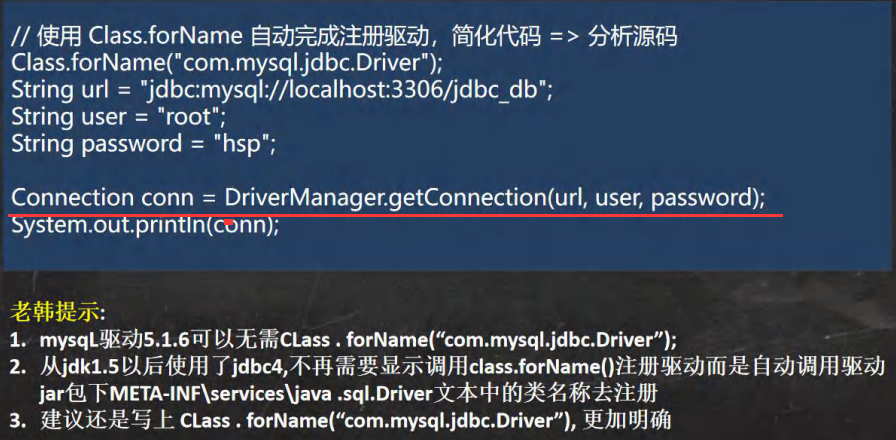
1 | //方式 4: 使用 Class.forName 自动完成注册驱动,简化代码 |
25.3.5 方式 5
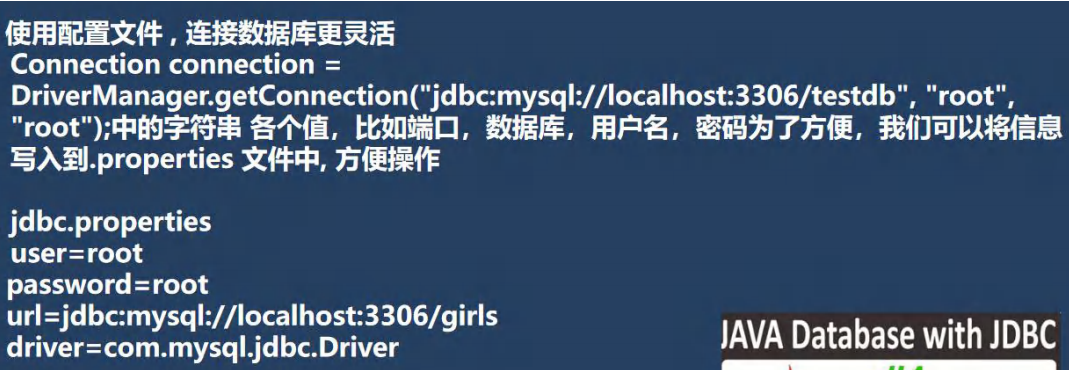
1 | //方式 5 , 在方式 4 的基础上改进,增加配置文件,让连接 mysql 更加灵活 |
25.4 ResultSet(结果集)

1 | public class ResultSet_ { |
25.5 Statement
25.5.1 基本介绍
- Statement对象 用于执行静态SQL语句并返回其生成的结果的对象
- 在连接建立后,需要对数据库进行访问,执行命名或是SQL 语句,可以通过
- Statement 【存在SQL注入】
- PreparedStatement【预处理】
- CallableStatement 【存储过程】
- 语句对象执行sql语句,存在sql注入风险
- SQL 注入是 利用某些系统没有对用户输入的数据进行充分的检查,而在用户输数据中注入非法的 SQL 语句段或命令,恶意攻击数据库。
- 要防范 SQL 注入,只要用 PreparedStatement (从Statement扩展而来) 取代 Statement 就可以了
25.5.2 SQL注入案例
1 | -- 演示 sql 注入 |
25.5.3 应用实例
1 | public class Statement_ { |
25.6 PreparedStatement
25.6.1 基本介绍
- PreparedStatement 执行的 SQL 语句中的参数用问号(?)来表示,调用
PreparedStatement 对象的 setXxx()方法来设置这些参数setXxx() 方法有
两个参数,第一个参数是要设置的 SQL 语句中的参数的索引(从 1 开始),第二个是设置的 SQL 语句中的参数的值 - 调用 executeQuery(),返回 ResultSet 对象
- 调用 executeUpdate0(), 执行更新,包括增、删、修改
25.6.2 预处理好处
- 不再使用+ 拼接sql语句,减少语法错误
- 有效的解决了**sql注入问题**!
- 大大减少了编译次数,效率较高
25.6.3 应用案例
1 | public class PreparedStatement_ { |
25.7 JDBC 的相关 API 小结
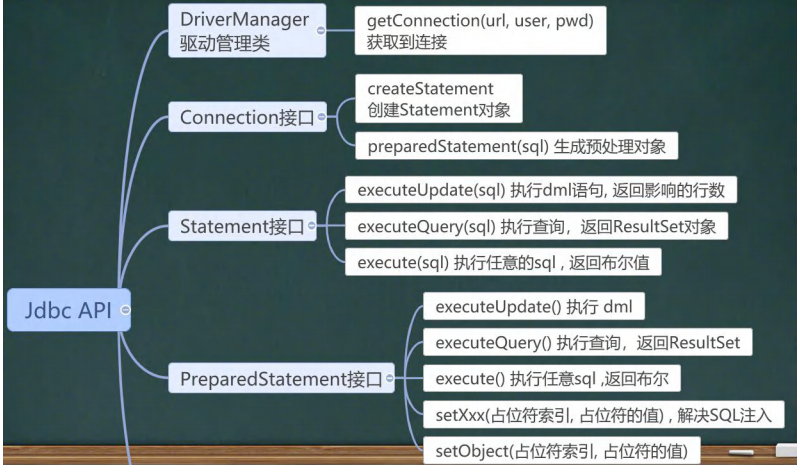
25.8 封装 JDBCUtils工具类
- 在jdbc操作中,获取连接和释放资源是经常使用到可以将其封装jdbc连接的工具类JDBCUtils
25.8.1 JDBCUtils工具类
1 | public class JDBCUtils { |
25.8.1 JDBCUtils工具类使用
1 | public class JDBCUtils_Use { |
25.9 事务
25.9.1 基本介绍
- JDBC程序中当一个Connection对象创建时,默认情况下是自动提交事务:每次执行一个 SQL 语句时,如果执行成功,就会向数据库自动提交,而不能回滚
- JDBC程序中为了让多个 SQL 语句作为一个整体执行,需要使用事务
- 调用 Connection 的 **setAutoCommit(false)**可以取消自动提交事务(开启事务)
- 在所有的 SQL 语句都成功执行后,调用 Connection 的 commit() 方法提交事务
- 在其中某个操作失败或出现异常时,调用 Connection 的 rollback() 方法回滚事务
25.9.2 应用案例
1 | public class Transaction_ { |
25.10 批处理
25.10.1 基本介绍
- 当需要成批插入或者更新记录时。可以采用Java的批量更新机制,这一机制允许多条语句一次性提交给数据库批量处理。通常情况下比单独提交处理效率更高
- JDBC的批量处理语句包括下面方法:
- **addBatch()**:添加需要批量处理的SQL语句或参数
- **executeBatch()**:执行批量处理语句:
- **clearBatch()**:清空批处理包的语句
- JDBC连接MySQL时,如果要使用批处理功能,请再url中加参数?rewriteBatchedStatements=true
- 批处理往往和PreparedStatement一起搭配使用,可以既减少编译次数,又减少运行次数,效率大大提高
25.10.2 应用案例
1 | public class Batch { |
25.11数据库连接池
25.11.1 5k 次连接数据库
1 | public class ConQuestion { |
25.11.2 传统获取 Connection 问题分析
传统的JDBC数据库连接使用 DriverManager 来获取,每次向数据库建立连接的时候都要将 Connection 加载到内存中再验证IP地址,用户名和密码(0.05s~1s时间)。需要数据库连接的时候,就向数据库要求一个,频
繁的进行数据库连接操作将占用很多的系统资源容易造成服务器崩溃。
每一次数据库连接,使用完后都得断开,如果程序出现异常而未能关闭,将导致数据库内存泄漏,最终将导致重启数据库
传统获取连接的方式,不能控制创建的连接数量,如连接过多,也可能导致内存泄漏,MySQL崩溃。
解决传统开发中的数据库连接问题,可以采用数据库连接池技术(connection pool)
25.11.3 数据库连接池种类
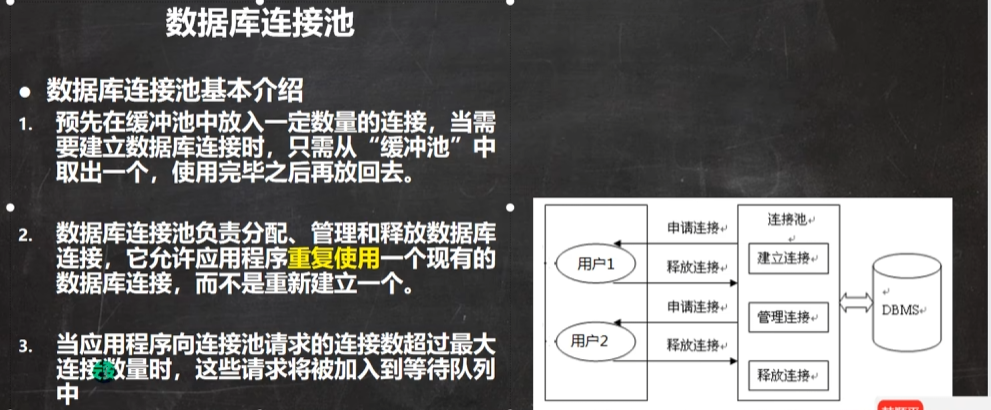
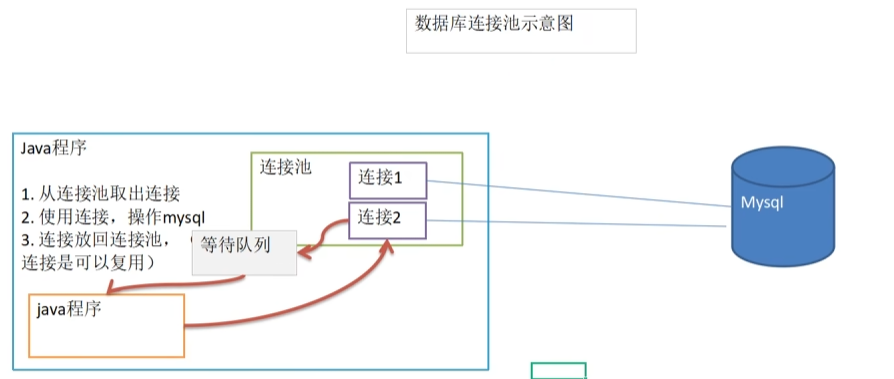
- JDBC 的数据库连接池使用 javax.sgl.DataSource 来表示,DataSource只是一个接口,该接口通常由第三方提供实现[提供 .jar]
- C3PO 数据库连接池,速度相对较慢,稳定性不错 (hibernate,spring)
- DBCP 数据库连接池,速度相对c3p0较快,但不稳定
- Proxool 数据库连接池,有监控连接池状态的功能,稳定性较c3p0差一点
- BoneCP 数据库连接池,速度快
- Druid(德鲁伊)是阿里提供的数据库连接池,集DBCP 、C3PO 、Proxoo优点于一身的数据库连接池
25.11.4 C3P0 应用实例
- 方式一
1 | // 方式 1: 相关参数,在程序中指定 user, url , password 等 |
- 方式二
1 | //第二种方式 使用配置文件模板来完成 |
- 配置文件 c3p0.config.xml
1 | <c3p0-config> |
25.11.5 Druid(德鲁伊) 应用实例
1 | public class Durid_ { |
25.11.6 将 JDBCUtils 工具类改成 Druid(德鲁伊)实现
1 | public class JDBCUtilsByDruid { |
25.12 Apache—DBUtils
25.12.1 先分析一个问题
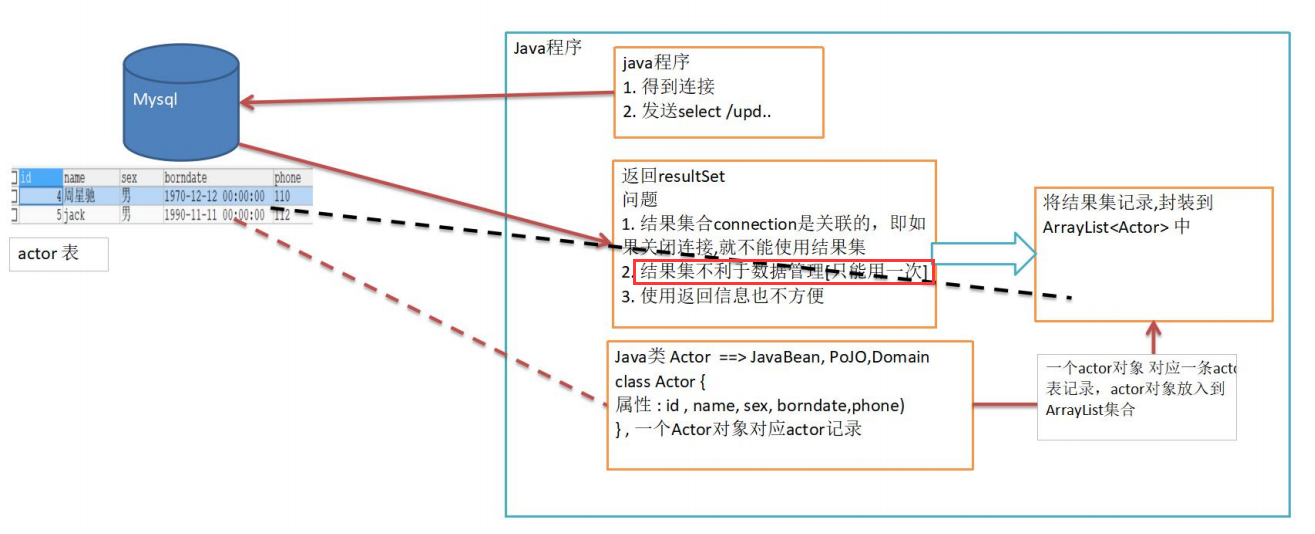
25.12.2 用自己的土方法来解决
1 | //使用老师的土方法来解决 ResultSet =封装=> Arraylist |
25.12.3 基本介绍
commons-dbutils 是 Apache 组织提供的-一个开源JDBC工具类库,它是对JDBC的封装使用dbutils能极大简化jdbc编码的工作量。
DbUtils类
**QueryRunner**类: 该类封装了SQL的执行,是线程安全的。可以实现增、删、改、查、批处理
ResultSetHandler接口: 该接口用于处理 java.sql.ResultSet,将数据按要求转换为另一种形式,有如下几种:

25.12.4 应用实例
query()方法源码
1 | public <T> T query(Connection conn, String sql, ResultSetHandler<T> rsh, Object... params) throws SQLException { |
apache-DBUtils 工具类 + druid 完成对表的查询操作
- 返回结果是多行数据的情况
1
2
3
4
5
6
7
8
9
10
11
12
13
14
15
16
17
18
19
20
21
22
23
24
25
public void testQueryMany() throws SQLException {
// 1.用druid方式得到连接
Connection connection = JDBCUtilsByDruid.getConnection();
// 2.使用 DBUtilsl 类和接口, 先引入DBUtils相关的jar
// 3.创建 QueryRunner
QueryRunner queryRunner = new QueryRunner();
// 4. 执行相关的方法,返回ArrayList结果集
String sql = "select * from actor where id >= ?";
// (1) query 方法就是执行 sql 语句,得到 resultset ---封装到 --> ArrayList 集合中
// (2) list: 返回集合
// (3) connection: 连接
// (4) sql : 执行的 sql 语句
// (5) new BeanListHandler<>(Actor.class): 在将 resultset -> Actor 对象 -> 封装到 ArrayList
// 底层使用反射机制 去获取 Actor 类的属性,然后进行封装
// (6) 1 就是给 sql 语句中的 ? 赋值,可以有多个值,因为是可变参数 Object... params
// (7) 底层得到的 resultset,会在query中关闭, 还会关闭 PreparedStatment
List<Actor> list = queryRunner.query(connection, sql, new BeanListHandler<>(Actor.class), 1);
System.out.println("输出集合信息");
for (Actor actor : list) {
System.out.println(actor);
}
//释放资源
JDBCUtilsByDruid.close(null, null, connection);
}- 返回结果是单行数据的情况
1
2
3
4
5
6
7
8
9
10
11
12
13
14
public void testQuerySingle() throws SQLException {
// 1.用druid方式得到连接
Connection connection = JDBCUtilsByDruid.getConnection();
// 2.使用 DBUtilsl 类和接口, 先引入DBUtils相关的jar
// 3.创建 QueryRunner
QueryRunner queryRunner = new QueryRunner();
// 4. 执行相关的方法,返回单个对象
String sql = "select * from actor where id = ?";
Actor actor = queryRunner.query(connection, sql, new BeanHandler<>(Actor.class), 4);
System.out.println(actor);
// 释放资源
JDBCUtilsByDruid.close(null, null, connection);
}- 查询结果是单行单列-返回的就是 object
1
2
3
4
5
6
7
8
9
10
11
12
13
14
15
public void testScalar() throws SQLException {
// 1.用druid方式得到连接
Connection connection = JDBCUtilsByDruid.getConnection();
// 2.使用 DBUtilsl 类和接口, 先引入DBUtils相关的jar
// 3.创建 QueryRunner
QueryRunner queryRunner = new QueryRunner();
// 4. 就可以执行相关的方法,返回单行单列 , 返回的就是 Object
String sql = "select name from actor where id = ?";
//因为返回的是一个对象, 使用的 handler 就是 ScalarHandler
Object obj = queryRunner.query(connection, sql, new ScalarHandler(), 4);
System.out.println(obj);
// 释放资源
JDBCUtilsByDruid.close(null, null, connection);
}
使用apache-dbutils + druid 完成 dml (update, insert ,delete)
1
2
3
4
5
6
7
8
9
10
11
12
13
14
15
16
17
18
19
public void testDML() throws SQLException {
// 1.用druid方式得到连接
Connection connection = JDBCUtilsByDruid.getConnection();
// 2.使用 DBUtilsl 类和接口, 先引入DBUtils相关的jar
// 3.创建 QueryRunner
QueryRunner queryRunner = new QueryRunner();
//4. 这里组织 sql 完成 update, insert delete
//String sql = "update actor set name = ? where id = ?";
//String sql = "insert into actor values(null, ?, ?, ?, ?)";
String sql = "delete from actor where id = ?";
// (1) 执行 dml 操作是 queryRunner.update()
// (2) 返回的值是受影响的行数 (affected: 受影响)
//int affectedRow = queryRunner.update(connection, sql, "林青霞", "女", "1966-10-10", "116");
int affectedRow = queryRunner.update(connection, sql, 1000 );
System.out.println(affectedRow > 0 ? "执行成功" : "执行没有影响到表");
// 释放资源
JDBCUtilsByDruid.close(null, null, connection);
}
25.12.5 表和 JavaBean 的类型映射关系
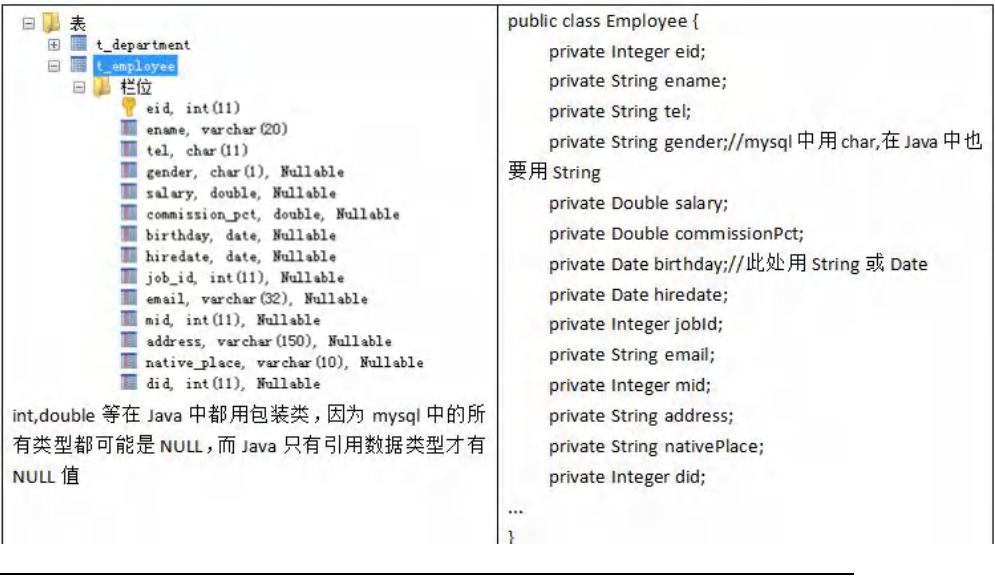
25.13 DAO 和增删改查通用方法-BasicDao
25.13.1 先分析一个问题

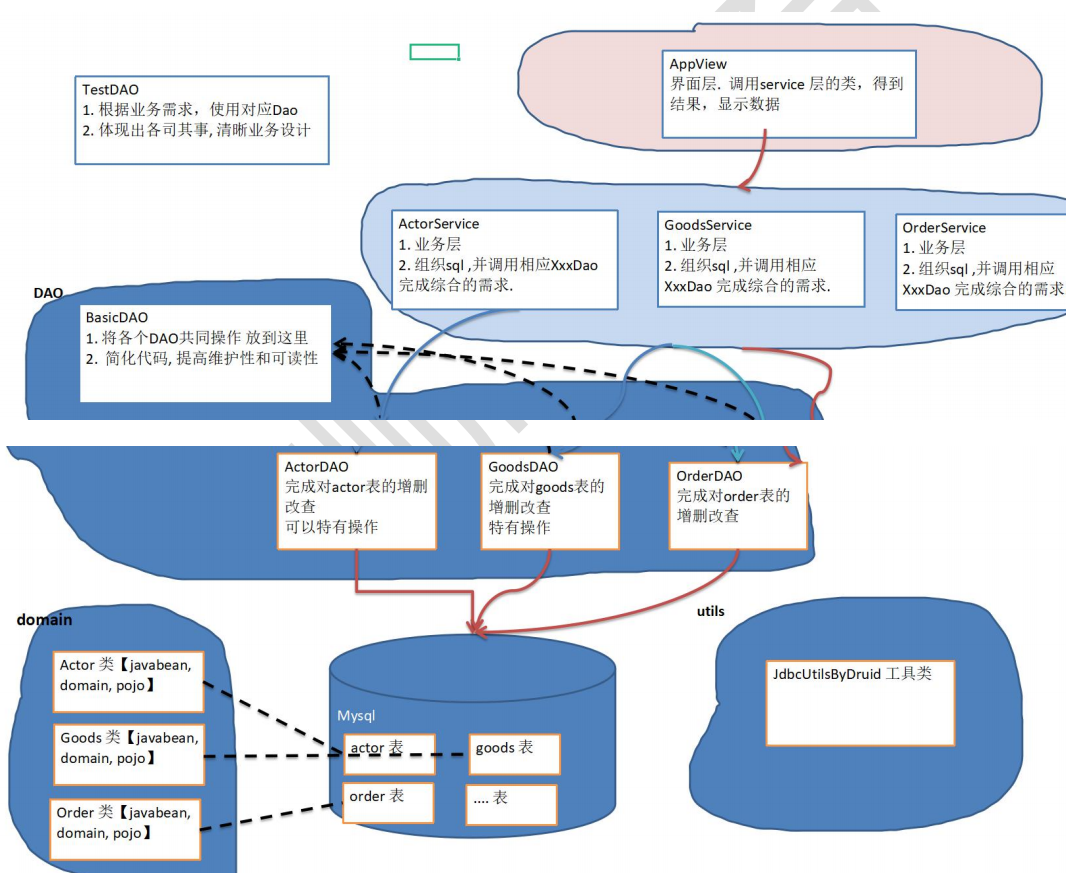
25.13.2 基本说明

25.13.3 BasicDAO 应用实例

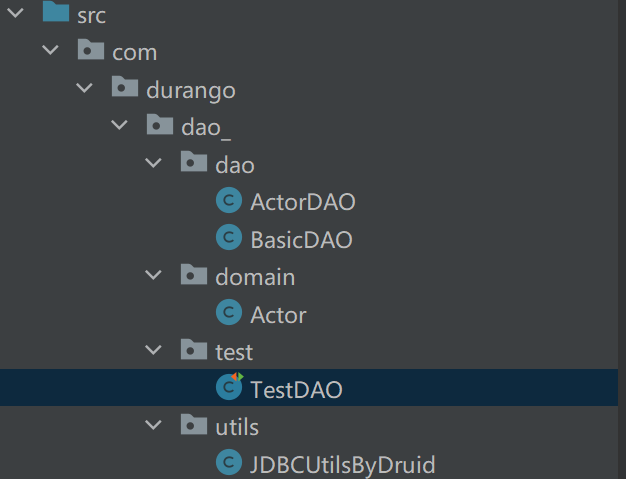
JDBCUtilsByDruid.java
1
2
3
4
5
6
7
8
9
10
11
12
13
14
15
16
17
18
19
20
21
22
23
24
25
26
27
28
29
30
31
32
33
34
35
36
37public class JDBCUtilsByDruid {
private static DataSource ds;
//在静态代码块完成 ds 初始化
static {
Properties properties = new Properties();
try {
properties.load(new FileInputStream("src\\druid.properties"));
ds = DruidDataSourceFactory.createDataSource(properties);
} catch (Exception e) {
e.printStackTrace();
}
}
//编写 getConnection 方法
public static Connection getConnection() throws SQLException {
return ds.getConnection();
}
//关闭连接, 在数据库连接池技术中,close 不是真的断掉连接
//而是把使用的 Connection 对象放回连接池
public static void close(ResultSet resultSet, Statement statement, Connection connection) {
try {
if (resultSet != null) {
resultSet.close();
}
if (statement != null) {
statement.close();
}
if (connection != null) {
connection.close();
}
} catch (SQLException e) {
throw new RuntimeException(e);
}
}
}Actor.java
1
2
3
4
5
6
7
8
9
10
11
12
13
14
15
16
17
18
19
20
21
22
23
24
25
26
27
28
29
30
31
32
33
34
35
36
37
38
39
40
41
42
43
44
45
46
47
48
49
50
51
52
53
54
55
56
57
58
59
60
61
62
63
64
65
66
67
68
69
70public class Actor { //Javabean, POJO, Domain对象
private Integer id;
private String name;
private String sex;
private Date borndate;
private String phone;
public Actor() { //一定要给一个无参构造器[反射需要]
}
public Actor(Integer id, String name, String sex, Date borndate, String phone) {
this.id = id;
this.name = name;
this.sex = sex;
this.borndate = borndate;
this.phone = phone;
}
public Integer getId() {
return id;
}
public void setId(Integer id) {
this.id = id;
}
public String getName() {
return name;
}
public void setName(String name) {
this.name = name;
}
public String getSex() {
return sex;
}
public void setSex(String sex) {
this.sex = sex;
}
public Date getBorndate() {
return borndate;
}
public void setBorndate(Date borndate) {
this.borndate = borndate;
}
public String getPhone() {
return phone;
}
public void setPhone(String phone) {
this.phone = phone;
}
public String toString() {
return "\nActor{" +
"id=" + id +
", name='" + name + '\'' +
", sex='" + sex + '\'' +
", borndate=" + borndate +
", phone='" + phone + '\'' +
'}';
}
}BasicDAO.java
1
2
3
4
5
6
7
8
9
10
11
12
13
14
15
16
17
18
19
20
21
22
23
24
25
26
27
28
29
30
31
32
33
34
35
36
37
38
39
40
41
42
43
44
45
46
47
48
49
50
51
52
53
54
55
56
57
58
59
60
61
62
63
64public class BasicDAO<T> { //泛型指定具体类型
private QueryRunner qr = new QueryRunner();
//开发通用的 dml 方法, 针对任意的表
public int update(String sql, Object... parameters) {
Connection connection = null;
try {
connection = JDBCUtilsByDruid.getConnection();
int update = qr.update(connection, sql, parameters);
return update;
} catch (SQLException e) {
throw new RuntimeException(e); //将编译异常->运行异常 ,抛出
} finally {
JDBCUtilsByDruid.close(null, null, connection);
}
}
//返回多个对象(即查询的结果是多行), 针对任意表
/**
* @param sql sql 语句,可以有 ?
* @param clazz 传入一个类的 Class 对象 比如 Actor.class
* @param parameters 传入 ? 的具体的值,可以是多个
* @return 根据 Actor.class 返回对应的 ArrayList 集合
*/
public List<T> queryMulti(String sql, Class<T> clazz, Object... parameters) {
Connection connection = null;
try {
connection = JDBCUtilsByDruid.getConnection();
return qr.query(connection, sql, new BeanListHandler<T>(clazz), parameters);
} catch (SQLException e) {
throw new RuntimeException(e); //将编译异常->运行异常 ,抛出
} finally {
JDBCUtilsByDruid.close(null, null, connection);
}
}
//查询单行结果 的通用方法
public T querySingle(String sql, Class<T> clazz, Object... parameters) {
Connection connection = null;
try {
connection = JDBCUtilsByDruid.getConnection();
return qr.query(connection, sql, new BeanHandler<T>(clazz), parameters);
} catch (SQLException e) {
throw new RuntimeException(e); //将编译异常->运行异常 ,抛出
} finally {
JDBCUtilsByDruid.close(null, null, connection);
}
}
//查询单行单列的方法,即返回单值的方法
public Object queryScalar(String sql, Object... parameters) {
Connection connection = null;
try {
connection = JDBCUtilsByDruid.getConnection();
return qr.query(connection, sql, new ScalarHandler(), parameters);
} catch (SQLException e) {
throw new RuntimeException(e); //将编译异常->运行异常 ,抛出
} finally {
JDBCUtilsByDruid.close(null, null, connection);
}
}
}ActorDAO.java
1
2
3
4public class ActorDAO extends BasicDAO<Actor>{
//1. 包含 BasicDAO 的方法
//2. 根据业务需求,可以编写特有的方法
}TestDAO.java
1
2
3
4
5
6
7
8
9
10
11
12
13
14
15
16
17
18
19
20
21
22
23
24
25
26
27
28public class TestDAO {
//测试 ActorDAO 对 actor 表 crud 操作
public void testActorDAO() {
ActorDAO actorDAO = new ActorDAO();
//1. 查询多行记录
List<Actor> actors = actorDAO.queryMulti("select * from actor where id >= ?", Actor.class, 1);
System.out.println("===查询结果===");
for (Actor actor : actors) {
System.out.println(actor);
}
//2. 查询单行记录
Actor actor = actorDAO.querySingle("select * from actor where id = ?", Actor.class, 6);
System.out.println("====查询单行结果====");
System.out.println(actor);
//3. 查询单行单列
Object o = actorDAO.queryScalar("select name from actor where id = ?", 6);
System.out.println("====查询单行单列值===");
System.out.println(o);
//4. dml 操作 insert ,update, delete
int update = actorDAO.update("insert into actor values(null, ?, ?, ?, ?)", "张无忌", "男", "2000-11-11", "999");
System.out.println(update > 0 ? "执行成功" : "执行没有影响表");
}
}
第二十六章 满汉楼
(略)
第二十七章 正则表达式
27.1 快速入门
1 | public class Regexp_ { |
27.2 正则表达式基本介绍
- 一个正则表达式,就是用某种模式去匹配字符串的一个公式.很多人因
为它们看上去比较古怪而且复杂所以不敢去使用,不过,经过练习后,
就觉得这些复杂的表达式写起来还是相当简单的,而且,一旦你弄懂它
们,你就能把数小时辛苦而且易错的文本处理工作缩短在几分钟(甚至
几秒钟)内完成
27.3 正则表达式底层实现(重要)
1 | public class RegTheory { |
27.4 正则表达式语法
27.4.1 基本介绍
元字符按照功能大致分为:
- 限定符
- 选择匹配符
- 特殊字符
- 字符匹配符
- 定位符
- 分组组合和反向引用符
27.4.2 元字符 - 转义号 \\


27.6.3 元字符 - 字符匹配符

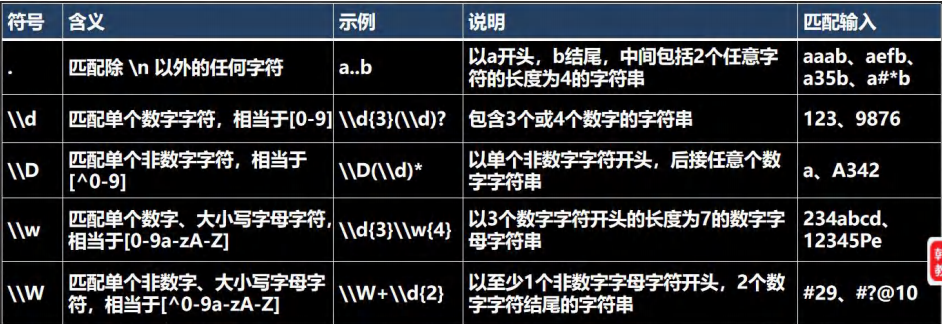
| 符号 | 含义 | 示例 | 说明 | 匹配输入 |
|---|---|---|---|---|
| [ ] | 可接收的字符列表 | [efgh] | e、f、g、h中的任意1个字符 | |
| [ ^ ] | 不可接收的字符列表 | [^abc] | 除a、b、c、之外的任意1个字符,包含数字和特殊符号 | |
| - | 连字符 | A-Z | 任意单个大写字母 | |
| . | 匹配除了\n以外的任何字符 | a..b | 以a开头,b结尾,中间包含2个任意字符的长度为4的字符串 | aaab, aefb, a35b |
| \\d | 匹配单个数字字符,相当于[0-9] | \\d{3}(\\d)? | 包含3个或4个数字的字符串 | 123, 9876 |
| \\D | 匹配单个非数字字符,相当于[^ 0-9] | \\D(\\d)* | 以单个非数字字符开头,后接任意个数字符串 | a, A342 |
| \\w | 匹配单个数字,大小写字母字符,相当于[0-9a-zA-Z] | \\d{3}\\w{4} | 以3个数字开头的长度为7的数字字母字符串 | 234abcd, 12345pe |
| \\W | 匹配单个非数字、大小写字母字符,相当于[^0-9a-zA-Z] | \\W+\\d{2} | 以至少1个非数字字母字符开头,2个数字字符结尾的字符串 | #29, #?@10 |
| \\s | 匹配任何空白字符(空格,制表符等) | |||
| \\S | 匹配任何非空白字符 |
1 | String content = "a11c8abc _ABCy @"; |
27.6.4 元字符 - 选择匹配符

27.6.5 元字符 - 限定符
用于指定其前面的字符和组合项连续出现多少次
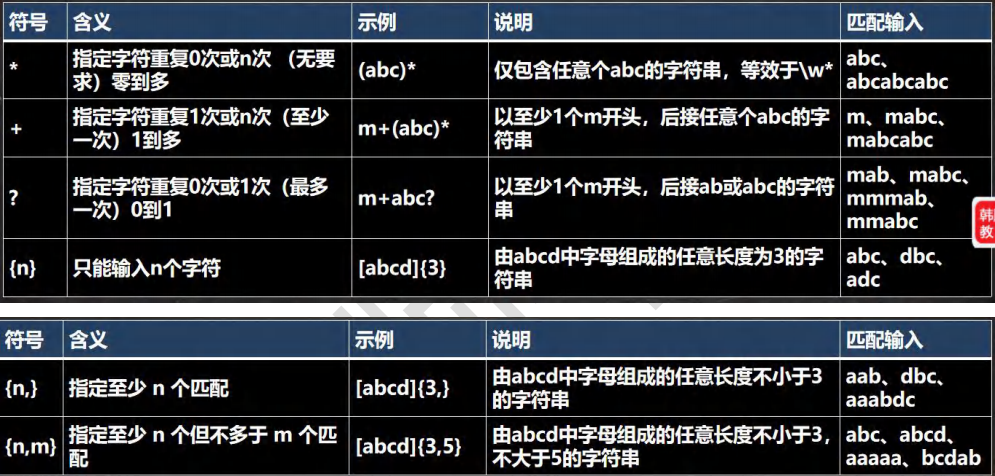
27.6.6 元字符 - 定位符

27.6.7 分组
- 捕获分组
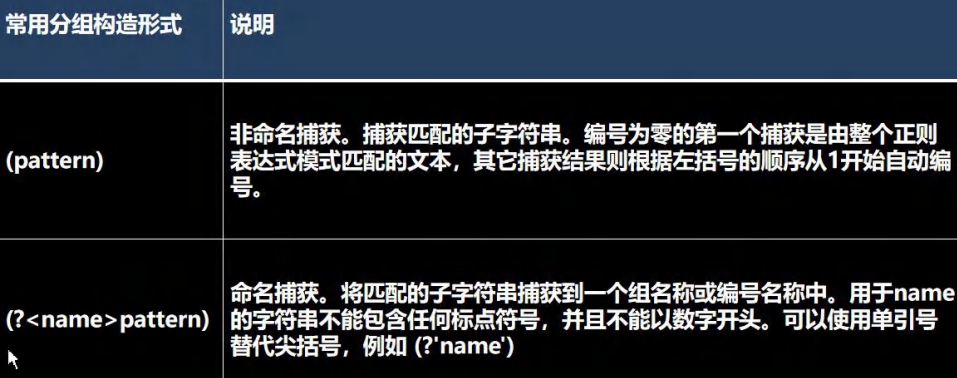
1 | //非命名分组 |
- 非捕获分组
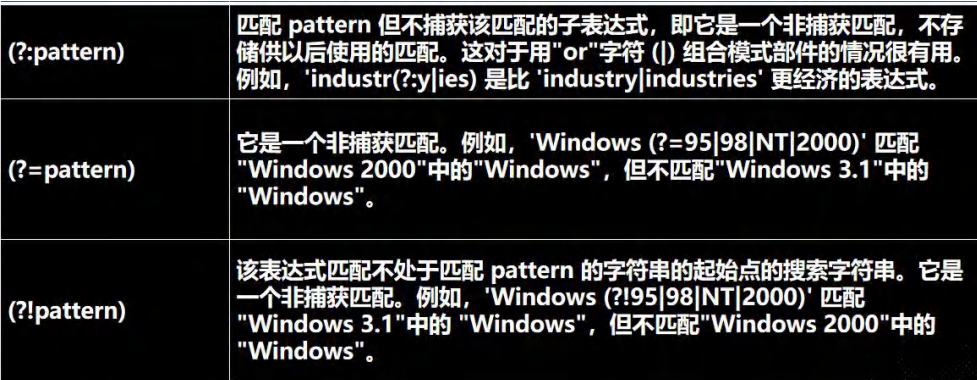
1 | String content = "hello 韩顺平教育 jack 韩顺平老师 韩顺平同学 hello 韩顺平学生"; |
27.5 应用实例
1 | String content = "13588889999"; |
1 | //网址 |
27.6 正则表达式三个常用类
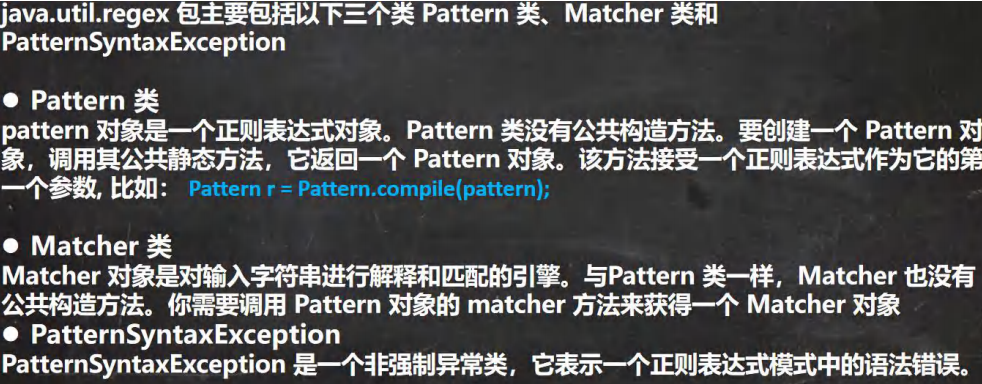
- 常用方法
- boolean Pattern.maches(regStr, content) 整体匹配
- boolean Macher.maches() 整体匹配
- int Macher.start() int Macher.end() 返回匹配的索引
- String Macher.replaceAll(String s) 替换匹配的子串
27.8 分组、捕获、反向引用
27.8.1 提出需求

27.8.2 介绍
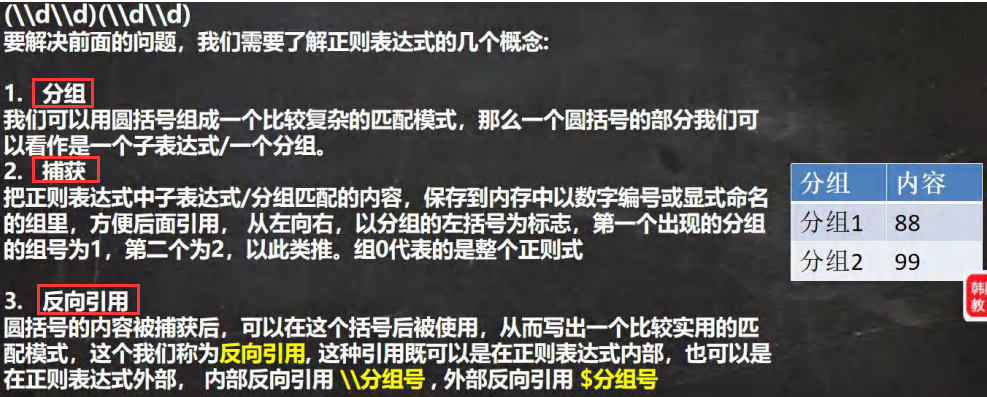
27.8.3 看几个小案例
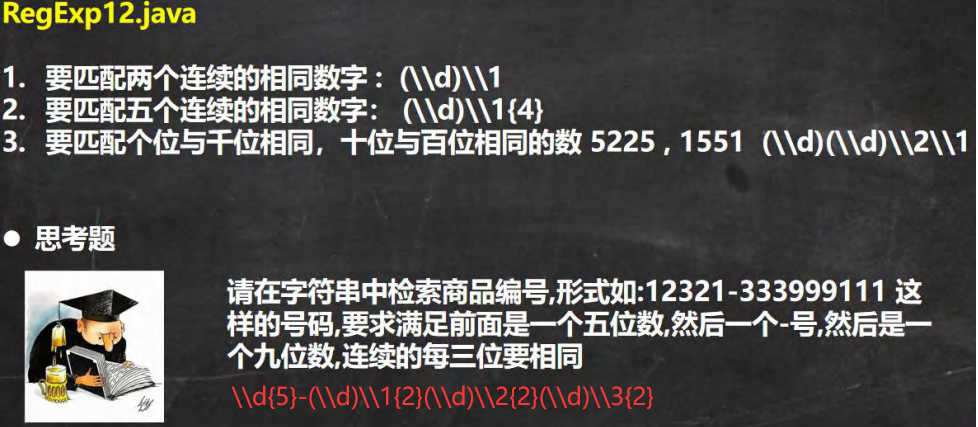
27.8.4 经典的结巴程序
把 类似 : “我….我要….学学学学….编程 java!”; 通过正则表达式 修改成 “我要学编程 java”

1 | public class RegExp13 { |
27.9 String 类中使用正则表达式
27.9.1 替换功能
1 | String content = "2000 年 5 月,JDK1.3、JDK1.4 和 J2SE1.3 相继发布,几周后其" + |
27.9.2 判断功能
1 | //要求 验证一个 手机号, 要求必须是以 138 139 开头的 |
27.9.3 分割功能
1 | //要求按照 # 或者 - 或者 ~ 或者 数字 来分割字符串 |
27.10 Homeworks
Homework01

1
2
3
4
5
6
7
8
9
10
11
12String content = "1530268781@qq.com";
String regStr = "^[\\w-]+@([a-zA-Z]+\\.)+[a-zA-Z]+$";
Pattern pattern = Pattern.compile(regStr);
Matcher matcher = pattern.matcher(content);
boolean matches = matcher.matches();
if (content.matches(regStr)) {
System.out.println("输入合法");
} else {
System.out.println("输入不合法");
}Homework02

1
2
3
4
5
6
7
8
9
10
11
12
13
14
15
16
17/**
* 要求验证是不是整数或者小数
* 要求考虑整数和负数 如123 -123 3.14 -3.14
* 思路:
* 先写出简单的正则表达式,再逐步完善
* 考虑 0012.3 不是规范的,0.3是规范的,将
* \\d+ 改成 [1-9]\\d*|0
*/
String content = "12.3";
String regStr = "^[-+]?([1-9]\\d*|0)(\\.\\d+)?$";
if (content.matches(regStr)) {
System.out.println("匹配成功");
} else {
System.out.println("匹配失败");
}
}Homework03
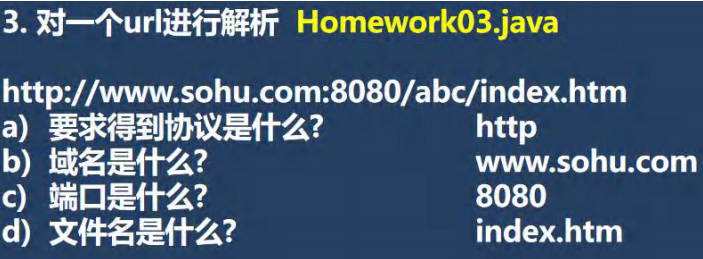
1
2
3
4
5
6
7
8
9
10
11
12
13
14
15
16
17
18
19
20
21
22
23/**
* 对一个url进行解析
* 协议 如 http: https:
* 域名 如 www.suhu.com
* 端口 如 8080
* 文件名 如 index.htm
*/
String content = "http://www.sohu.com:8080/abc/xxx/index.htm";
String regStr = "^([a-zA-Z]+)://([a-zA-Z.]+):(\\d+)([\\w-/]*)/([\\w.]+)$";
Pattern pattern = Pattern.compile(regStr);
Matcher matcher = pattern.matcher(content);
if (matcher.matches()) {
System.out.println("整体匹配=" + matcher.group(0));
System.out.println("协议=" + matcher.group(1));
System.out.println("域名=" + matcher.group(2));
System.out.println("端口=" + matcher.group(3));
System.out.println("路径=" + matcher.group(4));
System.out.println("文件名=" + matcher.group(5));
} else {
System.out.println("匹配失败");
}


